Tuesday 31 December 2013

Lia Stampz - Challenge #56 - Monochrome

Hello, my friends!

Welcome to my last post of 2013! Can you believe another year will begin in just a couple of hours? What a year it has been!  Before I get into my post I want to wish each of you a Very Happy New Year full of Blessings! :o)

It's also time for a new challenge to begin over at Lia Stampz. This time the theme is "monochrome" and you have until January 15th to link up a project. I made my card using a fun image that is very appropriately called "Happy New Year." It can be found at Whimsy Stamps right HERE. My colour inspiration was the Pantone Color of the Year 2014 - Radiant Orchid. I've included the photo farther down in the post.


Materials Used:
Papers: Recollections - Cardstock;
Image: Lia Stampz - Happy New Year,
Prismacolor Pencils and OMS;
Dies: Just Rite Custom Dies;
Spellbinders Nestabilities - Labels Fourteen;
Punches: WRMK Mini 8 Punch - Doily;
Sentiment: Unknown;
Ink: Martha Stewart - Lilac;
Pen: Micron Pigma Pen - Black;
Ribbons: Offray;
Bling: Kaiser Scrapbook Rhinestones.

Pantone Photo:


* * * * *
Head on over to Lia Stampz and join in the fun! :o)

* * * * *

Now, for those of you that are interested, I'll share my 2014 Design Team schedule.

Jellypark Friends Friday Challenges - New challenge post every other Friday beginning on January 3rd.

All Dressed Up - New challenge post the 2nd day of every month, as well as an inspirational post on the 17th of each month. This will begin in February because there is something special planned for January.

Lia Stampz - New challenge post the last day of each month, also on the 15th as time permits.

Ephemera's Vintage Garden - A new project 1-2 times per month. No set dates at this time but maybe I'll pick one.

For fun I plan to continue with:

Scripture Lessons and Lyrics 2014 - The new Scripture Challenge will be posted every two weeks beginning January 11th.  

Scrapping Every Day Miracles - I really enjoy their monthly challenge and plan to participate. I hear they have some fun new challenges in the works too.

There you have it! My upcoming schedule of fun and play! I do hope that you will continue to join me! :o)

Saturday 28 December 2013

Hymn and Scripture Challenge #21 and #22.- Last of the 2013 Challenge

Hello, my dear friends!

I hope you have all been enjoying a wonderful time of celebration! Things have almost returned to normal around here! :o)

Today I am posting my last two Hymn and Scripture Challenge pages together. I want to get them both in before the end of the year. Since one of them is rather seasonal, I thought I should post it right away. I will try not to ramble too much but this might be a long post! 


* * * * *

Challenge #21 is for "Lord, Speak to Me That I May Speak" and it's a beautiful song.  I included three Scripture verses on my page. The second part of the verse found in Psalm 81:10 really speaks to me. It says...
"Open wide your mouth and I will fill it." 
Isn't that great? If only I had the discipline to actually allow the Lord to give me my words every time I opened my mouth. There certainly wouldn't ever be a need for me to pull my foot out of my mouth, would there? lol This verse is also very encouraging for those times when you just don't know what to say to someone. They may be suffering terrible loss or pain and loving words of comfort fail to come to us. God will give us the words to say...the words that He wants them to hear. However, we do have to stop blabbing our own words in order to hear His words! :o)

My page is quite simple. I just had some fun with some punches, and used some of the punched out bits to decorate. A little stamping, punching, shaping and gluing for the flowers. Finally, a little shimmer was added with Liquid Pearls. 


Materials Used:
Papers: Recollections - Cardstock;
Punches: Stampin' Up - Boho Blossoms,
Martha Stewart - Flower Box Punch Around the Page:
Dies: Spellbinders Nestabilities - Beaded Circles,
Standard Circles (LG), Sizzix - Scribbles & Swirls,
Tim Holtz Alterations - Elegant Flourishes;
Stamp: Stampin' Up - Language of Friendship;
Ink: Martha Stewart - Melon, Memento - Tuxedo Black;
Ranger Liquid Pearls - White Opal.

* * * * *
Here is a very traditional version that includes all the words:


* * * * *
The final Hymn and Scripture Challenge for 2013 is "Joy to the World." I love this beautiful song and think that we should be singing it throughout the year...not just at Christmas time. I've used two Scripture verses on this page. The second one is found in Psalm 98:4. It says:
"Shout for joy to the Lord, all the earth, 
burst into jubilant song with music."
What a beautiful sound it is to hear voices raised in joyful song! It's even more beautiful when those voices are raised in joyful song for the Lord!  Voices full of gratitude and praise and worship for all the "marvelous things" He has done for us! :o)

I had fun with my page. I die-cut the carolers out of the music sheet. Then I backed it with black cardstock. I cut the "JOY" out with my Slice, and used my Label Buddy for the rest of the song title. I wrote out the Scripture verses and cut it into a banner. I wrapped some baker's twine around the page, and added some flowers.


Materials Used:
Papers: Recollections - Cardstock;
MM Slice Design Card: Noel;
Dies: Tim Holtz Alterations - Victorian Carolers;
Ink: Distress Ink - Vintage Photo;
Flowers: Prima - Poinsettias;
Brads: Recollections;
Baker's Twine: Stampin' Up - Cherry Cobbler;
Label Buddy.

* * * * *

* * * * *
You can read Patter's devotionals on both of these Hymns HERE and HERE.

Patter has just announced that she will be hosting  
Scripture Lessons and Lyrics Challenge 2014.

I am excited to continue participating. 
I haven't yet decided the format I will use. 
The first Challenge will be on January 11th.
I have added the button in my sidebar with a link to all the details.
Everyone is welcome to join! :o)

* * * * *

Friday 20 December 2013

A Merry Christmas Layout for All of You!

Hello my lovely friends!

Today I was in desperate need of some crafty therapy! So I set my long "to do" list aside, headed to my studio, turned up some fabulous worship music, and got busy! :o)

I had intended to post this project for all of you on the 24th...as my special Christmas card to each of you! However, the challenge that I want to enter at Scrapping Every Day Miracles ends in two days. I hope you don't mind if your card is early! lol

To each and every one of you...A Very Merry Christmas!! Your wonderful encouragement means so much to me! All your words of kindness are a treasure and a blessing! Those of you that come and visit but don't leave a comment are also very much appreciated. My numbers keep going up day after day, so I know that you are there, and it means a lot to me! I thank you all very much, and I wish you a season of JOY and LAUGHTER and LOVE! :o)


I got a very good response to all the details I shared with my last layout. So I have a number of photos, and a number of words for you this time too. I started by stamping on my background paper. I used a music note stamp, a shattered glass stamp, and a little round container. Then I added some spatters using a Glimmer Mist that was similar in color to the ink I used. I began to assemble things according to the December sketch from C'est Magnifique (shown below). I used my Cricut to cut out the wreath and the broken circles. For the paper strips I used a piece of vellum. IRL it is actually looks more sheer than it appears in the photo. I stayed quite true to the sketch, although I did substitute the flowers with some lovely red glittered ornaments. I also added a second piece of Washi tape. The beautiful image is another wonderful freebie from Ephemera's Vintage Garden. You can find it right HERE.


This cluster is made of red and white flowers. The ribbon ones were taken out of my sewing stash. There's one of the red ornaments, and even a little clock just like in the sketch. I punched out some greenery and tucked it in. You can see some of the music notes stamped in the upper right corner.


This cluster is very similar to the other, with the addition of this dangly bead that I attached to the page using a brad. Then I added a little white satin bow above it. 


This is the lower right corner; more stamping, ornament, bead and bow. I have also adhered various sequins around the page. I just sprinkled a few on the page and glued them where they landed. This also gives you a close-up peek of the beautiful doily. It was a gift from a friend.


Here you can see more of the layering and the sentiments. I just have to add a Bible verse to a Christmas page. To me...Christmas is all about the birth of my Savior...Jesus Christ! :o)

* * * * *
Linking Up To:


This is the great sketch:


* * * * *
Materials Used:
Papers: DCWV - Haberdash Stash, 
Recollections - Holiday Shimmer Cardstock;
Cricut Cartridges: Essentials, Holiday Cakes;
Punches: Martha Stewart - Holly, Branch;
Ink: Stampin' Up - Soft Suede;
Stamps: Tim Holtz - Joyful Song, Mini Holidays;
Charm: Blue Moon - Clock Face;
Tim Holtz - Mini Paper Clip;
Glimmer Mist: Partridge in a Pear Tree;
Flowers: Prima and Imaginisce;
Doily: Gift from Bonnie;
Beads: From My Bead Stash;
Ribbon Flowers and Sequins: From My Sewing Stash.

* * * * *


A Die for a Sketch - Challenge Reminder

Hello, my friends!

Today is my very last post at A Die for a Sketch. Someone has just stepped in to take over the Challenge blog in the new year. However, since I have now made prior commitments I will not be continuing. I would like to thank Dunja, and the rest of the DT, for all of the fun! :o)

For this final month we are sponsored by Kathryne at StampArt Design by Kathryne! I want to thank Kathryne for all her generosity to us at ADFAS. Kathryne, it has been a joy to work with you and to play with all your lovely images!


A gift of five images to one lucky winner!

* * * * *

Here is the wonderful sketch by Dunja. For my project I turned it on it's side, like this:


* * * * *

For my card I used the sweet image called "Alannah", and you can find her at Whimsy Stamps right HERE. Isn't she sweet? She comes with several images, including the sweet bird and the wonderful sentiment. I made up some pine cones, added a bow and some bling.


Materials Used:
Papers: K & Company - Elizabeth Brownd Designer Mat Pad,
Colorbok - Textured Cardstock;
Images: StampArt Design by Kathryne - Alannah;
Prismacolor Pencils and OMS;
Dies: Tim Holtz Alterations - Bird Branch, Tattered Pinecone,
Fiskars Shape Cutter and Oval Template;
Punches: Stampin' Up - Scalloped Circle, Martha Stewart - Branch;
Stamp: Unknown - Prize Win;
Ink: Memento - Tuxedo Black, Distress Ink - Walnut Stain;
Ribbon: Celebrate It;
Pearls: My Stash.

* * * * *

So head on over to A Die for a Sketch and join in our last challenge! 
Your chances of winning the prize are pretty good right now! :o)

Tuesday 17 December 2013

All Dressed Up - Inspiration Post

Good morning!

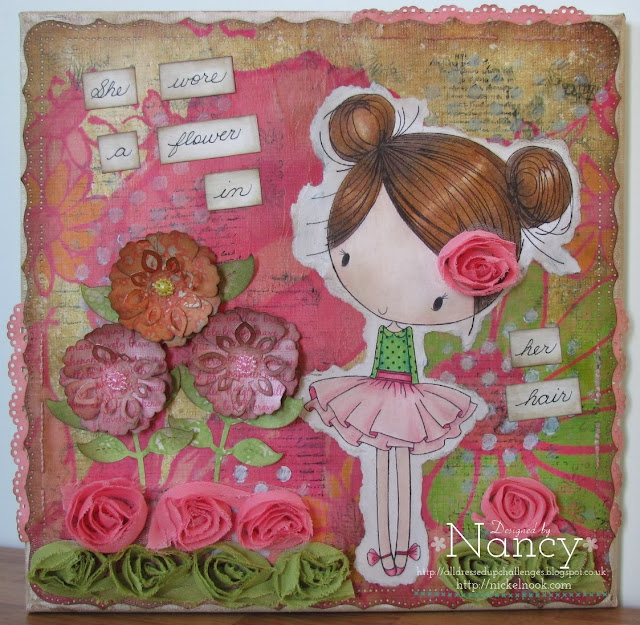
It's the 17th so that means I have another All Dressed Up inspiration post for you! This time I used one of the super sweet "Three Little Autumn Girls" from the image available HERE. I printed her out on 8 1/2 X 11 fit to page. I colored her up with my pencils and just tore around the image, leaving a white border. Then I set her aside and prepared my canvas.

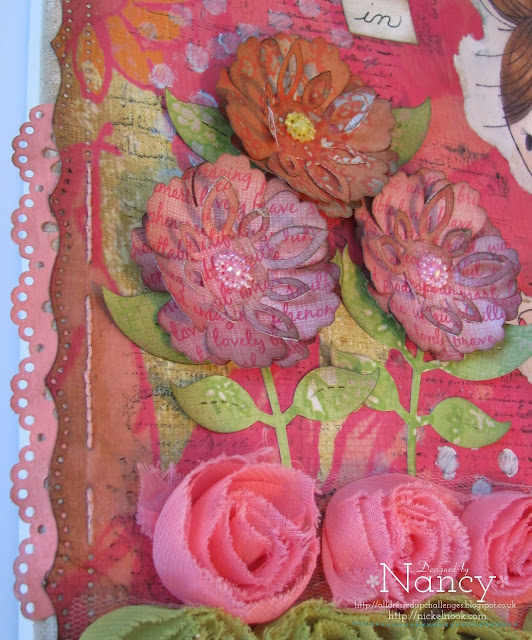
I inked all the edges of a 12 X 12 canvas. I chose my paper and punched around it. This particular punch makes holes that are crying out for stitching, so I added some stitching in several spots. I then punched some other borders out of a different paper and adhered them between the layers. I also added some stamping here, there, and everywhere. Then I used a stencil and added a bit of paint. Finally, it was time to adhere the image. 

All that is left to do now is a little embellishing. I punched out some flowers and die-cut some leaves, I inked them all and added them to the page. Then I cut some rosette trim and layered it along the bottom...and one in her hair as well. The final step was to write out my words and add them. 

It was a super fun piece to make, and I hope it inspires you to create something too! Wendy has so many images that are fun to play with. You can find them all in the All Dressed Up Etsy Shop!

A happy day to you all! :o)


A close-up of the flowers and stitching:


A closer look at the sweet image:


Materials Used:
Papers: GCD Studios - Melody Ross - Soul Food;
Image: All Dressed Up - Three Little Autumn Girls,
Prismacolor Pencils and OMS;
Punches: Martha Stewart - Punch Around the Page - Cherish,
Doily Lace Border Punch, EK Success - Daisy,
Stamin' Up - Punch Blossom, Blossom Petals;
Die: Sizzix - Leaves;
Ink: Memento - Tuxedo Black, Distress Ink - Walnut Stain;
Stencil: Heidi Swapp;
Stamps: Inkadinkado - Clings Lace Doilies,
Bo Bunny - Wall to Wall Textures, Recollections - Script,
Autumn Leaves - Doodle Bloom;
Claudine Hellmuth - Multi-Matte Medium,
Adirondak Paint Dabber - Snow Cap.

Sunday 15 December 2013

Lia Stampz Challenge #55 - Make a Tag!

Happy Sunday!

Can you believe it's already the middle of December! The count-down has begun in earnest now, hasn't it? We've had two full days of steady snow...YAY!! It's so pretty out! :o)

There's a new challenge starting today over at Lia Stampz. It's an easy one, and one that will maybe help you with your Christmas preparations. All you have to do is make a tag!

I made mine using this adorable image called "Clark Present". You can find it at Whimsy Stamps right HERE. It's really the perfect image for a gift tag, isn't it? I cut the tag out on my Cricut. Then I punched out some mini tags and added them, along with a ribbon and bling! It came together super quick!

I hope you're all having fun with your preparations for the Christmas celebration. Remember not to stress about "things" and to take some time to just sit and ponder the real reason for the season...Jesus! :o)


Materials Used:
Papers: Colorbok - Textured Cardstock,
Image: Lia Stamps - Clark Present,
Prismacolor Pencils and OMS;
Basic Grey - Eskimo Kisses;
Cricut Cartridge - Wrap It Up;
Punch; McGill - Multi Tags Scallop Bunch;
Sentiment: Hampton Art - Joyous Holiday;
Ink: Memento - Tuxedo Black;
Ribbon: Celebrate It;
Unknown Bling.

* * * * *

Head on over to Lia Stampz and join in the fun! :o)

Friday 13 December 2013

Creative Inspirations

*** If you missed my Jellypark post from earlier today, please scroll down and take a peek when you're finished with this one! ***


Hello again, my dear friends! 

Some of you might remember this mini album project from the last time I posted it...and some of you won't. I am re-posting it now because because there is a wonderful kit now available at Creative Inspirations that includes everything you need to make an album for yourself. It's the perfect place to put all those fun photos you're taking these days, and will continue to take in the days ahead.

We've had a bit of a break from Creative Inspirations posts. I'm very happy to report that I will be continuing to design for this great store.  We have some super fun things coming up in 2014!

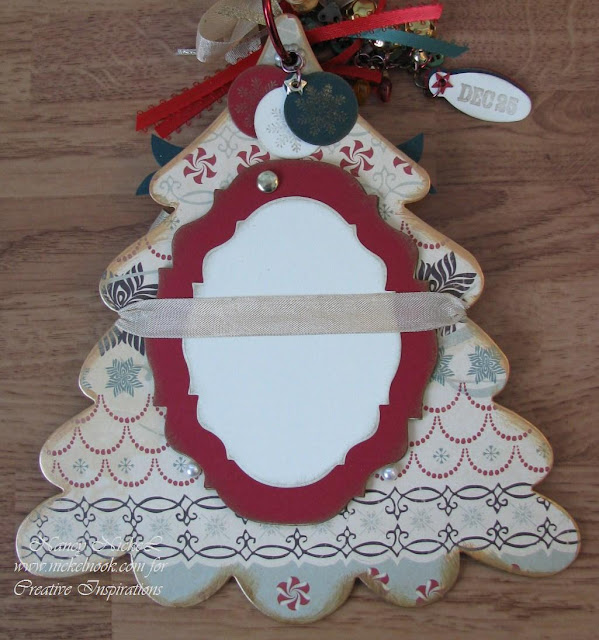
This mini album is a sweet little layered Christmas tree. Sue has another version of it, along with a kit supply list in the shop right HERE. You should pop over there and order the kit. Then come back here and bookmark this post. You can use my photos, and the photos in the shop for inspiration for your own creation! 

So here's what I did:

This is the cover. After adhering all the papers, I went around both sides of each piece with the gold paint dabber. I also made my first swivel clasp charm to hang from the binding ring.


Here are pages 1 and 2. I decided to decorate all the back pages "upside-down" so that when you flip them over they are actually right side up! lol  
On page 1 there is a ticket stamped with the date. 
Page 2 has a little swivel ornament set. It's actually some diecut tags. 
These are just the right side to document special seasonal events.

Page 3 had two ribbon bands that hold an assortment of stamped tags. 
There's also another ticket stamped with "Merry Christmas!"


Page 4 holds a stamped label. 
It opens up and has lines with a heading that says "Dear Santa". 
A wonderful little spot to list all the gifts received for Christmas. 
The bottom of the page also holds one poinsettia 
and a gold painted chipboard bird on a branch.


Here is a close-up of the pretty poinsettias that I made.  


Page 5 holds a large label that has pine cone branches stamped around the edge. 
A few pine branch punches with buttons creates a nice embellishment. 


Page 6 holds another mat that's been stamped with snowflakes, 
and two more of the poinsettias.


Page 7 is another Baroque mat page. 
This one has been stamped with a tree.


Page 8 has a seam binding band that holds a little booklet of  the Baroque die. 
These are large enough to add photos on the front and the back. 
There's also a little dangly charm set hanging from the binding ring. 
These charms are also made from tags and have sweet star eyelets.


Here is the back cover. 
The seam binding from the previous page is tied in a bow. 
I've glued on a sweet little Christmas wreath 
and a banner that says Merry Christmas. 
Another ticket filled out with my info is adhered to the bottom.


Here is a close-up of my swivel clasp charm. 
It holds buttons, mini ornaments, and some jingle bells. 
At the bottom is more stamped tags that look like ornaments. The only jump rings I had were a bright silver. 
So I turned them red with the help of some alcohol ink.


 So there you have it...again! :o)
If you want to see my original post and a list of all the materials used you can go HERE.

* * * * *

So head on over to Creative Inspirations 
and take a look at all the fabulous goodies in the shop.
There is even a wonderful free gift with the purchase of $60 or more!
If you have any questions just ask me or use the contact form in the store.
Then check out the Christmas Tree Mini Album Kit for yourself!

Happy Shopping! :o)


Jellypark - Challenge Reminder and Stocking Stuffer Idea!

Happy Friday, my friends!

I'm back today to share with you a fun little Jellypark project. It fits right in with the month long Christmas Challenge that is going on over at Jellypark Friends. I used the image called "Gingerbread Woman" and you can find it in the Jellypark Shop right HERE.

If you're still looking for some last minute stocking stuffers or gift ideas, this one is ideal. It's so quick and easy and FUN to make. It's a little recipe book! I printed the image on kraft cardstock, colored it up, and cut it out. I used two pieces of medium chipboard measuring 4" X  6". I covered the front and the back in this fun...and most suitable...designer paper. Then I added 24 recipe cards between the covers and bound it with my Bind-It-All. I adhered the fun sentiment on the front, then added some seam binding and rhinestones. 

This would make a lovely gift as it is, especially if some special recipes are added to the cards. It would also be a wonderful addition to a basket of baking goodies; cookie cutters, icing and decorative tips, baking pans, or even a jar of gingerbread mix! :o)


Here's a photo of the stamping I did on the inside.
This one is for one of my girls...but don't tell her! ;o)


Materials Used:
Papers: American Craft - Merrymint;
Image: Jellypark Digi - Gingerbread Woman,
Prismacolor Pencils and OMS;
Dies: Spellbinders Shapeabilities - Lotus Pendants,
Orchard Harvest Tags and Accents;
Stamps: Stampin' Up - Unknown,
October Afternoon - Home for the Holidays;
Inks: Memento - Tuxedo Black, CTMH - Cranberry;
Seam Binding and Rhinestones from My Stash.

* * * * *

Why don't you pop on over to the 
and link up your Christmas projects!
If you use a Jellypark Image your project will be counted twice! 

Christmas is so much FUN!! :o)

Tuesday 10 December 2013

Another Pocket Card!

Happy Tuesday to all of you!

I am very honored today to be Guest Designer for Kathryne at StampArt Design by Kathryne. I am showcasing a brand new release called "Snow Mail." It's such a fun image to play with, and you can find it in the Whimsy Shop right HERE.

I created another fun pocket card with a postcard inside. I coloured the image and fussy cut both the bird and the snowman. The "air mail" sentiment is also by StampArt Design by Kathryne! It is one of many sentiments that come as a bonus when you purchase the image. I added a few snowflake punches, including one behind the bird that you really can't see. I also used Liquid Applique for the first time! How fun is that stuff?

Kathryne always creates the sweetest images! They always seem to coincide with my collections; teddy bears, raggedy dolls, and snowmen! So pop on over to the shop HERE and take a peek at all the goodness! :o)


Materials Used:
Papers: Recollections - Cardstock, Basic Grey - Eskimo Kisses;
Image: StampArt Design by Kathryne - Snow Mail;
Prismacolor Pencils and OMS;
Punches: Stampin' Up - Oval, Martha Stewart - 
Stamp: Stampin' Up - Post Card;
Ink: Distress Ink - Walnut Stain, Memento - Tuxedo Black;
Liquid Applique and Unknown Pearls. 

* * * * *

Thursday 5 December 2013

A Die for a Sketch - Challenge #19

*** If you missed my announcement last night, 
please scroll down and check it out after this post! ***

Hello, my friends!

Today is the beginning of a new challenge over at A Die for a Sketch. It is the last challenge at A Die for a Sketch. Dunja announced a couple of months ago that she was closing down the challenge blog. This is another one of the changes that I have been referring to lately. I will be back on the 20th of the month for my last ADFAS post!

For this final month we are sponsored again by Kathryne at StampArt Design by Kathryne! I want to thank Kathryne for all her generosity to us at ADFAS. Kathryne, it has been a joy to work with you and to play with all your lovely images!


A gift of five images to one lucky winner!

* * * * *

Here is the wonderful sketch by Dunja:


* * * * *
Here is my card using the sweet image called "Beary Special Gift" which you can find in the Whimsy Store right HERE! This card was inspired by the fact that I always have some teddy bears under or next to my Christmas tree. The sketch was just perfect for this little scene. I started by choosing a paper that looked like wallpaper. Then I created the Christmas tree with the MS Branch punch and a woodgrain stamp on the trunk. I added some little ornaments from my stash. The tree skirt is cut from a doily die. I found the "Merry Christmas" in my button box. Finally, I colored the image and placed it on the tree skirt. 

As always, I had lots of fun putting this card together! I hope you like it! :o)


Materials Used:
Papers: Colorbok - Textured Cardstock, 
K & Company - Julianne, Elizabeth Brownd Designer Mat Pad;
Image: StampArt Design by Kathryne - Beary Special Gift,
Prismacolor Pencils and OMS;
Dies: Cheery Lynn - English Tea Party;
Punches: Math Stewart - Branch;
Fiskars Shape Cutter - Oval;
Stamps: Bo Bunny - Wall to Wall Textures;
Ink: Tim Holtz Distress Ink - Walnut Stain;
Bling: Kaisercraft - Rhinestones;
Button and Mini Ornaments: My Stash.

 * * * * *

Please come on over to A Die for a Sketch and join in our last challenge!


Blog Archive