Saturday 30 November 2019

Southern Ridge Trading Company - Peace Card

Hello, my friends!

I have a fun new post for Southern Ridge Trading Company!
I'm so excited to be sharing this great Canadian company with you!

 This time I have used their fabulous chipboard on a Christmas card!
I think they make a very elegant presentation! :o)


Here's what I used:


I began with a white cardstock card base.
I cut a white Glitter Cardstock panel to cover the front of the card.
Then I die-cut a blue Glitter Cardstock oval, 
and centered it over the white panel.


I inked the Angel chipboard piece up with embossing ink,
sprinkled it with the glittery white embossing powder, 
and set it with my heat gun.
I then adhered the angel to the center of the blue oval.


I repeated that process with the glittery blue embossing powder,
on the "Peace" chipboard.
Then I adhered it in place across the bottom of the card.


Finally, I added a sheer white ribbon to the top of the card.


Southern Ridge Trading Company Products:


Other Materials Used:
 White Cardstock, 
DCWV - White and Blue Glitter Cardstock;
Tim Holtz Distress Embossing Ink;
  Glitters Galore Cosmic Embossing Powders - Winter White, Ice Rink;
Celebrate It Ribbon.

* * * * *
Thanks so much for stopping in today!
I'll have another project share for you soon!

* * * * *
In the meantime, here are all the links for you:


Thursday 28 November 2019

Ephemoire - Rustic Christmas December Daily

Hello, friends!

Today I have a fun new project for Ephemoire!
I have used some fantastic printable projects to create
my very first December Daily!

Good news:
So once you've seen my album,
you can head over to the shop and get everything to make your own! :)

I had SO MUCH FUN putting this album together!
I've always thought the idea of a December Daily is great.
However, since it's just the two of us these days,
I thought there was no point in making one.
How would I fill the pages?

Well...this year I decided that I would make one regardless. 
I'll figure out some fun ways to fill it up.
Maybe I'll even share it when it's full.

I have lots of photos to share with you.
I'll try to keep the words to a minimum. lol

Here's the front cover:

I kept the cover simple and flat.
Then I added this fabulous red ribbon belly band.


I used a Snap Album for my base.
On the inside cover I added a big pocket.
It holds extra photo mats and journaling cards,
that I will use as I fill the album.
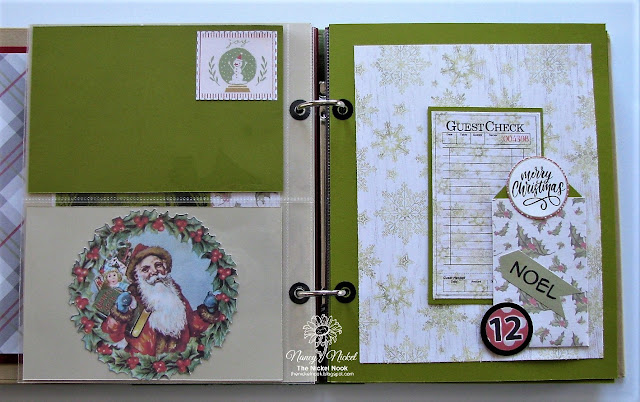
On the first page, I made a pocket with the printed image.


The base of each page is cardstock.
I've also added punched numbers to each page,
which have been matted on black.


The cardstock page bases are grouped into four color sections.
I have added one of the Snap Pocket Pages between each color section.
The first one is shown below.


Now we move on to the next color group.


I've used the digital images, and Guest Checks as tuck spots.


Here's the next pocket page:


Now we begin the green page section.
This first green page includes one of four pockets.


I created a tag to fit into the pocket.
I added one of the elements to the top of the tag.


Here's a second pocket.


Again, I've added a tag with element.


Here I've made another big pocket with the digital image,
and I've filled it with several big tags.
Here we end the green pages with another pocket page.


Now we begin the black page section.


Here's another pocket with a tag,
and another pocket page.


We finish with one final red page for the 24th and 25th.
I added this final digital image for all my cat loving friends.
It wasn't an easy thing to do! lol


For the final page of the album
I added a full page pocket page.
It's the perfect spot to add a large photo.
I think a Christmas tree photo will go on this page.


The final page is reserved for a large family photo.


There you have it...my first December Daily!
I hope you liked it, and will consider making one of your own! :o)


Ephemoire Products Used:

Rustic Christmas
(Papers, Journal Tags, Guest Checks, Labels)

 Christmas Countdown

Vintage Christmas Clipart Sampler #1

Whimsical Christmas Stamp Assortment

* * * * *
Final Thoughts:

* Aside from the printable products, the only things I have added is some eyelets, and some baker's twine.
* Printables are perfect for a project like this. You never have to worry about running out of anything...you just print more!
* If you're like me, and wonder how you can fill an album like this, I've come up with a few ideas. We can add: songs, poems, verses, food photos, menus, weather, fun facts. 
* If you have any more ideas for me, please add them in the comments below. I'd love the hear your ideas.

* * * * * 

Here are the links for you:

Wednesday 27 November 2019

Quietfire Digital - Hanging Christmas Ornament Boxes

Hello, my friends!

It's time for another project share for Quietfire Design

Today I'm over on the Quiefire Digital Blog sharing these 
two fun Christmas Ornaments,
created using some great cut files.


For all the details and product links,
 head on over to the Quietfire Creations Blog HERE.

* * * * *
While you're over there, check out the shop and the Designer's blog.
They're full of fabulous inspiration!

* * * * *
Here are all the links for you:


Monday 25 November 2019

Simply Crafty SVGs - Gingerbread House

Hello, my friends!

Welcome to a new project share for Simply Crafty SVGs!

This month I've combined two cut files from the shop,
to create a fun Christmas project. 

I've used:

Gingerbread House Box,

and Cone Christmas Tree.
(This is a FREE file)

Here's my project:


Isn't that fun? 
The papers aren't very bright
but that's because I opted to use fun Shimmer Cardstock.
In person it's really lovely,
although photos don't really do it justice.


The Shimmer paper pad did not include a white,
so I used the pretty pale blue for the rooftop and the snow drifts. 


Here's the other side:


Once everything was assembled,
I added some glitter glue to the top of each of the candies.
Here's the back:


The surprise with this house is that the roof lifts up!
It's just begging to be filled with gingerbread cookies! 
YUM!! :o)


Here are the cute little cone trees.
They're made from two green shades of Shimmer cardstock.
Then I added some fun Nuvo Drops for the "ornaments".
There are so many ways to decorate these little trees!


Here's one last look:


Other Materials Used:
Paper: Recollections - Holiday Shimmer Cardstock;
Nuvo Crystal Drops: Autumn Red, Bottle Green, Simply White;
Unknown Glitter Glue.`

File from Simply Crafty SVGs:

Gingerbread House Box,

and Cone Christmas Tree.
(This is a FREE file)

* * * * *
Thanks for stopping by today!
I hope you found some inspiration!
I'll be back next month to share a brand new project! :o)

* * * * * 
Here are all the links:


Friday 22 November 2019

Quietfire Design - Falalalala

Hello, my friends!

It's time for another project share for Quietfire Design

Today my project focuses on a die and stamp 
from the 2019 Calligraphic Christmas Release.
You'll find the complete release HERE.

Today I'm featuring the Falalalala Metal Cutting Die,

Here's my card:


Isn't that a pretty die?
The stamp works beautifully with it!


Here you can see how glittery the papers are:


It doesn't really show in the photo but the music on the die
lines up perfectly with the music on the background.


A great die and stamp make it so easy 
to create a pretty Christmas card.


Quietfire Products Used:


Other Materials Used:
Papers: Recollections - Cardstock, The Ballet Collection;
Ink: CTMH - Garnet,
Ribbon: Celebrate It.

* * * * *
Thank you so much for stopping in today!
I'll be back soon with another fun Quietfire project!

* * * * *
Here are all the links for you:


Saturday 16 November 2019

Rinea Tutorial - Autumn Owl Card

Hello, my friends!

Today I have a fun new tutorial for Rinea.

I'm going to show you how to make this sweet little owl card,
using these fabulous foiled papers!

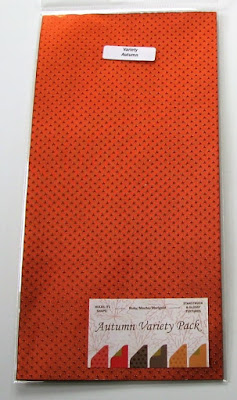
I'm using the Autumn Foiled Variety Paper Pack for this project.

Here's my Autumn Owl Card:


Here's how I did it:


Materials Used:
Machine to Cut SVG Filel;
White Cardstock.

1. Using your machine of choice, cut the file pieces out as shown in the photo above. 
Or change the colors according to your own taste.
2. Assemble all the pieces as described in the instructions, and shown in the following photos.


3. Experiment with the eye pieces before adhering them in place. 
He can have so many different expressions, just from varying the placement of his eyes.
4. I curled his wings before adhering them in place,. This adds a little bit of dimension to the card. You could even tuck something under his wing...like a little flower bouquet.


This card is so much fun to put together!
It's a simple project that would be easy to do in multiples
but the foiled paper makes it look so special!


* * * * *
Thanks so much for stopping by today!
I'll be back very soon with another new project!
* * * * *

Here are all the links for you:


Blog Archive