Wednesday 29 April 2020

Dies R Us - Thinking of You

Happy Wednesday, my friends!

It's my turn to share a new inspiration post, over on the Dies R Us Blog.

Today I'm sharing a new card,
just to let you know I'm Thinking of YOU!


Here is what I needed to make it:


Here's how I did it:


I began with the gorgeous Rose Frame die from Tutti Designs.
Using the die on a gorgeous piece of Rinea Lavendar/Gold Glossy Foiled Paper
I ran it through my die-cutting machine. 
The die is so intricute!
It does a fabulous job on the foiled paper.


Then I took the "Thinking of You" from the Impression Obsession die set.
I die-cut that from the left-over center piece, of the Rose Frame cut.

Isn't it a beautiful font?


I mounted a piece of black cardstock onto the white cardstock card base.
Then I adhered the Rose Frame in place.
Finally, I adhered the words in place, and added a pretty ribbon bow.


All you need is some shiny foiled paper and some fabulous dies!

I hope you enjoy my fun project!
I'll be back soon with more!

* * * * *

Dies R Us Product Used:


* * * * *
Don't forget to come join in the fun at the Dies R s Challenge Blog
 There's a new challenge theme offered on the 1st and 15th of each month 
and one lucky randomly drawn winner will receive a gift voucher prize to the Dies R Us Store.  
For your convenience, all the important Dies R Us links are provided below.


click below for:
FRIENDS OF DIES R US PINTEREST PAGE

Thanks for stopping by!

Monday 27 April 2020

Simply Crafty SVGs - Round Candy Box

Hello, my friends!

Welcome to a new project share for Simply Crafty SVGs!

This month I'm sharing:

Round Candy Box

It's a fabulous file, 
and makes such a pretty little box!
I used the leftover bits to create a sweet little matching tag!

Here's my project:


The file includes a cut for an acetate insert in the top.
I wanted to take it up a notch,
so I turned the top into a little shaker.
All I did was cut two pieces of acetate, and a ring of chipboard.
Foam would be a good option for the ring but I didn't have any.
I adhered one piece of acetate to the ring.
I then sprinkled some gold, pink and turquoise
glitter, beads, and sequins.
Then I adhered the second piece of acetate over top.
The rest of the construction is the same. 


Here's the top view of the lid. 
I kept the fillers light and pretty.


It's a really great design,
and would make a beautiful Mother's Day gift box.


Other Materials Used:
American Crafts Cardstock;
Craft Smith Tea Party Paper;
Acetate;
Scrap of Chipboard;
Unknown beads, glitter, and sequins.

File from Simply Crafty SVGs:


* * * * *
Thanks for stopping by today!
I hope you found some inspiration!
I'll be back next month to share a brand new project! :o)

* * * * * 
Here are all the links:


Thursday 23 April 2020

Maker's Movement - You Are the Sweetest!

Hello, my friends!

I'm back today to share a fun project for Maker's Movement

If you missed my recent Crossover II Machine review,
you'll find it right HERE.
I used this great machine for all my die-cutting on this project.


Here's my cute little Gift Carton:


Isn't that fun?
It's just a little carton and it's so much fun to play with!

I began with a piece of watercolor paper.
I stamped multiple stamps from the In the Kitchen Set,
using VersaMark ink. 
I then sprinkled it with white embossing powder,
and heat set it.


Next, I spritzed the embossed watercolor paper with water.
I sprinkled a couple of colors of Color Burst Powders 
onto the wet surface,
adding colors and water until I had the look I wanted.

Once it was all dry,
I ran it through my Crossover II Machine with the Gift Carton die.


I assembled the Gift Carton.
 It's easy to do with all the scorelines included.


I then cut the tag from some plain watercolor paper.
I stamped the sentiment on the tag,
and attached it to the Carton using a tiny red brad.

I punched a hole through the top tabs,
and tied a red ribbon bow through it.


It's such a fun little Gift Carton!
It would be perfect for gifting a special homemade treat!

I have to say that the In the Kitchen Stamp Set is really great!
There are 21...yes, 21...little stamps in the set!
It's a fabulous combination of kitchen utensils, food, and sentiments!
They're great for cards, layouts, recipe books and even planners!
I'll be sharing more projects using these stamps!

* * * * *

Maker's Movement Products Used:

Crossover II Fabric & Paper Cutting System,


Other Materials Used:
Watercolor Paper;
VersaMark Ink;
Memento Tuxedo Black Ink;
White Embossing Powder;
Ken Oliver Color Burst - Merlot, Yello Ochre;
Offray Ribbon;
Mini Brad.

* * *
Thanks so much for stopping by!
I'll be back soon with another fun project!

* * *

Here are all the links for you:


Wednesday 22 April 2020

Altair Art - Spring Blossoms

Hello, my friends!

I'm excited to share this post with you...for a variety of reasons!

First of all, I'm thrilled to share that I have been invited
to be a Brand Ambassador for Altair Art Scrapbooking Papers.

If you're not familiar with the company 
Altair Art is located in Poland,
and they make gorgeous papers.
The papers are heavy weight and fabulous to work with. 
They have a wonderful assortment of collections, available in various sizes.
They also have matching element packs - FULL of wonderful images to fussy cut.

I'm so happy to be sharing my first project with you today!
I confess that it was hard to think of cutting into these gorgeous papers...
...I just wanted to hoard them for a little while! lol

I was waiting for just the perfect project idea!
When I saw this purse cut file...I knew it was the one.

Here is my purse, using the Altair Art Spring Blossoms papers:


I started with a cut file from My Scrap Chick called Purse With Big Bow.
I cut the base out of pink cardstock.

I used three papers from Altair Art for the panels. 
The front, sides, and handle, were cut from the Spring Blossoms 03.


The back, top, and front flap, were cut from Spring Blossoms 05.


The big bow panels were cut from Spring Blossoms 02 page.
These papers are so pretty!
I didn't need to add anything else to make it special.
I did distress all the edges with a distress tool,
and the edges feathered up beautifully!
I added the handle with some pearl brads from my stash.


This purse opens up to a wonderful spot that needs to be filled.
Can you guess what I'm making to fit in here? 
I'll be posting it as soon as it's finished! ;o)


  Here's a look at the collection pack:


Altair Art Products Used:


Other Materials Used:
Pink AC Cardstock;
Unknown Pearl Brads.

* * * * *
Thanks so much for stopping in today! 
I'll be back soon with more projects using these pretty papers!

Oh, one more thing...
Altair Art also has a wonderful monthly Challenge,
with a chance to win some fabulous prizes!
Check it out at the blog.

* * * * *

Here are all the links for you:


Tuesday 21 April 2020

Vilda Stamps - Strawberry Girl

Hello, my friends!

I'm back with my second project for Vilda Stamps!

On the 12th and 21st of each month, I will be sharing two projects/blog posts,
that I hope will inspire you to get some Vilda Stamps of your own.
They have such a fabulous variety of stamps to create with!
Due to the time difference between Canada and Sweden,
I will share my first project in the evening,
and my second project the next morning.

I have a second card to share, using a sweet watercoloured image.
This is the strawberry girl from the V834 Stamp Set.
She comes with some strawberries,
and a cute little boy image with a soccer ball.

Here it is:


Isn't she adorable?
I stamped the image onto watercolour paper.
Then I coloured it with watercolour pencils and a water brush.

I came across this fun strawberry printed paper in my stash,
which I used as a background. 
Then it was just some simple die-cutting and layering
to finish off the fun summery card!


Vilda Stamps Used:


Other Materials Used:
Watercolour Paper;
Watercolour Pencils and Water Brush;
AC Cardstock;
Sizzix Vine w/ Leaves and Fruit Die;
Sizzix Framelits Dotted Ovals Dies

* * * * *
Thanks so much for taking a look!
I'll be back soon with more fun Vilda projects!

* * * * *
If you're not familiar with Vilda Stamps, they are located in Sweden!
I've been a big fan of the stamps since I was introduced to them 
while working on a DT in Germany!
The stamps can be purchased from Engstroms Artstudio AB.
They ship all over the world.

* * * * *

Here are all the links for you:


Monday 20 April 2020

Vilda Stamps - You Are So Special

Hello, my friends!

It's my time to share some projects for Vilda Stamps!

On the 12th and 21st of each month, I will be sharing two projects/blog posts,
that I hope will inspire you to get some Vilda Stamps of your own.
They have such a fabulous variety of stamps to create with!
Due to the time difference between Canada and Sweden,
I will share my first project in the evening,
and my second project the next morning.

Today I have a fun card to share with you:


I heat embossed the design on bristol paper, 
adding the sentiment, along with several extra butterflies.
The grungy style of the sentiment
works beautifully with the steampunk stamp.


I then stenciled the background design over the entire card front,
using distress ink.
Finally, I trimmed the piece and layered it onto black cardstock
before adding it to the card base.

Here you can see the shiny gloss of the embossing:


Vilda Stamps Used:


Other Materials Used:
Bristol paper;
Black Detail Embossing Powder;
Salty Ocean Distress Ink;
Recollections Stencil;
Wendy Vecchi - Make Art Station.

* * * * *
Thanks so much for taking a look!
I'll be back soon with my second project!

* * * * *
If you're not familiar with Vilda Stamps, they are located in Sweden!
I've been a big fan of the stamps since I was introduced to them 
while working on a DT in Germany!
The stamps can be purchased from Engstroms Artstudio AB.
They ship all over the world.

* * * * *

Here are all the links for you:


Friday 17 April 2020

Rinea Tutorial - Shooting Star Skyline Card

Hello, my friends!

Today I have a new tutorial for Rinea.
It's another great collaboration post with Poppystamps!


I have combined the wonderful foiled paper
with two great dies from Poppystamps!

Here's my card:


Here's What I Used:


Materials Used:
Poppystamps - Shooting Star Craft Die;
Poppystamps - Townhouses Craft Die;
White A2 Card Base.

 Here's How:


1. Cut a piece of the Sapphire/Gold Glossy Foiled Paper to 4 1/4" x 5 1/2". Adhere it to the front of the card base.
2. Since I wanted all my little houses to be in a variety of different colors, I reached for my Assorted Foiled Papers - Misfits Pack. I die-cut the Townhouses die from multiple colors, in both Starstruck and Glossy foiled papers. 
3. I added some small pieces of the Gold/Gold Glossy Foiled Paper behind some of the windows, so it appears that the lights are on. 
4. After assembling all my little houses, I adhered them along the bottom of my card front. 


5. Die-cut the Shooting Star from the Gold/Gold Glossy Foiled Paper.
6. Adhere the Shooting Star to the night sky above the house skyline. 


  This was such a fun card to put together!
The dies are so intricate and cut beautifully!
As always, the foiled papers just make it special!


Thanks so much for stopping by today!
I'll be back with some new inspiration soon!
* * * * *

Here are all the links for you:


Sunday 12 April 2020

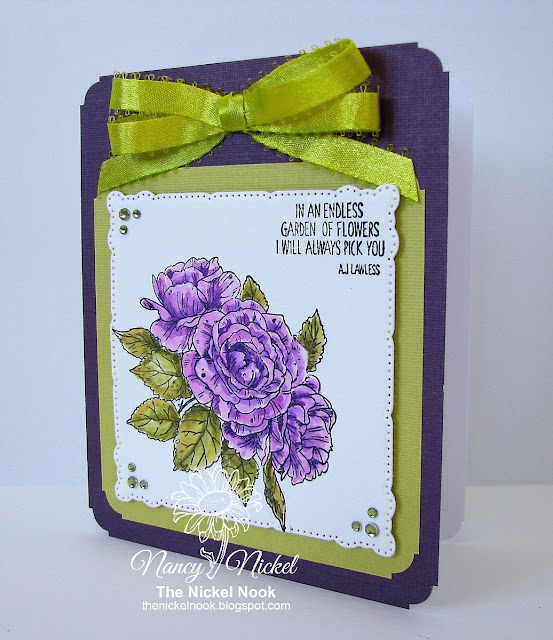
Vilda Stamps - In An Endless Garden of Flowers...

Hello, my friends!

I'm back with my second project for Vilda Stamps!
I have another card to share, using a pretty floral stamp!

Here it is:


This beautiful stamp, along with the sentiment,
are two of the seven stamps in Vilda Set V861.
Again, I have watercolored my image.
Then I just did some simple layering,
pulling the colors from the stamp.


To finish things off, I added a double looped bow, 
and some pretty rhinestones.

Here's a closer look at the image.


Vilda Stamps Used:


Other Materials Used:
Watercolor Paper;
Watercolor Pencils and Waterbrush;
Recollections Cardstock;
Spellbinders - Marvelous Squares Die;
WRMK Deco Corner Chomper;
Kaisercraft Rhinestones;
Offray Ribbon.


* * * * *
Thanks so much for taking a look!
I'll be back soon with more fun Vilda projects!

* * * * *
If you're not familiar with Vilda Stamps, they are located in Sweden!
I've been a big fan of the stamps since I was introduced to them 
while working on a DT in Germany!
The stamps can be purchased from Engstroms Artstudio AB.
They ship all over the world.

* * * * *

Here are all the links for you:


Saturday 11 April 2020

Vilda Stamps - Wishing You a Happy Easter!

Hello, my friends!

I hope you're enjoying a very Blessed Easter!

It's my time to share some projects for Vilda Stamps!

On the 12th and 21st of each month, I will be sharing two projects/blog posts,
that I hope will inspire you to get some Vilda Stamps of your own.
They have such a fabulous variety of stamps to create with!
Due to the time difference between Canada and Sweden,
I will share my first project in the evening,
and my second project the next morning.

Today I am sharing a final Easter card.
Rather appropriate for Easter Sunday!
(Sweden time)

Here it is:


I began with the cute wheelbarrow stamp from the Kit With Flower Elves V656,
and the egg stamps from the Easter Bunny and Young Rooster V835 set.
I stamped them all onto watercolor paper, 
and colored them in with watercolor pencils and a waterbrush.
Then I fussy cut them out. 
I created a simple scene on my blue card base,
using some dies from my stash.


I cut a slit into the wheelbarrow and inserted my eggs.
I also used some foam tape when adhering everything in place.
This gives it some extra dimension. 


You can see some of the dimension in the photo here:


Vilda Stamps Used:


Other Materials Used:
Recollections Cardstock;
CC Designs Frame Die;
Your Next Die Grass Border Die;
Memento Tuxedo Black Ink;
Watercolor Paper;
Watercolor Pencils.

* * * * *
Thanks so much for taking a look!
I'll be back soon with my second project!

* * * * *
If you're not familiar with Vilda Stamps, they are located in Sweden!
I've been a big fan of the stamps since I was introduced to them 
while working on a DT in Germany!
The stamps can be purchased from Engstroms Artstudio AB.
They ship all over the world.

* * * * *

Here are all the links for you:


Friday 10 April 2020

Easter Blessings!

Hello, friends!

Happy Easter to you all!
I'm scheduling this post for Good Friday!
Our celebrations will all be very different this year, won't they?
Yet we still have so very much to be grateful for!

I hope to be busy filling my day with good things.
We can attend an Easter Church Service online,
where we can focus on the truth of Easter.
Then we'll enjoy some delicious food...followed by an isolated walk.
We will also share phone calls with family! :o)

What will you be doing to bring JOY to your day?


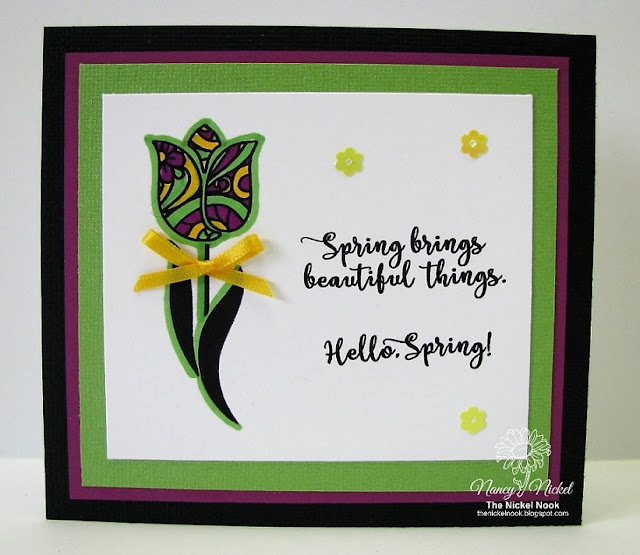
I've been saving these cards to share today.
They were both published in the Spring 2020 Issue of Creative Scrapbooker Magazine.


Both of these cards are created with a lovely stamp set by The Project Bin.
It's called Spring Zen and you can find it HERE.

Other Materials Used:
Recollections - Cardstock;
Memento - Tuxedo Black Ink;
Spectrum Noir Markers;
Offray Ribbon;
Unknown Sequins.

* * * 

May you all enjoy a Very Blessed Easter! :o)

Blog Archive