Wednesday 29 March 2017

The Project Bin - Dog Loves You!

Happy Wednesday, my friends!

It's time for another post for The Project Bin

Today I am sharing a project using the "Kinda Pawsome" Stamp Set,
which you can find HERE.

I stamped and die-cut the dog from the stamp set,
then I adhered him to the pretty leaf paper.
It looks like he's really enjoying being all stretched out in the yard!
I cut out the tag shape and added it to the lovely background paper using a brad.
Then I stamped, matted, and adhered the sentiment.


I know the second part of the sentiment is for the inside of the card
but I like things to be interactive,
so I stamped, matted and adhered it under the tag.


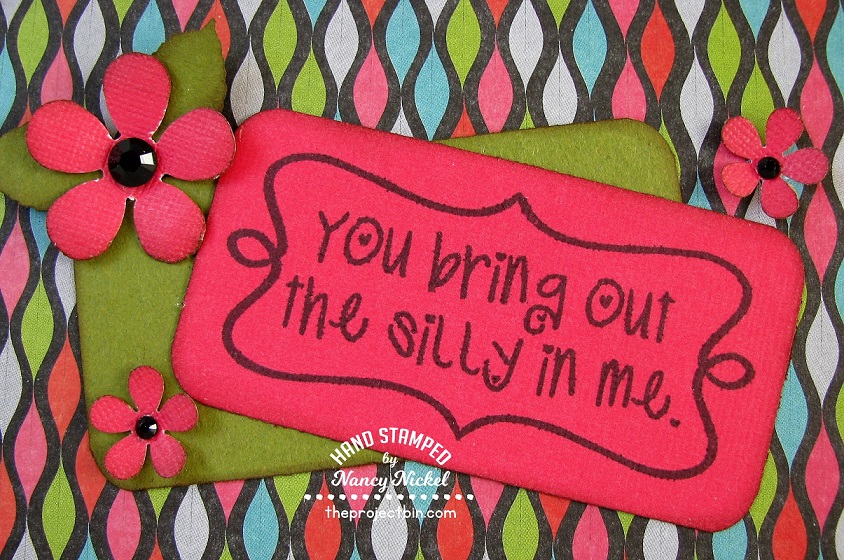
Here's a closer look: 


Finally, I matted it on more leaf paper,
and adhered it to a white card base!


Other Materials Used:
Papers: Momenta Collection, Recollections - Cardstock;
Dies: Tutti Designs - Stitched Nesting Tags Die;
Ink: Memento - Tuxedo Black;
Brad: EK Success.

The Project Bin - Kinda Pawsome


* * * * *
If you're not familiar with The Project Bin,
they specialize in wonderful sentiment stamps.
They're clear photopolymer and stamp as crisp as can be!
Each set has multiple stamps, and 
"A Way With Words."
* * * * *
I'll be back next week to share another wonderful stamp! :o)
In the meantime...

Here are all the links you'll need:


Sunday 26 March 2017

Tutti Designs - Oriental Fan

Hello, my friends!

It's Monday, and I'm back with a new Tutti Designs share!

This is the final die share from the February Release.
It is called "Oriental Fan" and you can find it HERE.

I just happened to have this pretty oriental fan paper
all in shades of purple.
So I had to make a purple card! :o)

Again, I teamed this die up with the Nesting Stitched Ovals Die.
I love these dies!
Just some simple layering, and pretty ribbon bow.


Finally, I added some little purple rhinestones to the flowers.


Here's a closer look at all the dies:


Other Materials Used:
Papers: Recollections - Cardstock, DCWV - Far East Stack;
Ribbon: Offray Picot Edge;
Bling: Crafts - Rhinestones.

Tutti Designs Dies Used:


* * * * *
I'll be back next week with a new project.
In the meantime, here are all the links you'll need:


Wednesday 22 March 2017

The Project Bin - Fun Is Good Again!

Happy Friday, my friends!

Today I'm back with another project for The Project Bin

I'm sharing another one from the great Fun Is Good Stamp Set.
This is such a fun and versatile set!

I'm not sure why this paper suited the "silly" theme for me...but it did! 
I love the happy colors and the squiggly lines.
I layered the paper on black, and then on matching pink cardstock.


I stamped the sentiment in black, on the pink cardstock.
Back to the "silly"...I placed the stamped piece wonky,
and then I added a matching piece of green cardstock.
Finally, I added some punched flowers with bling centers.


Here's a closer look at the stamping:


Other Materials Used:
Papers: Momenta, Bazzill Cardstock;
Ink: Memento - Tuxedo Black, DIstress Ink - Walnut Stain;
Punches: EK Success - Retro Flowers;
Bling: Crafts - Rhinestones.


The Project Bin - Fun is Good Stamp Set


* * * * *
If you're not familiar with The Project Bin,
they specialize in wonderful sentiment stamps.
They're clear photopolymer and stamp as crisp as can be!
Each set has multiple stamps, and 
"A Way With Words."

* * * * *
I'll be back next week to share another wonderful stamp! :o)
In the meantime...

Here are all the links you'll need:


Sunday 19 March 2017

Tutti Designs - Koi

Hello, my friends!

It's Monday, and I'm back with a new Tutti Designs share!

This is another fun one from the February Release.
It's called "Koi" and you'll find it HERE.

I placed this fun fish in a water colored oval.
I was hoping it looked like he was in a pond.
Then I backed it with an Asian style decorative paper.


Finally, I added a sheer ribbon bow.


Here's a closer look at the Koi Die, and the Stitched Nesting Circle Die.


Other Materials Used:
Papers: DCWV - Far East Stack;
Ink: Distress Ink - Walnut Stain;
Ribbon: Celebrate It.

Tutti Designs Dies Used:


* * * * *
I'll be back next week with a new project.
In the meantime, here are all the links you'll need:


Introducing the NEW Mustard Seed Faith Challenge

Sunday Blessings to you, my friends!

I'm excited about today!
Today I get to introduce you to a brand new challenge blog. 
You may have noticed the word "Faith" in the title.
Those of us on the Design Team...did I mention I'm on the Design Team? ;o)
Anyways...those of us on the Design Team all have a strong love for...and faith in...Jesus Christ. 
We are really looking forward to sharing that love with you,
as well as sharing our crafty projects.

We have a key Scripture verse that's found in Matthew 17:20:

He replied, “Because you have so little faith. Truly I tell you, if you have faith as small as a mustard seed, you can say to this mountain, ‘Move from here to there,’ and it will move. Nothing will be impossible for you.”

Have you ever seen a mustard seed? It is TINY!
That tiny seed grows into a big plant. 
So guess what? It's not the quantity of your faith...it's the quality of your faith that matters.
I read that somewhere, and it's stuck with me.
Just know that with God nothing is impossible! :o)

* * * * *
Okay...so what IS the challenge, you ask?
It's an easy one!
Just make something...anything...and use YELLOW.
That's it! 

* * * * *
Here's the card I made:


I tool and ink distressed all the edges.
Then I did some simple layering.


I layered some ovals and then added the "Faith".
I also added the wildflower die-cut to depict a growth in faith.
That tiny mustard seed grows into a big plant!


Finally, I added a loopy twine bow and some pretty yellow sequins.


Materials Used:
Papers: Crate Paper - Random;
Dies: Tutti Designs - Faith Word Set, Stitched Nesting Ovals, 
Tim Holtz - Wild Flowers Thinlits;
Ink: Distress Ink - Walnut Stain;
Twine: MME - Follow Your Heart
Bling: Sequins - My Stash.

* * * * * 
So head on over to the

There you can meet the rest of the Design Team
and see what they've created for the challenge this week. 

Then check out the simple rules, make something,
and link it up!

I can't wait to see what you make! :o)

Wednesday 15 March 2017

All Dressed Up - Challenge # 67

Hello, my friends!

Today is the beginning of a new challenge at All Dressed Up!
The challenges are always Anything Goes but you MUST use an image from All Dressed Up.
There are freebies available at the challenge blog HERE! :o)

For this challenge, I created my March Calendar Page.
Yes, March is my birthday month, so this image was perfect!
It's called "Smile It's Your Birthday" and you can find it HERE.

Won't it be a wonderful reminder for my husband to see every day? ;o)
Actually, he doesn't need a reminder. 
He has already asked me to make a birthday card 
...that he can buy from me...to give to me.
Yes, he does that! lol

Okay, on to my page.
I knew this paper would be just perfect for the image. 
I border punched the pretty matching yellow paper, 
and added one strip to the top and one strip to the bottom. 
 I inked the calendar in yellow, and adhered it.  
I fussy cut the image and the sentiment and popped them up on foam tape.
Finally, I added some pretty pearls. 


Here you can see how nicely they stand out off the page
...as they should! :o)


Materials Used:
Papers: Crate Paper - Maggie Holmes;
Image: All Dressed Up - Smile It's Your Birthday;
Coloring: Spectrum Noir Markers;
Punches: EK Success - Daisy Border, Scalloped Scallop Border;
Ink: Martha Stewart - Blue Sky, Dandelion;
Calendar: Maya Road Printable Calendar;
Bling: Crafts - Pearls.

* * * * *
Head on over to the Challenge Blog and join the fun! :o)

Here are all the links you'll need:


The Project Bin - Fun Is Good!

Happy Friday, my friends!

Today I'm back with another project for The Project Bin

Before I get to my share for today,
I would like to thank you all for your great response to my confession in last week's post! 
Thank you for all the fun comments! :o)

Today I am sharing a fun sentiment from the Fun Is Good Stamp Set.
I've been looking forward to using this stamp.
When I came across this paper in my stash I thought it was really fun,
and I immediately thought of this stamp.

It's just a simple tent-fold card.
Isn't it a fun paper? So happy!
I really liked all the pretty colored circles on it.
Drawing from that, I cut a circle and stamped the sentiment on it. 
I took some matching seam binding and knotted them together. 
I spritzed it with water and crumpled it all up.
When it was dry I pulled the crumple apart and adhered it to the card. 


Here's a close-up of the stamping; so crisp and clean!


I wanted to draw some attention to all the little circles.
I was going to do it with applying Glossy Accents, but then I came across these little dew drops.
I used Glossy accents to add them instead.


They add such lovely sparkle and dimension!


Materials Used:
Papers: Momenta;
Die: WRMK - Nesting Circles;
Ink: Memento - Tuxedo Black;
Bling: Robin's Nest Dew Drops - Water, Orchid, Mowed Grass;
Seam Binding: My Sewing Stash;
Glossy Accents. 

The Project Bin - Fun is Good Stamp Set


* * * * *
If you're not familiar with The Project Bin,
they specialize in wonderful sentiment stamps.
They're clear photopolymer and stamp as crisp as can be!
Each set has multiple stamps, and 
"A Way With Words."


* * * * *
I'll be back next week to share another wonderful stamp! :o)
In the meantime...

Here are all the links you'll need:


Tuesday 14 March 2017

Miss Daisy Stamps DT - Blossom

Hello, my friends!

I have a new card to share with you today, 
using an image from Miss Daisy Stamps.
This one is called "Blossom" and you can find it HERE.

Isn't she lovely?

I distressed the edges of all the papers and layered them up.
I added a pretty daisy trim, and then covered most of it when I decided to use this ornate frame.


Materials Used:
Papers: Recollections - Cardstock, Project Life - Desktop Edition; 
Image: Miss Daisy Stamps - Blossom;
Coloring: Spectrum Noir Markers;
Die: Spellbinders Nestabilities - Fleur de Elegance;
Trim: My Sewing Stash;
Bling: Crafts - Pearls.

* * * * *
If you haven't been over to Miss Daisy Stamps lately
you really need to go and check it out!
There are all kinds of exciting additions and events going on!
There's always a really fun challenge going on in the group too!

* * * * *

Here are all the links:


Kathryne is very generous with gifts and surprises.

You'll want to sign up so you don't miss any of the fun!

Sunday 12 March 2017

Tutti Designs - Oriental Parasol

Hello, my friends!

It's Monday, and I'm back with a new Tutti Designs share!

Today I'm sharing another one of the Asian themed dies from the February release.
This week it is the Oriental Parasol Die.
You can find it HERE.

I began with this decorative paper.
Choosing a matching cardstock, I created the card base.
I added a decorative punch along the bottom of the card front. 
I cut the parasol out of the same cardstock and adhered it.
Finally, I added some Liquid Pearls and sheer ribbon. 
Here you can see a peek of the strip of decorative paper that I added to the inside of the card. 
It shows through the punched border on the front. 
Other Materials Used:
Papers: Recollections - Cardstock, DCWV - Far East Stack;
Punch: Fiskars Border Punch - Parisian;
Bling: Liquid Pearls - Bisque;
Ink: Distress Ink - Walnut Stain;
Ribbons: Celebrate It.

Tutti Designs Die - Oriental Parasol


* * * * *
I'll be back next week with a new project.
In the meantime, here are all the links you'll need:


Blog Archive