Showing posts with label Tags. Show all posts

Tuesday, 17 February 2026

Pretty Printables to make Tags for Lavender Blu Journals

 Hello, my friends!

Today I am sharing my latest project for Lavender Blu Journals!
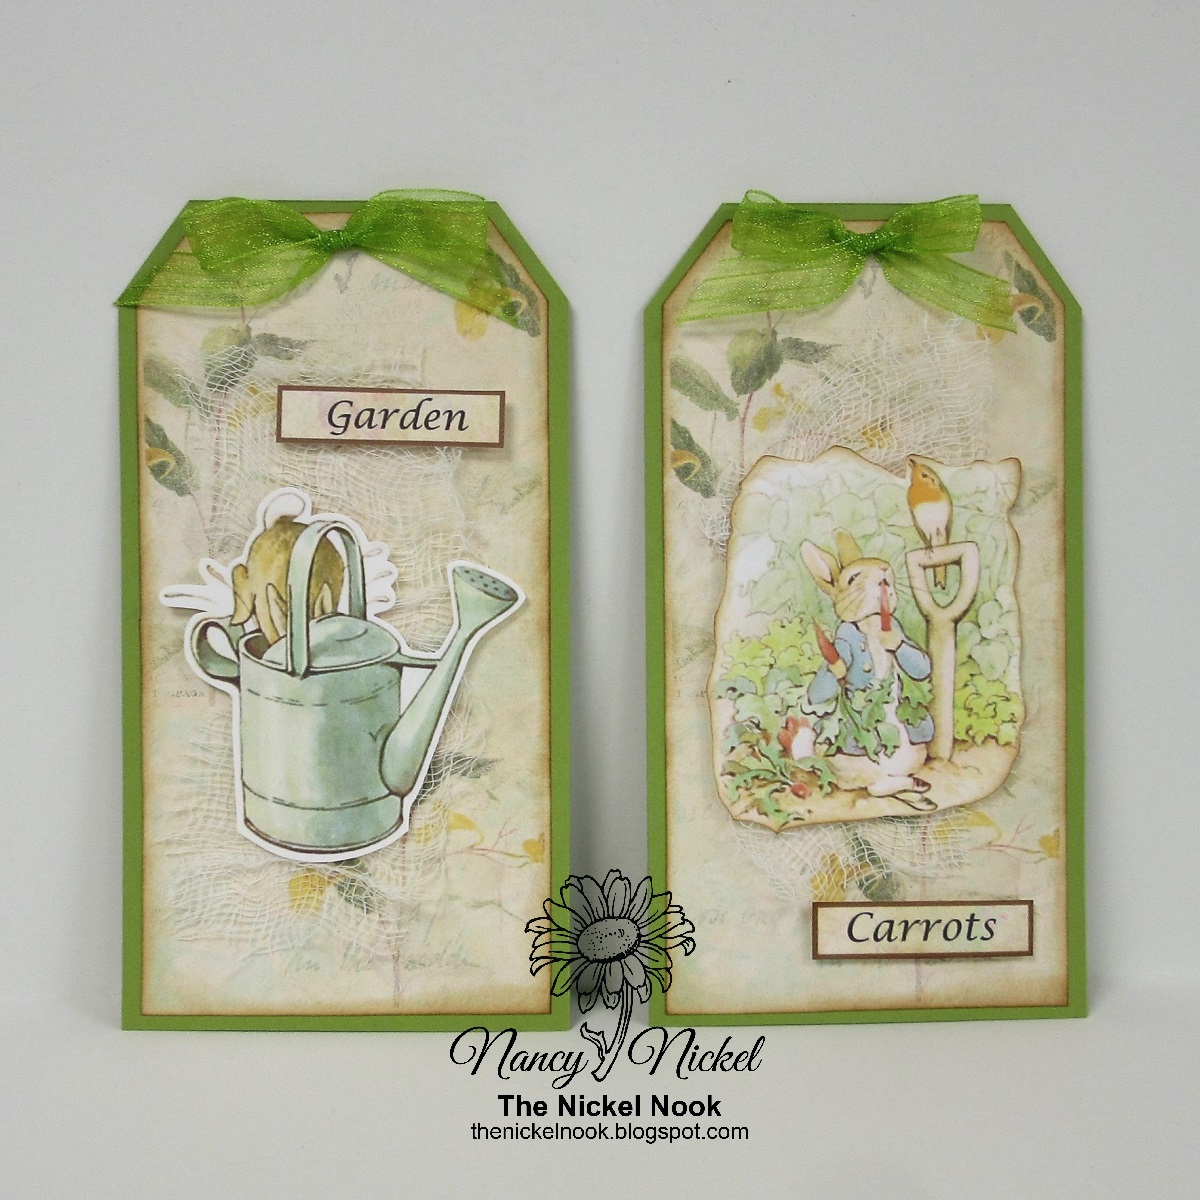
I'm on a fun tag making kick lately, so I have two more for you. 
These are created with some beautiful products from the
New Year Garden Flight Junk Journal Kit.

Tags are so fun because there are so many options for size, style and design. 
These two tags are one of my most common to make. 
I have some antique sewing machine drawers that fit them beautifully,
and I've been filling them up nicely over the years. 

Here are my tags:


I started with my cardstock tag base. 
Then I printed one journal page from the kit, and used it for the tag background.
I fussy cut some of the sweet elements, and adhered them in place.

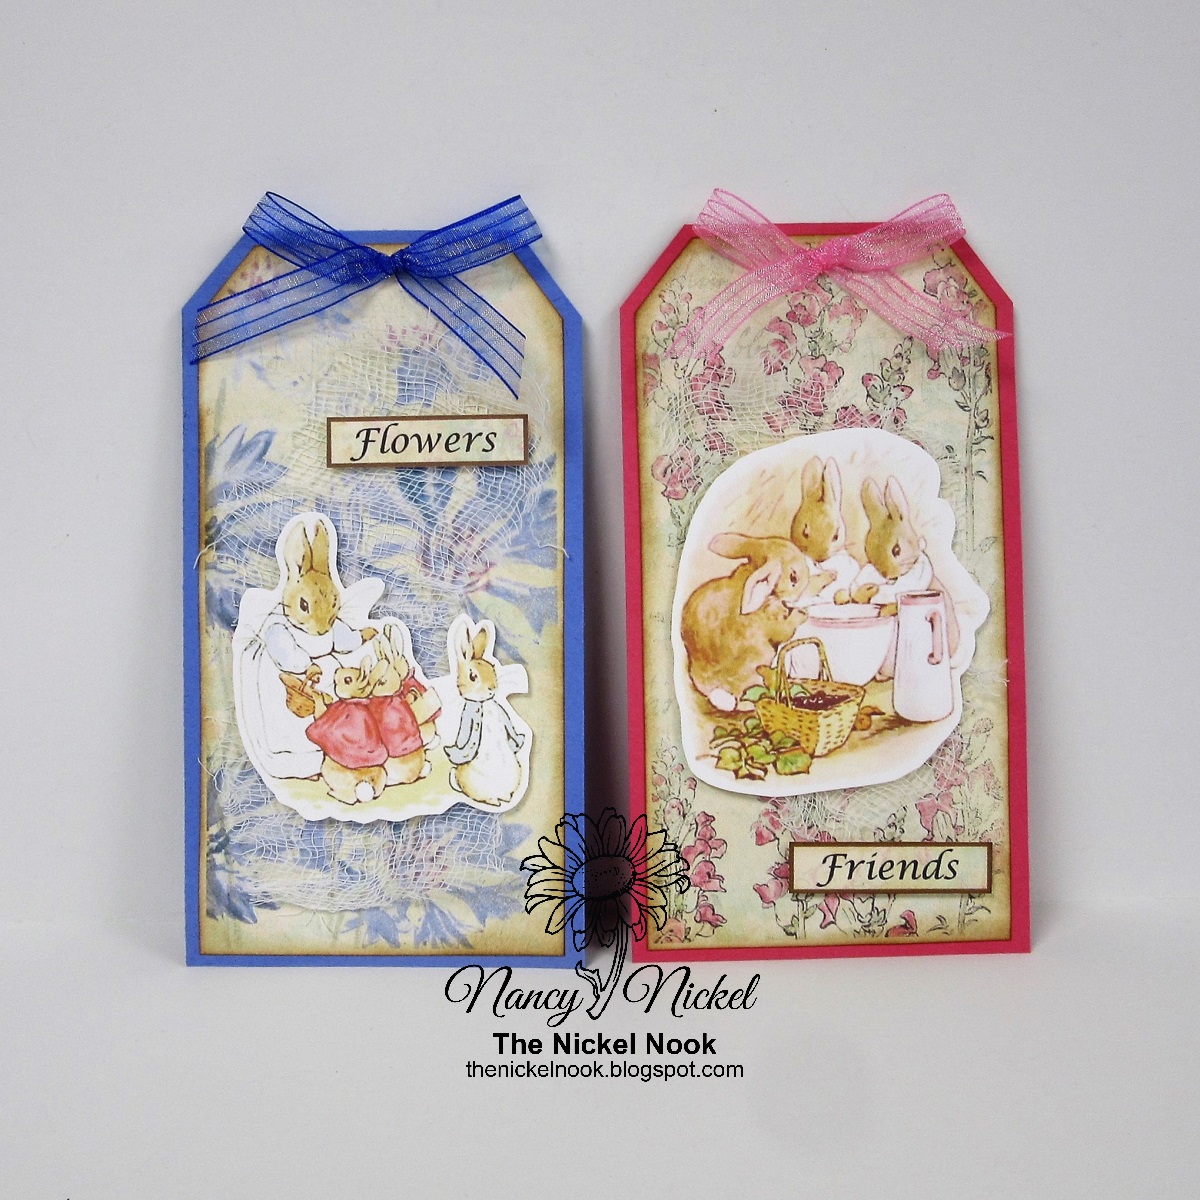
I also decorated the back of my tags.
The pretty yellow background is another one of the journal pages. 
I used some of the ticket labels to create pockets,
and then filled them with more tags and fussy cut ephemera.


To finish everything off, I added twine and fibers to the tag tops.
I also went over all the flowers, birds and butterflies with my sparkle pen.
It doesn't show in the photos but everything has a beautiful shimmer.

Lavender Blu Products Used:

New Year Garden Flight Junk Journal Kit

Other Materials Used:
Walnut Stain Distress Ink;
Spectrum Noir Sparkle Pen;
Whisker Graphics Baker's Twine;
Unknown Fibers.

* * *
Thanks for stopping by today!
I'll be back soon with more fun to share!

* * *

Here are all the links for you:

Lavender Blu Designs

Lavender Blu Journals Shop

Lavender Blu Journals Facebook Page

Lavender Blu Journals Instagram

Friday, 13 February 2026

Heartbreaker Society Tags for KCS Designs by Kim

   Hello, my friends!

Today I have some fun tags I created for KCS Designs by Kim!

These would make great Valentine's but they're also lovely for any occasion!

The fabulous images are from the Heartbreaker Society Clip Art Collection.
There are 26 lovely images included.

Here are my tags:


The tag shape itself is from the Build an Alpha Cut File in the shop.
I've used this file a lot already, and I really like this particular tag shape.


After layering everything up, and adding the ribbons and twine,
I simply added some matching black and red sequins.


There's still time to make some of these before tomorrow!
That's the joy of using digital products.
They're ready to use immediately!

I know I'll be using both of these collections again and again!

* * *

KCS Designs by Kim Products Used:

 Clip Art: Heartbreaker Society;

 Build an Alpha Cut File.

Other materials used:
Cricut Explore Air 2 Machine;
Recollections Cardstock;
Celebrate It Ribbon;
Unknown Baker's Twine;
Unknown Sequins.

* * *

Here Are Kim's Links:

KCS Designs By Kim Etsy Shop

KCS Designs By Kim Instagram

Friday, 23 January 2026

Some Tag Fun for KCS Designs by Kimm

 Happy New Year, my friends!

I know I'm a little late to the party but I've had the flu ALL year! 
I'm finally feeling up to posting some projects that I finished ages ago. 

My first post of the year is some fun tags for KCS Designs by Kim!

These have a Winter/hot chocolate theme, which is most appropriate for us in Canada today. 
We reached -39 C this morning - with a windchill of -49 C.
It's the perfect day to stay in and enjoy a warm drink!


I printed and fussy cut two sweet girls from the Cozy Cocoa Cuties.
This is actually a free file from Kim's Ko-fi Shop.

The tag bases were created with the Design An Alpha Set from the shop, using my Cricut. 
I added a layer of coloured cardstock, and a sentiment from the Christmas Word Snippets.

Once everything was adhered in place, I added some fuzzy fibers to the tag top.
Finally, I added Glossy Accents to the eyes.
I think the extra shine adds a little bit of life to the sweet images. 


Thanks for stopping by today!
I hope to be back again very soon with more!

* * *

KCS Designs by Kim Products Used:

 Cozy Cocoa Cuties;

Design An Alpha Set;

Christmas Word Snippets.

Other Materials Used:
Recollections Cardstock;
Walnut Stain Distress Ink;
Ranger Glossy Accents;
Cricut Explore Air Machine.
 

* * *

Here Are Kim's Links:

KCS Designs By Kim Etsy Shop

KCS Designs By Kim Instagram

Kim's Ko-fi Shop

Tuesday, 29 April 2025

April Project for Lavender Blu Journals

 Hello, my friends!

Today I am sharing my April project for Lavender Blu Journals!

This month I have created two fun tags and a card!

Lavender Blu Products Used:

Vintage Victorian Ephemera Kit;

Vintage Victorian Journal Kit.

This is a gorgeous collection...with endless creative possibilities!

Here are my tags.:


Everything was printed and then fussy cut.
The edges were distressed with a tool or ink or both.


Then I did some simple and flat layering. 
I think I'll be using these tags in a future journal.


Then I made this pretty card, using the same process.


Although here I did adhere the center heart using foam tape.

Here's the inside of the card, decorated with other elements from the collection.


Thanks so much for stopping by!
I'll be back next month with another fun project for Lavender Blu Journals!

* * *

Here are all the links for you:

Lavender Blu Journals Shop

Lavender Blu Journals Facebook Page

Lavender Blu Journals Instagram 

Sunday, 8 December 2024

Have a Tag Party using Printable Cuttable Creatables

         Hello, my friends!

It's time for a new project share for Printable Cuttable Creatables!

This time of year we all need some tags for our packages, right?
We also need some fun projects that we can do with the kids,
or something fun to do while spending time with friends and family. 
This idea fills both of those requirements!

Here's what I made:


Isn't that a fun assortment of tags?
They were so much fun to make!

I started with printing some lovely papers from the Christmas Treats SVG Scrap Kit.
Then I used the Christmas Sentiment Gift Tags Freebie to cut out a variety of tags.
The bonus with this file is that you then have the cut-out words to use on another tag.


Then I used the Christmas Gift Tags Free SVG File to cut out an assortment of green tags.
Again, the cut-out bits can be used on another tag.


Finally, I went through a pile of scraps on my table and cut a variety of plain cardstock tags.
These are all different sizes of rectangles with the corners snipped off.


Once I had a really good assortment of tags, I went back to the Christmas Treats SVG Scrap Kit.
I chose all the little clipart bits I wanted, and sized them to fit my tags. 
I then used the Print/Cut feature in Cricut Design Space to cut out all the fun images.
The kids would love to be involved in choosing their favorite images.


Now that you have all the pieces ready, it's time to have fun putting them together.

Here's a closer look at some ideas for you:


You can get as simple or as elaborate as you want with this step.
I used only glue and a black fine tip marker.
You could get much fancier with ink, glitter, bling, etc.
Finally, to finish them all off, I punched a hole in the top and added ribbon or twine.


The backs of the tags are free space for writing a personal message,
or adding a To/From stamp. 

This is just a fun Pre-Christmas project idea!
Get an item crossed off your to do list while making some fun memories of time spent together!

* * *

Use my code to get 15% off your purchase:


* * *

Printable Cuttable Creatables Products Used:
Other Materials Used:
Recollections Cardstock;
Black Pigma Pen;
Offray Ribbon;
Baker's Twine.

* * *

Thanks for stopping by today!
I'll be back soon with another fun project!

* * * * *

Here are all the links for you:

Printable Cuttable Creatables Shop

Printable Cuttable Creatables Blog

Printable Cuttable Creatables Facebook     

Thursday, 21 December 2023

Pumpkin Season Tag for Emerald Creek Craft Supplies

Hello, my friends!

I'm back with another fun project for Emerald Creek Craft Supplies

There are only a few hours left in our Fall season,
so I thought I better hurry and share this one now.

It's really hard to believe that Winter begins later today here in Saskatchewan.
Our weather, and view out the window, are definitely more Fall then Winter!

Here's my tag:


My tag base is cut from matboard, and covered with a decorative paper.
The fence image was stamped onto the background.
The edges are all inked, and a piece of ribbon was threaded through the top.

The leaves and pumpkins were stamped with embossing ink,
and then heat embossed with the Gothic Black Gilding Powder.
The images were then coloured with the fabulous Kaleidoscope Watercolours.
I LOVE these watercolours! They are so rich and creamy!

I only had red, blue and yellow (links below),
so I had lots of fun mixing the colours into green and orange.
Once the images were dry, I adhered them in place with foam tape.


Finally, I added some adorable charms to a bulb pin,
and threaded it through the ribbon.


Emerald Creek Craft Supplies Used:

Powders:

Gothic Black Gilding Powder by Quietfire

Stamps:

Leaf Corner Cling Mount Stamp;

Not Wired Cling Mount Stamp;

Pumpkin Patch Cling Mount Stamp.

Kaleidoscope Watercolours:

Pomegranate Seeds;

Swept Mustard

Kananaskis Slate.

Charms:

Mini Acorn Charm;

Other Materials Used:
Matboard Tag Base;
Recollections Paper;
Offray Ribbon;
Black Soot Distress Ink;
Bulb Pin.

* * *

Thanks for stopping by today!
I'll be back with another new project soon!

Emerald Creek Craft Supplies has such a great variety of fun products!
Head on over to the shop and check it out!

* * *

Here are all the links for you:

Emerald Creek Craft Supplies

Emerald Creek Facebook

Emerald Creek Instagram

Thursday, 24 August 2023

Tuck Tags for Polka Art Studio

   Hello, my friends! 

Today I have another fun new project for Polka Art Studio!

I am busy working on a full journal,
which I hope to share with you next week. 

Today I want to share some sweet tuck tags that I made.
These will be tucked into the finished journal.

I had so much fun making these! 

Here they are:


Although these all look like they have great dimension,
they are actually nice and flat.
That makes them perfect to tuck into a journal and not add any bulk.


I used a couple of printable papers for the tag background,
and adhered them all onto a kraft cardstock base.


The sweet little girl images were all printed, fussy cut,
and adhered in place.

I then printed/fussy cut all the words and sentiments and added them to each tag.
I added a little bit of cheesecloth under several of them.


You may have noticed that I didn't even add a ribbon
or a tab to the top of these tags.
It's unusual for me, I know.
However, these tags just don't need it, do they? :o)

* * *

Polka Art Products Used:


(I used the backing papers from this kit)

 
Other Materials Used:
Kraft Cardstock;
Walnut Stain Distress Ink;
Cheesecloth.

* * *

Thank you for stopping by today!
I'll be back next week with the finished journal!

* * *
There are lots more fun goodies in the Polka Art Studio Shop!
Make sure you sign up for the newsletter too!
You don't want to miss all the fun events and freebies!

Polka Art Studio Links:

Polka Art Studio Etsy


Polka Art Studio Instagram  

Monday, 27 March 2023

Beatrix Potter Tags for Rach and Bella Crafts

     Hello, my friends!

I'm still busy working on my journal project for Rach & Bella Crafts!

In the meantime, I have been making some additional journal bits.
This time I am sharing some fun tags, using:

The Works of Beatrix Potter

These would be lovely tucked into a Beatrix Potter journal,
or even a Spring/Easter journal!

 Here they are:


I used the tags from the kit, and backed them with cardstock.
The images and words were all fussy cut from the kit.
I tucked a bit of cheesecloth behind each image for some added texture.
To finish things off I added a sparkly ribbon bow to the top of each tag.


Quotes from the kit were added to the back of each tag.

Here's another set:


The back of those:


These were lots of fun to put together! 
There's room on the back to add some journaling too!

* * *

Rach&Bella Crafts Products Used:

The Works of Beatrix Potter

Other Materials Used:
AC Textured Cardstock;
Vintage Photo Distress Ink;
Cheesecloth;
Assorted Ribbons.

* * *

Thanks so much for stopping by!
See you again soon!

* * *

Here are all the links:

Rach&Bella Crafts Facebook Page

Rach and Bella Crafts Etsy Shop

Rach&Bella Crafts Instagram   

Thursday, 2 February 2023

Month of Masculine for Kate Crafts

    Hello, my friends!

It's time for another fun project for Kate Crafts!

With it being a new month,  
I thought I would concentrate on sharing some masculine projects.
I always enjoy making them,
and Kate has some great products to use for this purpose.

First up are some masculine tags:


Very masculine, right?
Also very vintage!
I'll link all the products below.


I began with my usual kraft tag base, measuring 4 1/4" wide.
I then added a layer of paper for the background.
Then I just had fun layering all kinds of printed bits and pieces.
All the edges were distressed with both a tool and ink.

The second tag was created the same way.
I used the same background paper and more bits and pieces.
The masculine photos are the obvious focal point. 


Each tag was finished off with a jute knot at the top.
It just adds more masculine texture.
Finally, I went in with some Tim Holtz stamps to fill in some empty spots. 

* * *

Kate Crafts Products Used:


Other Materials Used:
Kraft Cardstock;
Vintage Photo Distress Oxide Ink:
Tim Holtz Field Notes Stamp Set;
Jute Twine.
 
* * *

Thanks so much for stopping by!
I'll be back soon to share another masculine project!

* * * * *

Here are all the links:

Kate Crafts Facebook Group

Kate Crafts Facebook Page

Kate Crafts Store on Etsy    

Monday, 5 December 2022

Silent Christmas for Kate Crafts

  Hello, my friends!

It's time for another fun project for Kate Crafts!

 This time I am sharing some seasonal cards and tags, featuring: 

Silent Christmas Card Making Collection.

This is another great digital collection, and it includes 20 pages of fun!
There are patterned papers, great images, and a wonderful collection of sentiments.
Also, it's on sale right now for 50% off!

Here are my cards:


Here are the tags:


These were so fun and easy to put together!
I printed out the papers I wanted to use, 
added some cardstock and ribbons,
then did a little inking and gluing!
Finally, to finish things off, I added some Stickle sparkle! :o)

* * *

Kate Crafts Products Used:


Other Materials Used:
Recollections Cardstock;
Offray Ribbon;
Stardust Stickles;
Walnut Stain Distress Ink.

* * *

Thanks so much for stopping by!
I'll have more fun from Kate Crafts very soon!

* * * * *

Here are all the links:

Kate Crafts Facebook Group

Kate Crafts Facebook Page

Kate Crafts Store on Etsy   

Thursday, 20 October 2022

With Thanksgiving Tag Book for Rach and Bella Crafts

Hello, my friends!

It's time for a new project for Rach & Bella Crafts!

This week I am sharing a fun tag book,
created with fabulous printables from the shop.
I'm calling it my "With Thanksgiving" Tag Book, 
as you can see from my cover.
I also added the word "Joy" because I'm all about the JOY! :o)

Here is my tag book:


As I've mentioned before...we have recently celebrated our Thanksgiving here in Canada.
The US is going to be celebrating next month.
I always like to think of every day as Thanksgiving Day!
I believe that being grateful makes us joyful! 


The idea with this tag book is to make record of 
ALL that we have to be grateful for.
To the back side of each tag I have added a belly band.
Then I have inserted a journal card into each belly band.
I have also added a word, as a prompt for the gratitude list.


For example, here you can list several areas of beauty that you are thankful for:
the beautiful Fall foliage,
your beautiful friends,
or your own beautiful face.


Here, make a list of some things that you know to be true:
God loves you,
Winter follows Fall,
tomorrow is another day.


I think you get the idea! ;o)


So many lovely images on these tags!


The little tags have been included in between the big ones.
I added the final belly band/journal card on the inside of the back tag.

Then used this pretty tag for the back:


To finish things off, I added a binding ring to the top of the tags.
I tied several coordinating ribbons around the ring.
I also added some buttons to a bulb pin, and included it on the ring.


This would make a sweet gift, wouldn't it?
Or use it with your family at Thanksgiving,
and fill out all the pages together! 

* * *

Rach&Bella Crafts Products Used:

Fall Friends Junk Journal Kit  - for all the tags;


Give Thanks Ephemera Cards - for the title on the cover;

Floral Ledger Journal Cards - journaling card inserts;

Other Materials Used:
Walnut Stain Distress Ink;
Binding Ring;
Bulb Pin;
Mini Buttons;
Burlap and Lace Bits.
 

* * *

Thanks so much for stopping by!
I'll be back soon with another fun project for Rach&Bella Crafts!

* * *

Here are all the links:

Rach&Bella Crafts Facebook Page

Rach and Bella Crafts Etsy Shop

Rach&Bella Crafts Instagram 

Sunday, 28 August 2022

Dotty About Flair August Project

   Hello, my friends! 

 It's time for a fun new project for Dotty About Flair.
There are some big changes happening at DAF!
I'll tell you all about that next month!

This month I have made a tag featuring:

 
Here's my tag:


Isn't that fun? 
The gingham flair are so fresh and summery!


I grabbed some coordinating ribbons and papers from my stash.


I punched several black scalloped circles out.
I wrapped them with pink and yellow crochet cotton,
and then added the flair to the centers.
I added a pearl to the smaller ones.


This was a really fun tag to put together!
The flair adds such a pretty dimensional accent to my tag!


Save 10% by using my code: Nancy10


Dotty About Flair used:


Other Materials Used:
Recollections Cardstock;
Dylusions Sentiment Stamp;
Memento Tuxedo Black Ink;
Stampin' Up Scalloped Circle Punches;
Very Old Paper from My Stash;
Crochet Cotton;
Offray Ribbon.

* * *

Thanks very much for stopping by today!
I'll be back soon with more fun to share!

  * * *

Here are all the links for you:

Dotty About Flair Shop

Dotty About Flair Facebook Group

Dotty About Flair Instagram

Blog Archive