Showing posts with label Cut File. Show all posts

Thursday, 19 December 2024

Snow Day Layout for Printable Cuttable Creatables

   Hello, my friends!

It's time for a new project share for Printable Cuttable Creatables!
This is my last project as DT for PCC,
although you will see more projects using these fun files.

I haven't made a 12 x 12 layout for a while, 
and when I saw these Winter photos on my desk, I was inspired!
 
There are so many fabulous Winter themed files in the shop!
I used two of my favorite, and then added a fun title. 

I have used:

Happy Snowman Looking Up SVG File;

Snowflake Circle Frame SVG File;

Snow Day Free SVG File.

Here's my project:


This was lots of fun to put together.
The photos are some that I took from our yard and on a winter walk.


The title and photos were adhered in place using foam tape.
Once everything was added in place to the page,
I went over the title and the snowman with very sparkly glitter glue.


Finally, to finish it all off,
I added rhinestones and bling to the snowflakes,
and randomly around the page.


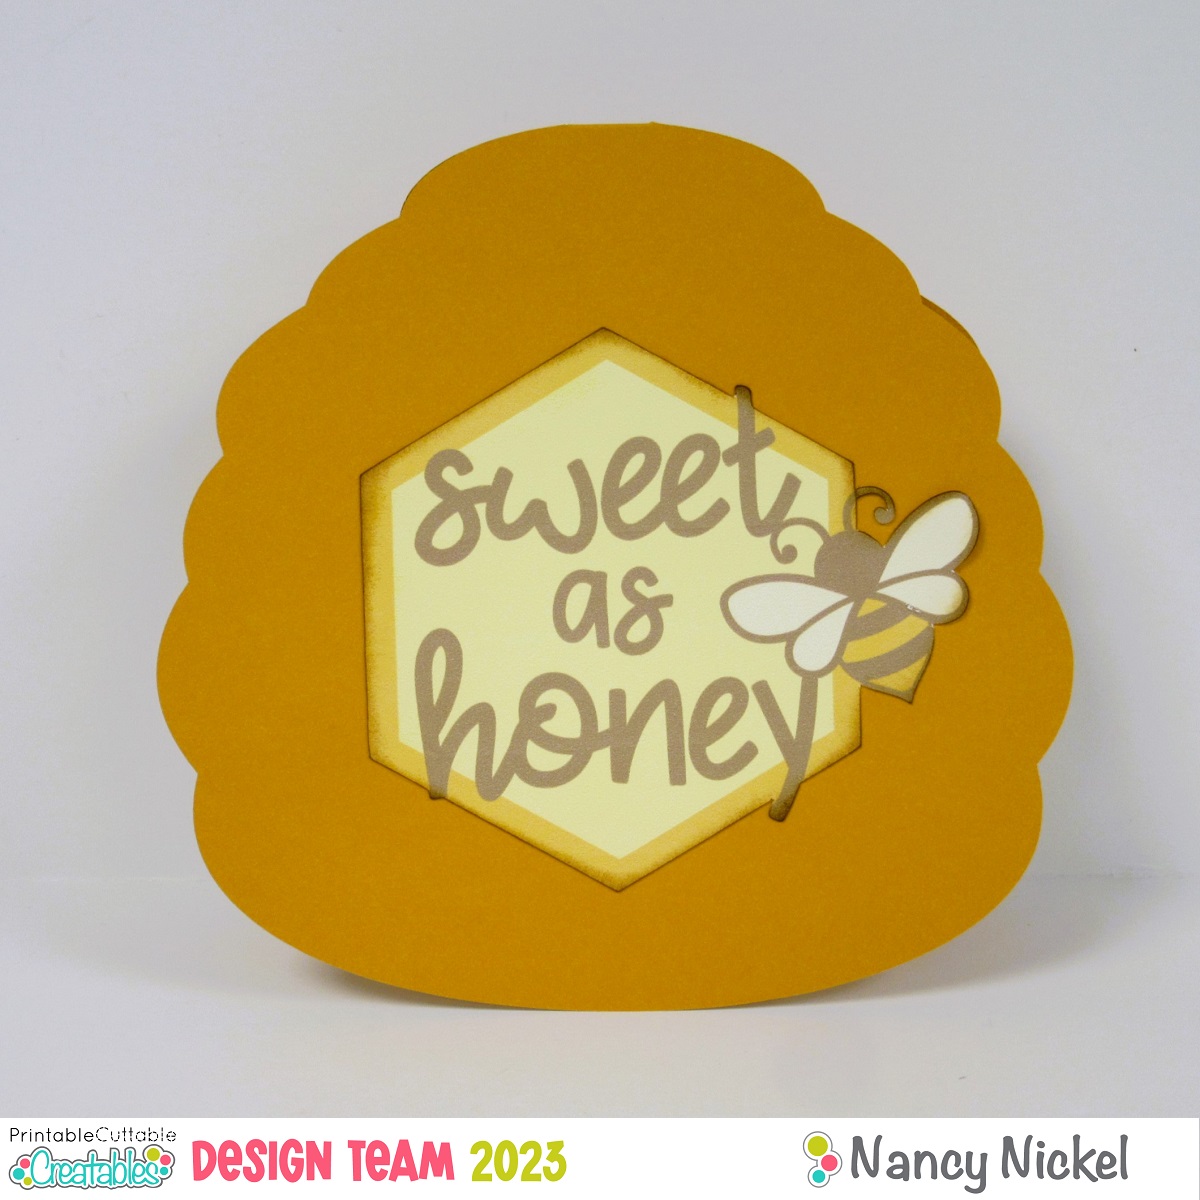
I've actually used two of these files previously on a card.
That shows the great versatility of these files.
Head on over to the shop and check out all the fun Winter files!

* * *

Use my code to get 15% off your purchase:


Printable Cuttable Creatables Products Used:
Other Materials Used:
Cricut Explore Air Machine;
Textured Cardstock:
Unknown Rhinestones and Bling.

* * *

Thanks for stopping by today!
I'll be back soon with another fun project!

* * * * *

Here are all the links for you:

Printable Cuttable Creatables Shop

Printable Cuttable Creatables Blog

Printable Cuttable Creatables Facebook     

Sunday, 8 December 2024

Have a Tag Party using Printable Cuttable Creatables

         Hello, my friends!

It's time for a new project share for Printable Cuttable Creatables!

This time of year we all need some tags for our packages, right?
We also need some fun projects that we can do with the kids,
or something fun to do while spending time with friends and family. 
This idea fills both of those requirements!

Here's what I made:


Isn't that a fun assortment of tags?
They were so much fun to make!

I started with printing some lovely papers from the Christmas Treats SVG Scrap Kit.
Then I used the Christmas Sentiment Gift Tags Freebie to cut out a variety of tags.
The bonus with this file is that you then have the cut-out words to use on another tag.


Then I used the Christmas Gift Tags Free SVG File to cut out an assortment of green tags.
Again, the cut-out bits can be used on another tag.


Finally, I went through a pile of scraps on my table and cut a variety of plain cardstock tags.
These are all different sizes of rectangles with the corners snipped off.


Once I had a really good assortment of tags, I went back to the Christmas Treats SVG Scrap Kit.
I chose all the little clipart bits I wanted, and sized them to fit my tags. 
I then used the Print/Cut feature in Cricut Design Space to cut out all the fun images.
The kids would love to be involved in choosing their favorite images.


Now that you have all the pieces ready, it's time to have fun putting them together.

Here's a closer look at some ideas for you:


You can get as simple or as elaborate as you want with this step.
I used only glue and a black fine tip marker.
You could get much fancier with ink, glitter, bling, etc.
Finally, to finish them all off, I punched a hole in the top and added ribbon or twine.


The backs of the tags are free space for writing a personal message,
or adding a To/From stamp. 

This is just a fun Pre-Christmas project idea!
Get an item crossed off your to do list while making some fun memories of time spent together!

* * *

Use my code to get 15% off your purchase:


* * *

Printable Cuttable Creatables Products Used:
Other Materials Used:
Recollections Cardstock;
Black Pigma Pen;
Offray Ribbon;
Baker's Twine.

* * *

Thanks for stopping by today!
I'll be back soon with another fun project!

* * * * *

Here are all the links for you:

Printable Cuttable Creatables Shop

Printable Cuttable Creatables Blog

Printable Cuttable Creatables Facebook     

Wednesday, 13 November 2024

Buzzing In with Dr Digi's

 Hello, my friends!

I'm very happy to be sharing a second project as Guest Design Team member for
Dr. Digi's House of Stamps!

If you're not familiar with Dr Digi's, it's an online shop that carries a wonderful - and fun -
assortment of digital images, papers, and sentiments. They also carry some fabulous cutting files!

Today I have combined a digital background paper,
along with two fabulous cutting files.

Here's my card:


Isn't that bee fabulous?!
I think it is my favorite cut file EVER!
It is so intricate and detailed!

I actually began by cutting my card base, using the shape feature in Design Space.
Top to bottom it measures 5 1/2 inches.
I printed the background paper out, and then cut it to mat on the card base.
Knowing I would just be using pieces of the honeycomb cut, I sized that at 6" square.
Once those pieces were all assembled, I measured the space left,
and sized my bee to fill it.


When the bee was adhered in place I did just a little embellishing.
I added big drops of Glossy Accents for the buggy eyes of the bee.
Then I used the Spectrum Noir Shimmer Marker to fill in the wings.


I have thoroughly enjoyed working with these fabulous products!
Big thanks to Dr. Digi for having me as a Guest DT!

* * *

Dr.Digi's Files Used:

Distressed Drops Backing Paper;

Honeycomb Stencil SVG File;

Bumble Bee Decal SVG File.

Other Materials Used:
Cricut Explore Air Machine;
Recollections Cardstock:
Ranger Glossy Accents;
Spectrum Noir Shimmer Pen.

* * *

Thanks for stopping by today!
I'll be back to share another fun project very soon!

* * *

Dr. Digi's Links:

Dr. Digi's House of Stamps Shop

Dr. Digi's House of Stamps Facebook

Dr. Digis House of Stamps Instagram

Tuesday, 23 July 2024

Fun Summer Card Inspiration for Printable Cuttable Creatables

        Hello, my friends!

It's time for a new project share for Printable Cuttable Creatables!

 I had so much fun making this card!
I used cut files only - no "print then cut" this time!

I have used:

Rolling Waves Background Stencil SVG File, 

and Seagull on Pier SVG Cutting File and Clipart.


Here's my project:


I began by resizing the stencil cut to fit my 5 1/2" square card base.
This is a wonderful file for making an actual stencil to use with ink or sprays.
However, I chose to use mine for a background.


I then cut out the pieces for the seagull on the pier file option.
There are so many fun options with this file!


The pier post itself has a bottom and top layer. 
I cut 3 bottom layers to add some extra dimension to my post.
The file includes two layered cuts for some rope around the post.
Instead, I tied some string on my post.
It adds some nice texture and dimension.
I adhered my post in place on my card front.
After assembling the seagull, I adhered him in position using foam tape.


I always have a little chuckle over birds on posts!
Whether it's in the middle of the ocean, on a lake,
or even in the middle of our river;
if there's something poking out of the water,
there is always a bird resting on the top of it! 

That was my inspiration for this card! :o)

Use my code to get 15% off your purchase:


Printable Cuttable Creatable Products Used:
Other Materials Used:
Cricut Explore Air Machine;
Recollections Cardstock;
Walnut Stain Distress Ink;
Piece of String.
 

* * *

Thanks for stopping by today!
I'll be back soon with another fun project!

* * * * *

Here are all the links for you:

Printable Cuttable Creatables Shop

Printable Cuttable Creatables Blog

Printable Cuttable Creatables Facebook      

Thursday, 22 June 2023

Another Shaped Bee Card for Printable Cuttable Creatables

         Hello, my friends!

It's time for another fun project for Printable Cuttable Creatables!
Sadly, this will be my final post as a Design Team member.
I've made the tough decision to step down from the team.
I'd like to thank Kristin, and the rest of the DT, for all the fun!
It's been a fabulous year!

For my final project, I have created another shaped card.
If you missed my tutorial on how I make the shaped card base,
you can find it HERE.

Again, I have used:

Honey Bee SVG Collection 

Here's my card:


I began by making my shaped card base.
I then used the same shape to size another layer slightly smaller.
I then combined one of the papers from the collection with the shape.
This gave me the printed layer for the background.


The wreath element is so pretty!
I used the "print then cut" for that element. I inked all the edges and adhered it in place.
I curled the leaves and wings up, then added some glitter glue for some sparkle.
Although this is a flat piece, it has lots of dimension.


Here is the inside of the card:


I simply used the "print then cut" option with another fun element,
and adhered it in place.


This is such a fun collection to play with!
It includes a wonderful variety of papers and elements.
The creative possibilities are endless! :o)

* * *

Printable Cuttable Creatable Products Used:
Other Materials Used:
Cricut Explore Air Machine;
DCWV Textured Cardstock;
Glitter Glue - Brown and Clear;
Walnut Stain Distress Ink.
 
* * *

Thanks for stopping by today!
I'll be back soon with another fun project!

* * * * *

Here are all the links for you:

Printable Cuttable Creatables Shop

Printable Cuttable Creatables Blog

Printable Cuttable Creatables Facebook     

Tuesday, 6 June 2023

Making a Shaped Card for Printable Cuttable Creatables

        Hello, my friends!

I know things have been a little quiet around here lately,
but today I'm happy to share a new project for Printable Cuttable Creatables!

I'm going to share how I use these great cut files,
along with Cricut Design Space, to make a fun shaped card!
I've got lots of photos for you, as I took some screen shots along the way.

I have used:

Honey Bee SVG Collection 

Here's my card:


I think shaped cards are so much fun to make.
I began by choosing my shape...in this case it was the fun hive.


I imported it into Cricut Design Space,
as both a print then cut file, and a cut file.


Here I have changed the color of the cut file to the cardstock color I will use. 
Since my hive is sized to 5.5" tall, I size the shape to 5.75" tall.


I then move the hive out of the way, and duplicate the shape.
One is the front of the card, and the other is the back of the card.
Just in case the shape is not totally symmetrical, I give it a flip.
This ensures that the edges of the card will match perfectly when folded.


Next, I decide where I will attach my front and back.
I decide to attach them at the top.
I rotate the shapes to do this, so I could get everything in frame.


I then position the shapes so they are just touching at the top,
where I want them to be hinges.


I then highlight both shapes, and click on "Combine".
You'll find this in the bottom right corner.
I list of options pop up, and I choose "Weld".


...and just like that the pieces are connected.
Simply score the hinge, and you have a really fun shaped card!


All the other elements I used were done with the "print then cut" option.
Once they were cut, I inked the edges and adhered them to the card base.


To finish things off, I added some glitter glue to the bee wings,
and a little drop to the antennae.

I then added another printed and cut element to the inside of the card!


It's so easy to make fun shaped cards using these simple steps.
Take a look through the shop and see what inspires you to make one!
Have fun!

* * *

Printable Cuttable Creatable Products Used:
Other Materials Used:
Cricut Explore Air Machine;
DCWV Textured Cardstock;
Glitter Glue - Brown and Clear;
Walnut Stain Distress Ink.
 
* * *

Thanks for stopping by today!
I'll be back soon with another fun project!

* * * * *

Here are all the links for you:

Printable Cuttable Creatables Shop

Printable Cuttable Creatables Blog

Printable Cuttable Creatables Facebook     

Monday, 22 May 2023

Printables Cuttables Creatables Design Team Blog Hop!

        Hello, my friends!

Welcome to the Design Team Blog Hop for Printable Cuttable Creatables!


You know the drill!
Hop around to check out all the fun projects.
Leave a comment on each one to be eligible for the prize!
Don't worry - there are only a few! :o)

 Here's the entire list for you:

Printable Cuttable Creatables Blog

Morena

Nancy 

Kris

Ellen

Shalon
 

* * *
Also, this week Printable Cuttable Creatables is Celebrating it's 8th Birthday! 
ALL Designs and Commercial Licenses are on sale for 50% OFF!
WOOHOO! 

I think that's all the business news!

* * *

Now, let's move on to my project!

This is a fun little mini album that would be perfect to document 
the birthday of a little princess.
I began by making a white cardstock album base. 
I then printed out the pages I wanted from the Fairy Tale Princess Digital Paper Pack.
I cut them to fit my pages and adhered them in place.


I used the Birthday Princess Free SVG File for the title on my front cover.
I also added the castle.


and chose all the elements I wanted to use.
I imported them into Cricut Design Space and sized them to fit.
I then used the print/cut feature for all the resized elements.


Then it was just a matter of inking the edges
and adhering them to the pages. 


I added pockets to a couple of the pages, and cut some tags to fit into them.
Most of the elements are only partially adhered.
This means that photos or journaling cards can be tucked in behind them.


Since all the elements are from the same kit,
everything coordinates beautifully. 


I took time and care in cutting the pockets, so the design is seamless.
When the pages were all finished,
I went through and added some pretty touches of glitter glue.


Finally, I tied wrapped some sparkly ribbons around the spine,
and tied them in a pretty bow!

You can find a Prince Collection in the shop HERE.

There are so many wonderful collections in the shop!
They're ideal for fun little mini albums!

* * *

Printable Cuttable Creatable Products Used:
Other Materials Used:
Cricut Explore Air Machine;
Recollections Cardstock;
Glitter Glue;
Celebrate It Ribbon.

* * *

Thanks for stopping by today!
I'll be back soon with another fun project!

* * * * *

Here are all the links for you:

Printable Cuttable Creatables Shop

Printable Cuttable Creatables Blog

Printable Cuttable Creatables Facebook     

Sunday, 7 May 2023

Welcome Spring with Printable Cuttable Creatables

       Hello, my friends!

It's time for a new project share for Printable Cuttable Creatables!

I decided it was time to begin a Spring themed 8 x 8 album.
Today I am sharing the title page that I have created for that album,
using a combination of fun cut files from the shop.

I have used:

Welcome Spring Banner,
(free file)

Birds and Branches SVG Files,

and Pretty Bird House SVG File.


Here's my project:


I really had fun putting all these little cut bits together!
In real life my background paper is a light green.
For some reason it shows more turquoise in my photos,
and the bird and birdhouse are seeming to blend in.

Here's a closer look at the banner:


Here's a closer look at the bird on the branch, and the birdhouse:


Aren't all the little flowers adorable?
They add such a lovely dimension to the page.
Of course, I had to go in and add a little sparkle with the rhinestone centers. 


Individually, each of these files would make a great project.
However, they really work beautifully when all combined on the same page!


Printable Cuttable Creatable Products Used:
Other Materials Used:
Recollections Cardstock;
Unknown Mini Rhinestones.

* * *

Thanks for stopping by today!
I'll be back soon with another fun project!

* * * * *

Here are all the links for you:

Printable Cuttable Creatables Shop

Printable Cuttable Creatables Blog

Printable Cuttable Creatables Facebook     

Thursday, 23 March 2023

Happy Easter with Printable Cuttable Creatables

      Hello, my friends!

It's time for another Easter project for Printable Cuttable Creatables!

This time I've used a wonderful SVG file to make a fun Home Decor item for Easter.
I have a cute stand that I use to display things like this,
and change them up for the season.
 
I have used:

Happy Easter Digital Paper Pack;

Woven Easter Basket SVG and Clipart;

and Scroll Banners SVG.

Here's my project:


Isn't that a sweet file?
It was so much fun to put together,
and there's nothing better than a pastel plaid background!


The basket file does include a lovely little bow to add to the basket handle.
However, when I saw the fabulous banner file I just had to use it!
There are SO MANY banner options included!
It was easy to pick one that fit perfectly on my project!


My finished project measures eight inches square.
The basket weave is so intricate and delicate but cut like a dream!

I used some alphabet stamps from my stash to add the "happy easter" to the banner.
Unfortunately, the capital letters I had were too big to fit. ;o)


This project will be lovely displayed in my stand for the Easter Season! 

* * *

Printable Cuttable Creatable Products Used:
Other Materials Used:
Cricut Explore Air Machine;
Recollections Cardstock;
American Crafts Cardstock;
Unknown Alphabet Stamps;
Memento Tuxedo Black Ink.

* * *

Thanks for stopping by today!
I'll be back soon with another fun project!

* * * * *

Here are all the links for you:

Printable Cuttable Creatables Shop

Printable Cuttable Creatables Blog

Printable Cuttable Creatables Facebook     

Blog Archive