Showing posts with label Layout. Show all posts

Thursday, 19 December 2024

Snow Day Layout for Printable Cuttable Creatables

   Hello, my friends!

It's time for a new project share for Printable Cuttable Creatables!
This is my last project as DT for PCC,
although you will see more projects using these fun files.

I haven't made a 12 x 12 layout for a while, 
and when I saw these Winter photos on my desk, I was inspired!
 
There are so many fabulous Winter themed files in the shop!
I used two of my favorite, and then added a fun title. 

I have used:

Happy Snowman Looking Up SVG File;

Snowflake Circle Frame SVG File;

Snow Day Free SVG File.

Here's my project:


This was lots of fun to put together.
The photos are some that I took from our yard and on a winter walk.


The title and photos were adhered in place using foam tape.
Once everything was added in place to the page,
I went over the title and the snowman with very sparkly glitter glue.


Finally, to finish it all off,
I added rhinestones and bling to the snowflakes,
and randomly around the page.


I've actually used two of these files previously on a card.
That shows the great versatility of these files.
Head on over to the shop and check out all the fun Winter files!

* * *

Use my code to get 15% off your purchase:


Printable Cuttable Creatables Products Used:
Other Materials Used:
Cricut Explore Air Machine;
Textured Cardstock:
Unknown Rhinestones and Bling.

* * *

Thanks for stopping by today!
I'll be back soon with another fun project!

* * * * *

Here are all the links for you:

Printable Cuttable Creatables Shop

Printable Cuttable Creatables Blog

Printable Cuttable Creatables Facebook     

Sunday, 11 August 2024

Nature in Bloom Layout with Printable Cuttable Creatables

         Hello, my friends!

It's time for a new project share for Printable Cuttable Creatables!

I had an entirely different project in mind when I began.
I had recently printed out a page of flower photos that I had taken in my yard,
and found it lying on my desk. It inspired this layout.
I haven't done a layout in a long time, and this file was so much fun to play with!

I also want to share a couple of simple tips with you

I have used:

Nature in Bloom Embellishment Set

Here's my finished layout:


 This file is fabulous, and includes MANY different pieces and layers. 
My first tip for you is this: you don't have to use them ALL.
The purpose of this layout is to feature my flower photos.
That means that the embellishments are second, and cone be done more simply.
I opted to use only one fence layer, and I limited the number of flower layers too.
Rather than using the full word title embellishment,
I added only the words across the top of my page.


When I play with flower/grass/leaf cuts, I really like to add dimension to them.
I do this by curling up all the petals and fronds.
You might think that there is no point in doing this on a layout.
Once it's slipped into a sleeve, everything gets flattened. 
My second tip for you today is this: add something to the page that will prevent the flattening.

You can see some of the dimension on my page in the photo below.
I even curved the gate latch.
Now look at the center of the flowers. I added great big pearls.
Now the plastic sleeve will rest on the pearls, and not flatten all the curled pieces.


Although I used only some of the cuts in this file,
they do a wonderful job of showcasing my flower photos,


I hope that gives you some fun ideas of what to do with this collection!
It contains some intricate design details that can be used over and over again!

* * * * *

Use my code to get 15% off your purchase:


* * * * *

Printable Cuttable Creatable Products Used:
Other Materials Used:
Cricut Explore Air Machine;
Assorted Cardstocks;
Unknown Pearls.

* * *

Thanks for stopping by today!
I'll be back soon with another fun project!

* * * * *

Here are all the links for you:

Printable Cuttable Creatables Shop

Printable Cuttable Creatables Blog

Printable Cuttable Creatables Facebook     

Thursday, 27 May 2021

BLOOM Layout

  Hello, my friends!

Today I have a fun new project for Kate Hadfield Designs.

I've used fabulous Tape Runner adhesive on all the fun doodles.

I haven't made a layout for quite some time.
These pretty Art Joodle doodles inspired this one.
They were the perfect accompaniment to this pretty photo of flowers.
The retractable tape runner just right to adhere everything in place.

Here's my page:


Since these doodles from Kate Hadfield Designs are all digital,
they work beautifully for any digital work you want to do.
However, I just have too much fun with my fussy cutting.
So I print out what I want and fussy cut everything out.


The corner flowers were adhered with some foam tape.
All other pieces were adhered with the Tape Runner.


To finish everything off,
I added some white crystal drops around the page.


Here's a closer look at the pretty flower picture.
The joodles for a perfect frame to show it off.


 Kate Hadfield Designs Used:


Tape Runner Products Used:

BGT-2088 Value Pack Tape Runner 

* * * * *

Thanks so much for stopping in today!
You'll be seeing lots more posts with these products combined!

* * * * *

Here are all the links:

Kate Hadfield Designs Shop

Kate Hadfield Blog

Kate Hadfield Facebook


* * * * *

Tape Runner:

Tape Runner Shop

Tape Runner Facebook

Tape Runner on Amazon


Monday, 22 March 2021

Kate Hadfield Designs - Easter Memories

   Hello, my friends!

Today I have a fun new project for Kate Hadfield Designs,

It's hard to believe that Easter is already less than two weeks away. 
I was reminiscing with my husband the other day,
and that is how this "Easter Memories" page came about. 

This is another page for my 8 x 8 memory album.
I have left a spot open to slip my journaling behind the page.

Here's my page


When I was a little girl, I always got a new Easter dress to wear to church.
When I was about 5 or 6, I got a pretty yellow dress with ruffles.
I also got a special Easter bonnet that year.
It was a white straw hat with a pretty blue ribbon. 
I was so thrilled with my special Easter outfit.
I actually still have the little hat! ;o)


The background was my first foray into a photo editing program.
First I inserted one of the papers from the Painted Pretties Papers,
as my background.
Then I added the title using the Spiral Bound Alpha.
Finally, I printed it out.
As someone who is used to printing and fussy cutting everything,
this was a big change...a fun change.


Here's a closer look at the image. 
This is one of the sweet digital stamps from Egg Hunters Stamps.
Since I saw this image right after my reminiscing,
I just had to colour her up in my Easter outfit! :o)
Here's one final look at the page.
I really like the texture of the beautiful background,
and the memories the image brings to mind.


Kate Hadfield Designs Products Used:

Painted Pretties Papers,

Spiral Bound Alpha,

Egg Hunters Stamps.

Other Materials Used:
Spectrum Noir Markers.

* * * * *

Thank you so much for stopping by! 
I'll be back very soon with more creative fun!

* * * * *

Here are all the links:

Kate Hadfield Designs Shop

Kate Hadfield Blog

Kate Hadfield Facebook

Monday, 8 March 2021

Kate Hadfield Designs - Our Guinea Pig Page

   Hello, my friends!

Today I have a fun new project for Kate Hadfield Designs,

Last month Kate released a really fun new collection of pet themed doodles.
I was so excited to see a Guinea Pig in the collection,
and it just happened to resemble the pet we had when I was a child. 

I made a really cute memory page for my 8 x 8 album.

I started with a base of white cardstock.
Then I added the pretty yellow page from Sketchbook Pages 1.
I used Print/Cut in Cricut Design Space to cut out all the fun elements from:


The title was done using the Summer Camp Alphabet.
About the title...our sweet Guinea Pig's name was "Guinea"! lol
One of my brothers must have come up with the name.
I'd like to think I would come up with something a bit more creative! ;o)

I was hoping to find a good photo to feature in the layout.
I only managed to find some small old photos,
of questionable quality! 

I copied the photos and fussy cut Guinea out of them.
His cage was actually just like the one from the collection
but it didn't have legs and just sat on the floor.
I was going to cut the legs off but decided to keep them to position Guinea against it.
In the actual photo Guinea was propped against the trunk of the Christmas tree.

This was such a fun page to put together,
and it brought back some sweet memories too! 

* * * 

Kate Hadfield Products Used:

My Kinda Pet,

Pet shop,

Summer Camp Alphabet,

Sketchbook Pages 1,

Art Joodles: Mixed Bag 3.

* * * * *

Thanks for stopping by today!
I'll be back with more fun doodle project soon!

* * * * *

Here are all the links:

Kate Hadfield Designs Shop

Kate Hadfield Blog

Kate Hadfield Facebook

Thursday, 30 January 2020

Southern Ridge Trading Company - Loveable Layout

Hello, my friends!

I have a fun new post for Southern Ridge Trading Company!

 After yesterdays break from the theme,
I'm back today with another sweet Valentine project!

Most of you know that I always have several 8 X 8 Albums going. 
Some are seasonal, like the Winter one I shared last month. 
Some are filled with assorted pages that I've been inspired to make.
This is one of those pages.

It was the beautiful Abstract Heart Frames,
from Southern Ridge Trading Company,
that inspired this page.


I started by gathering all my supplies.


I dabbed the heart chipboard frames with embossing ink,
sprinkled them with the embossing enamel, and heat set. 
I repeated the process using the pink embossing powder,
on the "Loveable" and the three little hearts. 


I laid the smaller heart frame onto an old photo of my daughters.
This was taken back in the day...when they were still "Loveable"! lol
 Using my blade, I cut the photo to fit the frame. 
If you don't like using a blade, just draw around the frame, 
and cut out with scissors. 


Here's a close-up of the intricate frame, and the sparkly enamel. 
The "Loveable" is so shiny and pink!


 I adhered the 6" decorative paper to the center of the 8" cardstock base.
I adhered the large frame in place first, and then added the word in place.
Next, I added foam tape to the back of the framed photo,
and adhered it in place.
Finally, I added the three little hearts to the page.


I know that the word and little hearts would have shown up
much more clearly on the first paper I had chosen.
However, I really wanted something more whimsical and pretty.
So that's why I decided to go with this paper!


Southern Ridge Trading Company Products:


Other Materials Used:
  Recollections - Cardstock, Bo Bunny - Crazy Love;
Stampendous Embossing Ink;
Stampendous Shabby Pink Embossing Enamel;
Glitters Galore Shabby Pink Embossing Powder;
ScraPerfect Best Glue Ever and No Clog Writing Cap.

* * * * *
Thanks so much for stopping in today!
I'll have another project share for you in very soon!

* * * * *
In the meantime, here are all the links for you:


Wednesday, 5 June 2019

Passport To Summer Blog Hop

Hello, my friends!

Welcome to our Passport To Summper Blog Hop for Taylormadecards4u!

Today is the release of three special Passport Kits:

Passport to Paris,
Passport to London
and Passport to New York.

Each member of the Design Team has created a project with one of the Passport Kits.
You have a chance to win one of the great kits!
All you have to do is leave a comment!
Then head over to the shop and leave a comment there.
Monica is giving away a $15 gift certificate to her digitals!

Also, there is a Special Promotion on the entire Passport Kit Category.
Use the Promotion Code PPKPROMO to get 3 Kits for only $11!
That gives you your third kit for free! :o) 

* * * * *

Okay, with all that fun business out of the way, 
let's move on to my project. 

I had the pleasure of using the Passport to Paris Kit:


Here's the layout I created:

Originally, I had different photos in mind for this layout. 
Then the fire happened at the Notre Dame Cathedral,
so I thought these photos would be more appropriate.
I took these photos when I was in Paris 4 years ago.
I also have some beautiful photos of the interior of the cathedral,
and of the gorgeous ceiling,
but these photos were perfect with the coloring of the kit.


I distressed all the edges of the papers with both tool and ink.
I added stenciling to the peach colored background cardstock,
using the Mini Carte Postale Stencil from TCW.


Then I added some fun stamping around the page,
using the gorgeous Vintage Paris stamp set from Cavallini.
There's even a Notre Dame Cathedral stamp.


I punched a hole in this tag and added some string.
I added a date stamp, and wrote in the date.
I had the month and year but was going to check on the day,
so I'll add that when I know it.


The elements in this kit made it so easy to put this page together.
There was lots more that I didn't add too!

What will you create if you win the Passport to Paris?
Leave a comment and you might be the one to win it!

Here's the complete list for you: 
 Monica Taylor
You are here >Nancy Nickel<You are here Robin Sizemore Wendy Chapman Bellino
Robin Francini
Jeanie Ellis
Alina Florea
* * * * * Thanks so much for hopping along with us! You have until June 12th to complete the hop and to qualify for the prize draw! Have fun and be inspired! :o)

Saturday, 26 January 2019

Mirtillamente Craft Shop - Freezing Season Layout

Hello, my friends!

Today I have a Winter layout to share with you for Mirtillamente Craft Shop.
(The shop is closed for inventory just now)

 I wanted to play with this photo of a beautiful Blue Jay. 
He is a regular visitor to my back yard. 
He is VERY noisy, and always lets me know when he is there! 

I call this my Freezing Season Layout:


Here is how I created it:

I began by gathering a navy cardstock for my background base. 
I then used two Dylusions stencils (Let It Snow and Small Bubbles) 
and Prima art extra vagance Snowflake Paste.


I stenciled my snowy design, and then set it aside to dry.
 When it was dry, it resembled snow beautifully!


Next, I cut a mat for my photo from white cardstock, 
and I cut several strips from the Les Papiers de Padore - Weeeek-end! paper. 
I also punched several circles from white cardstock using my 1/2", 1", and 1 1/4" circle punches. 
These will be my snowballs.


This photo shows how I assembled all these pieces. 
I first distressed all the edges with a distressing tool. 
I began with matting the photo. 
Then I added a strip of paper to the top, and a smaller strip to the bottom. 
I then adhered it to the background using foam tape. 
I then added a longer strip of the paper along the bottom of the page. 
I then added a variety of the "snowballs" randomly around the page.


Finally, I added some fun stickers from the 
Echo Park - I Love Winter 12 x 12 Sticker Sheet. 


Here's a closer look at the photo, 
and the embellishments surrounding it:


Here's the bottom of the page:


The top right corner: 


Here you can see some of the dimension the foam tape adds:


The paste also adds wonderful texture:


Here's one final look at the finished page:


Thanks so much for stopping by today! 
May you enJOY happy Winter days!


* * * * *
Here are all the links for you:


!

Thursday, 14 June 2018

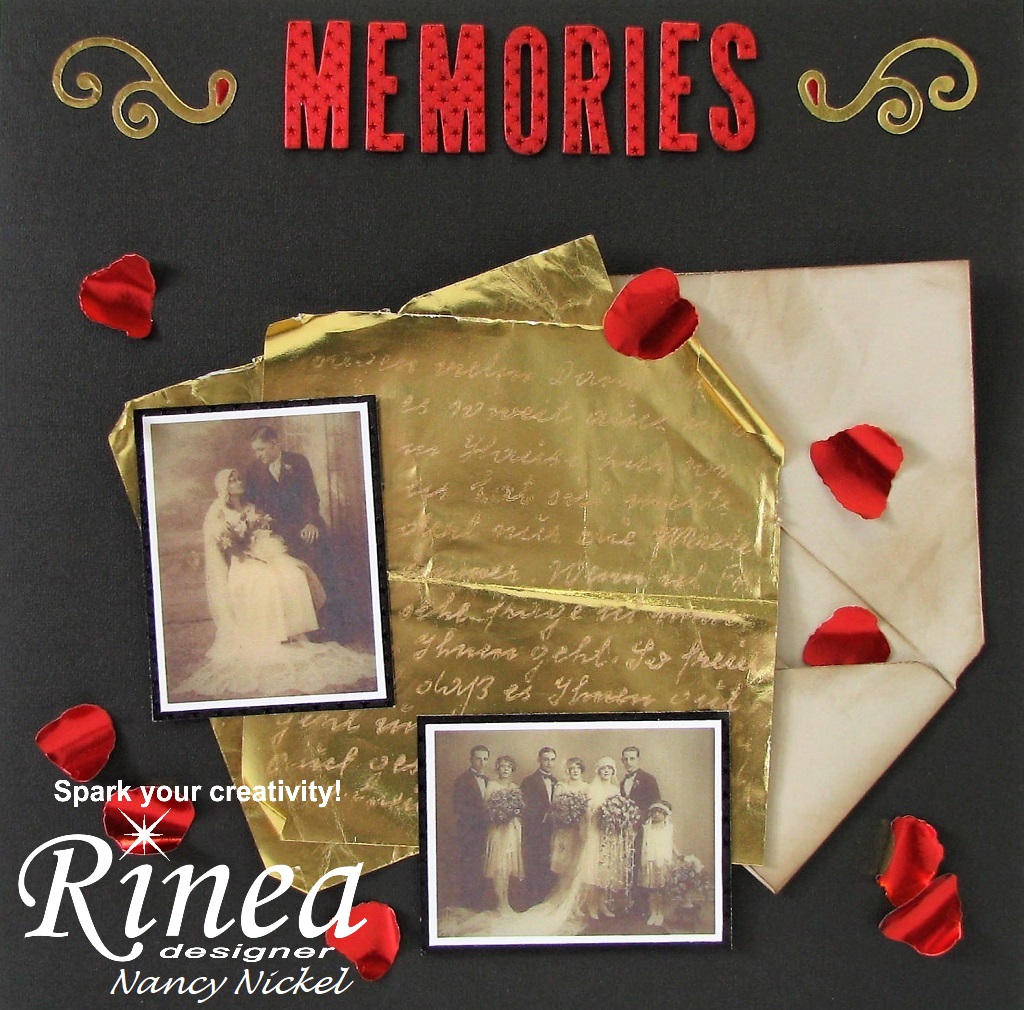
Rinea - Vintage Memories Layout

Hello, my friends!

I'm so excited to be sharing my first DT post for Rinea

From the first time I saw these fabulous foiled papers...
I found them absolutely fascinating!
They just happened to be having a DT Call, 
so I immediately applied, and here I am with my first project share!

I was so excited to play with all the products, and see what they could do! 
So I tried a few techniques in my first layout.

I began with the beautiful Magical Foiled Paper Variety Pack.

Here's what I made: 


Isn't all the foiled paper gorgeous?
I began with a 12 X 12 black cardstock base.

First, I took two 6 X 6 pieces of the Gold/Gold Glossy Foiled Paper.
Using the Ghost Ink, I stamped the Oma's Postcard Stamp on the center of each piece.
This video HERE shows you exactly how it works!
It is so cool!


Since I wanted these pieces to look like old letters,
I played with them until they did. 
I used a distressing tool on some of the edges, 
I did a little tearing, crumpling, folding and curling!
Now they look like old letters that have been read over and over again, right?
Folded in half they would measure 3 X 6, 
so I created a 3 x 6 envelope out of cardstock. 
I wanted it to look aged too, so I inked it and crumpled it.


I positioned the letter pieces in place on my page,
and tucked the envelope in place underneath them.
What else would be tucked in with an old love letter?
Rose petals, of course!
I die-cut a large and medium rose from the Ruby/Gold Glossy Foiled Paper
I cut the petals apart, and curled them up with my fingers. 
This foiled paper holds the shape beautifully. 
I scattered them on the page, and glued them in place. 


For the title of my page, I die-cut "MEMORIES" out of chipboard.
I die-cut it again out of the Ruby/Ruby Starstruck Foiled Paper.
I added two die-cut swirls from the Ruby/Gold Glossy Foiled Paper.

 One final thing found in an old love letter, along with rose petals,
would be old photos, right?
So I found these vintage wedding photos that fit the page perfectly.
I printed them out and matted them with the Ebony/Ebony Starstruck Foiled Paper.
I adhered the matted photos in place with foam tape, to lift them off the page a bit.


Here's one final look at the finished page:

Other Materials Used:
Papers: American Crafts, Recollections - Cardstock;
Dies: Sizzix - Scribbles Swirls, Tim Holtz - Alphabet,
Spellbinders Tammy Tutterow - Shabby Posies;
Ink: Distress Ink - Walnut Stain;

* * * * *

Don't these Rinea Foiled Papers look fantastic?
Are you as fascinated by them as I was? 
They really are as wonderful and fun as they look!
I can't wait to share more with you!

Head over to the shop and take a look at all the options.
There are so many gorgeous colors!
There are also MANY different options as far as sizes and quantities.
Don't forget to check out the beautiful inspiration from the rest of the DT!

* * * * *

Here are the links for you:


Blog Archive