Showing posts with label Foiled Paper. Show all posts

Friday, 17 April 2020

Rinea Tutorial - Shooting Star Skyline Card

Hello, my friends!

Today I have a new tutorial for Rinea.
It's another great collaboration post with Poppystamps!


I have combined the wonderful foiled paper
with two great dies from Poppystamps!

Here's my card:


Here's What I Used:


Materials Used:
Poppystamps - Shooting Star Craft Die;
Poppystamps - Townhouses Craft Die;
White A2 Card Base.

 Here's How:


1. Cut a piece of the Sapphire/Gold Glossy Foiled Paper to 4 1/4" x 5 1/2". Adhere it to the front of the card base.
2. Since I wanted all my little houses to be in a variety of different colors, I reached for my Assorted Foiled Papers - Misfits Pack. I die-cut the Townhouses die from multiple colors, in both Starstruck and Glossy foiled papers. 
3. I added some small pieces of the Gold/Gold Glossy Foiled Paper behind some of the windows, so it appears that the lights are on. 
4. After assembling all my little houses, I adhered them along the bottom of my card front. 


5. Die-cut the Shooting Star from the Gold/Gold Glossy Foiled Paper.
6. Adhere the Shooting Star to the night sky above the house skyline. 


  This was such a fun card to put together!
The dies are so intricate and cut beautifully!
As always, the foiled papers just make it special!


Thanks so much for stopping by today!
I'll be back with some new inspiration soon!
* * * * *

Here are all the links for you:


Friday, 3 April 2020

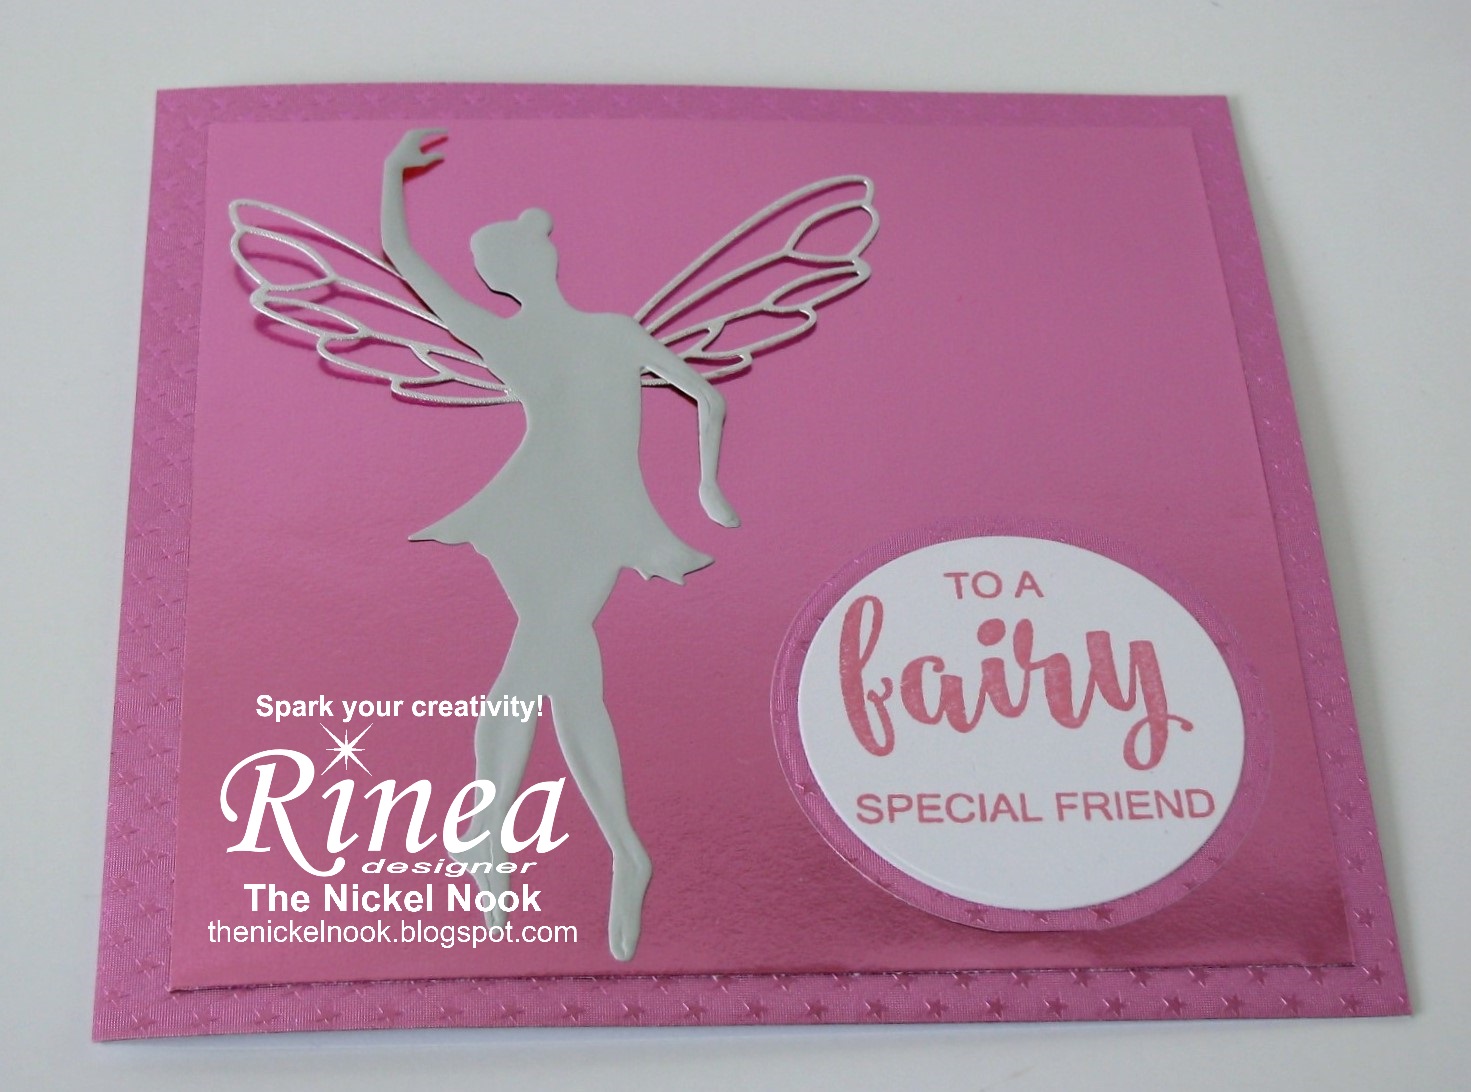
Rinea Tutorial - Fairy Special Friend Card

Hello, my friends!

Today I have a fun tutorial for Rinea.
This month we are enjoying a wonderful collaboration with Poppystamps!


I'm going to show you how to make this fun fairy card,
using these fabulous foiled papers,
along with a stamp and die from Poppystamps!
I'm also introducing the fabulous new Arctic Foiled Paper.
It's just been released...and it's fantastic!


Here's what I used:


Materials Used:
Poppystamps - Fairy Die;
White Card Base - 5 1/2 x 5 1/2;
Small piece of White Cardstock;
Pink Ink;
Circle Die or Punch.

Here's How:

1. Cut a piece of the Blush/Blush Starstruck Foiled Paper to 5 1/2" square. Adhere to the card base.
2. Cut a piece of the Blush/Gold Glossy Foiled Paper to a 5" square. Adhere to the center of the foiled card base.


3. Die-cut the fairy from the Arctic foiled paper.
4. Die-cut the fairy wings from the Silver/Silver Starstruck Foiled Paper. 


5. Using matching pink ink, stamp the sentiment onto white cardstock. Cut out using a punch or circle die.
6. Cut or punch a circle of the Blush/Blush Starstruck Foiled Paper slightly bigger than the stamped piece. 
7. Add the sentiment circle to the center of the larger circle.


8. Adhere the fairy in place to the left side of the card front. Adhere the wings in place behind the fairy, leaving the rest of the wing free of glue. 
9. Finally, adhere the layered sentiment in place on the bottom right corner.


This is such a lovely combination of products!
The fairy is lovely in the new Arctic Foil,
and the wings are so delicate and pretty!
The stamp set offers a really great variety of sentiment options!


Thanks so much for stopping by today!
I'll be back later in the month with another fun project,
combining Rinea with Poppystamps! 
* * * * *

Here are all the links for you:


Tuesday, 17 March 2020

Rinea With Creative Embellishments - Birdhouse Branch Tag

Hello, my friends!

Today I have a fun tutorial for Rinea.
Again, this post is in collaboration with Creative Embellishments!

This time I have created a really fun Birdhouse Branch Tag,
combining fabulous foiled paper
with wonderful chipboard pieces!

Here's my tag:


Here's how I did it:


Materials Used:
Creative Embellishements - Large Tag, Branches, Bird Cage;
Brown Acrylic Paint;
Stampendous Embossing Ink;
Ranger Liquid Platinum Embossing Powder;
Brown and Green Grosgrain Ribbon.


1. I began by painting the chipboard branch, and the outside edges of the Large Tag, with brown acrylic paint.
2. I inked the birdhouse with embossing ink, liberally covered it with the embossing powder, and heat set it. 


3. Once the paint was dry, I measured and cut the Mocha/Mocha Starstruck Foiled Paper to fit the tag, and adhered it in place.
4. I cut a piece of the Jade/Jade Starstruck Foiled Paper slightly smaller, and adhered it in place on top of the Mocha. (refer to photo below)


5. Next, I adhered the branch in place on the tag, ensuring that the birdhouse would fit well under it. 
6. I adhered the birdhouse in place, ensuring the "chain" was placed on one of the branches.  


7. I cut multiple little leaves from the Jade/Jade Starstruck Foiled Paper, and adhered them on the branch leaves. I curled the leaves up to add some extra dimension.
8. Finally, I added a green ribbon loop through the hole at the top of the tag, and added a brown ribbon bow in place.


This was such a fun tag to make...and such a great combination of products!

* * * * *
Thanks so much for stopping by today!
I'll be back with more very soon!
In the meantime,
check out the Creative Embellishments Shop.
* * * * *

Here are all the links for you:


Tuesday, 3 March 2020

Rinea with Creative Embellishments - Easter Album Cover

Hello, my friends!

Today I have a fun tutorial for Rinea.
All month long, we are partnering with Creative Embellishments.
They have such incredible products in their shop!
It was so fun to combine them with Rinea foiled paper!

For my first project this month, 
I've created a pretty Easter Album Cover. 


Here's how I did it:


Materials Used:

Creative Embellishments - Junk Journal Cover 2, Easter Frame, Egg Word Set;
Purple Ink;
Stampendous Embossing Ink;
Embossing Powders - Green and Purple;
WRMK Corner Chomper;
Sticker Paper.


1. I began by inking up all the edges of the chipboard cover with purple ink. I set it aside to dry.


2. Next, I laid the Easter Frame over a piece of the Glossy Turquoise/Gold Foiled Paper. I used my craft knife to cut around the egg shape. You could also trace it with a pencil and cut it out with scissors. 
3. I then inked the frame with embossing ink, covered it with green embossing powder, and heat set it.
4. I then followed those same steps to emboss the word "Easter" in purple.


5. I cut two pieces of sticker paper to the size I wanted for the front and back covers. 
6. I rounded the corners to match the cover.
7. From the Starstruck Foiled Papers in Lavender, Jade and Turquoise, I cut multiple one inch strips.
8. I removed the backing from the sticker paper, and applied one of the strips in a pleasing angle. 
9. I continued laying down strips, alternating colors, until the sticker paper was completely covered.
10. I turned the paper over and trimmed all the excess foiled paper.
11. I cut a strip of Jade Starstruck Foiled Paper to fit the spine.


12. I adhered the front and back covers to the inked cover. I then adhered the spine strip in place.
13. I adhered the embossed frame over the Glossy Turquoise egg shape.
14. I adhered the Easter Frame in place on the cover.
15. Finally, I adhered the "Easter" in place on the egg


I can't wait to fill this pretty album with all kinds of Easter items!


* * * * *
Thanks so much for stopping by today!
I'll be back soon with another collaboration project!
In the mean time,
head over to Creative Embellishments and check it out!
* * * * *

Here are all the links for you:


Monday, 17 February 2020

Rinea - Snowman Card

Hello, my friends!

Today I have a new tutorial for Rinea.

I'm going to show you how I made this cute
Snowman Card,
using these fabulous foiled papers!

This is a good indication of what I see when I look out my window! 

I'm using the beautiful "Frosted" collection for this project.


Here's how I did it:


Materials Used in this Project:
Sizzix Let It Snow Die by Debi Potter;
White Cardstock;
Three Coordinating Rhinestones.


1. I began by cutting an A2 card base out of white cardstock.
2. I cut an A2 size piece of the Sapphire/Gold Glossy Foiled Paper, and adhered it to the card base.
3. Using the die, I cut the entire piece out of Silver/Silver Starstruck Foiled Paper (shown in photo), and another one out of the Turquoise/Turquoise Starstruck Foiled Paper (not shown).


4. I adhered the Silver piece in place on the card front. From the Turquoise cut, I took all of the bits that I wanted to use, and put them in place on the card front. It was like putting a puzzle together. I adhered the letters in place, and added the Turquoise snowflakes. 
5. Using the scrap of Blush/Blush Starstruck Foiled Paper, I die-cut just the hearts on the front of the snowmen. Then I adhered them in place on the card front. 
6. Finally, I added rhinestones to the center of the snowflakes.


These foiled papers are always perfect for a fun frosty card!


Thanks so much for stopping by today!
I'll be back soon with another fun project!

* * * * *

Here are all the links for you:


Monday, 3 February 2020

Rinea - Faceted Heart Card

Hello, my friends!

Today I have a fun tutorial for Rinea.

I'm going to show you how to make this fun 
Faceted Heart Card,
using these fabulous foiled papers!

I think this makes a really pretty Valentine card!

I'm using a couple of papers from the "Love" collection for this project.


Here's how I did it:


Materials Used in this Project:

From this Pack I used: Ruby/Ruby Starstruck Foiled Paper,
Tim Holtz Dies: Faceted Heart, and Crochet;
White Cardstock;
Strip of Gold Glitter Ribbon.


1. I began by creating a 5 1/2" square card base from the white cardstock.
2. I covered it with a 5 1/2" square, cut from the Ruby/Ruby Starstruck Foiled Paper.
3. On top of that I layered a 5" square of the Gold Glossy Foiled Paper.
4. I die-cut the Faceted Heart and the Crochet trim from the Ruby/Ruby Starstruck Foiled Paper.


5. I assembled the Faceted Heart, and adhered it to the the card.
6. I adhered the Crochet trim in place, under the heart.
7. Finally, I tied a bow from the gold glitter ribbon, and adhered it in place beneath the heart.


The intricate Crochet die cuts these foiled papers so beautifully!
It makes such a pretty card! 
I think it would be gorgeous out of any colour combination of these foiled papers!


Thanks so much for stopping by today!
I'll be back soon with another fun project!

* * * * *

Here are all the links for you:


Friday, 17 January 2020

Rinea Tutorial - Valentine Pocket Card

Hello, my friends!

Today I have a fun tutorial for Rinea.

I'm going to show you how to make this great 
Valentine Pocket Card,
using these fabulous foiled papers!

I'm using the "Love" collection for this project.


Here's how I did it:


Materials Used in this Project:

Punches: Martha Stewart - Filigree Heart, Mini Hearts,
EK Success - Arrow Border Punch;
Die: Love Word;
White Cardstock;
Ribbon: Celebrate It.


1. Using the variety of foiled papers in the variety pack, I cut out the file, as shown in the photo. I cut multiples of  a couple of them because I wasn't sure which one I would use. 
2. From the white cardstock, I cut one tag panel, and one circle.


3. I then punched the filigree heart and the mini hearts, and die-cut the "Love", all from the Fuchsia/Gold Glossy Foiled Paper in the Variety Pack. 
4. I assembled the pocket, as per the file instructions.
5. I decided to use the Blush/Gold Glossy Foiled Paper front pocket panel. I used the border punch along both long ends, and then adhered it in place. I then added the filigree heart, the "Love", and several hearts, to the front panel. The pocket is finished.


6. I used the tag cut from the Blush/Gold Glossy Foiled Paper, and the tag panel cut from the Blush/Blush Starstruck Foiled Paper. Once they were adhered together, I added the small "Love" and several mini hearts. 
7. To the back of the tag, I added the white cardstock tag panel, embellished with some more mini hearts. This offers a great spot to stamp/write your sentiment.
8. Finally, I looped a pretty ribbon through the tag hole, and added a little bow to each side. 


 Here's a closer look at the pocket detail:


These foiled papers make a lovely project extra special! :o)


Thanks so much for stopping by today!
I'll be back soon with another fun project!

* * * * *

Here are all the links for you:


Blog Archive