Showing posts with label Card. Show all posts

Wednesday, 12 November 2025

Card Series Part 2 for Crafty Critta

   Hello, my friends! 

I'm back with Part 2 of my Crafty Critta card series! 

I've created two more space themed cards, using the same products that I used in Part 1.

Again, both cards were made using one piece of foil.
The first pass through my Your Best Mate Machine adheres the foil to the Art Foil Design.
The second pass adheres the relief of the foil to the Toner Sheet I use.

Here is the first card:


These new space themed products are so much fun!
The background papers are stunning double-sided galaxy images. 

I used another one of the fabulous foil art pages.
I ran in through my Your Best Mate Machine, and the foil adhered to the space design.


Here is the second card:


On this card the foiling is the opposite of the previous piece.
I used the leftover foil, and ran it through the machine on a coloured toner sheet. 
It's hard to see the design details in the photo but they're very evident in person.

I fussy cut one of the images, and adhered it in place using foam tape.
I did the same with the foiled sentiment.
Isn't that background paper gorgeous?!


I think foiling is so much fun!
The products from Crafty Critta make it super easy to make very effective cards!

Crafty Critta Products Used:

Foil Art - T0162 Space;


* * *
Thank you for stopping by today!
I hope you come back next week to see the next two cards!

* * *

Here are all the links for you:

Crafty Critta Website

Crafty Critta Facebook

Crafty Critta Instagram 

Wednesday, 29 October 2025

Christmas Notecards for Lavender Blu Journals

  Hello, my friends!

I'm back with a fun new project for Lavender Blu Journals!

I have made a set of eight Christmas Notecards,
using only two listings from the shop.

I fell in love with the gorgeous Christmas Toile Digital Paper Pack.
There are 16 pages in the kit, and they're all beautiful.

All the sentiments used came from the wonderful Christmas Labels and Fussy Cuts Pack.
It's a full page of images - in seven different colour options.

Here's a closer look at the cards:


These would also make great tags or gift enclosures!
The variety of images and sentiments combine for multiple creative options!


Lavender Blu Journals Products Used:


* * *
Thanks for stopping by!
I'll be back soon with more fun to share!

* * *

Here are all the links for you:

Lavender Blu Designs

Lavender Blu Journals Shop

Lavender Blu Journals Facebook Page

Lavender Blu Journals Instagram

Monday, 27 October 2025

Card Series Part 1 for Crafty Critta

  Hello, my friends! 

I'm back with a new Crafty Critta post!
I'm using some of the wonderful newer products in the shop too.

Over the next several weeks I will be sharing a number of new cards with you. 
I will be sharing them two at a time, with all the product links listed below.

If you have watched my foiling video,
then you know that I can create 2 cards with each piece of foil.
The first pass through my Your Best Mate Machine adheres the foil to the Art Foil Design.
The second pass adheres the relief of the foil to the Toner Sheet I use.
This is the process I have used to create my first two cards. 

Here is the first:


The first cards are created using some of the fabulous new space themed products.
The background papers are stunning double-sided galaxy images. 
One of the pages includes all the fun fussy cut images.

They coordinate with the wonderful space themed toner art.
For this card I used this cosmic swirl toner image.
I ran in through my Your Best Mate Machine, and the foil adhered to the swirl. 


Here is the second card:


On this card the foiling is the opposite of the previous piece.
I used the leftover foil, and ran it through the machine on a coloured toner sheet. 


I fussy cut more images, and adhered them in place using foam tape.
The sentiments for both cards were foiled using the same foil. 


I think foiling is so much fun!
The products from Crafty Critta make it super easy to make very effective cards!

Crafty Critta Products Used:

Foil Art - T0162 Space;


* * *
Thank you for stopping by today!
I hope you come back next week to see the next two cards!

* * *

Here are all the links for you:

Crafty Critta Website

Crafty Critta Facebook

Crafty Critta Instagram 

Saturday, 25 October 2025

Fun Fall Cards for KCS Designs by Kim

  Hello, my friends!

I have some fun new Fall themed cards for  KCS Designs by Kim!

Both cards use a fabulous combination if digital designs from Kim's shop!


Aren't those background papers fabulous?
Ideal for a Fall themed journal as well.

The girls are just too cute, and so much fun to fussy cut.
There are 27 sweet girls in the collection.


Head on over to Kim's shop and check out the wonderful products!
She's adding more great items every day!

* * * 

KCS Designs Products Used:


Other Materials Used:
Recollections Cardstock;
EK Success Circle Punches;

Walnut Stain Distress Ink;
Tim Holtz Distress Tool.

* * *
Thanks so much for stopping by!
I'll be back with more fun cards very soon!

* * *
 Here Are Kim's Links:

KCS Designs By Kim Etsy Shop

KCS Designs By Kim Instagram

Sunday, 5 February 2023

Valentine Tutorial for Printable Cuttable Creatables

      Hello, my friends!

It's time for a new project share for Printable Cuttable Creatables!

Today I just want to share a fun tip for you, 
when using Cricut Design Space. 

Many of you will probably already know this but it's fairly new to me. 
First, here is the card that I made:


The owl image is super cute, right? 

Now I'm going to share my process with you.

When I'm using an image like this, that I know I want to print then cut,
I head to Cricut Design Space.
I begin by choosing the base size I want to use
and then sizing all my layers accordingly.

Here's a look:


I knew that I wanted to make 5 1/2" square card base.
So I begin by clicking on shapes, choosing a square, and sizing it to 5 1/2".
This allows me to then resize the owl image.
Then I decided that the owl would look nice in a circle.
So using the "Shapes" option again, I add a circle.
As shown in the photo above I sized the circle to 4".
 I didn't want the owl to just be "floating" in the circle. 
I added the sweet arrow cut, resized it to fit my circle,
and positioned it under the owl.
I also make sure that all my elements are chosen as print then cut.
This intricate arrow was the reason that I was going to use print then cut.
My Cricut does a fabulous job with intricate cuts but this might be pushing it! ;o)


I really like the way everything is looking here, and can see how my finished card will look.
I don't need the green square, as I have other plans for my background.
At this point I highlight the circle section, as shown in the photo.
If you look at the list on the right side you can see the ones that are highlighted.
Then I go to my "Flatten" option, which you can see in the lower right corner,
and I click on it. 


If  you want to include the background square in your project,
then you would highlight the entire square and click on flatten.
As shown above, the complete project has been flattened,
and is ready for print then cut.

Now we can go back to my finished card.
I knew that I wanted to use this pretty heart paper for my background.
I cut my 8 1/2" x 11" paper to a 5 1/2" card base.
I printed the heart paper and cut a 5 1/4" square.
I then matted my finished circle with a matching piece of cardstock.
I adhered it to my card front with foam tape.


I also finished the inside of the card using this sentiment cut.


It makes a really great Valentine card, right?
Flattening the layers helps to cut down on some of the bulk,
making it easier to mail to your Valentine.


Those are my tips for you today!
It's always fun to learn new things and new ways to do our projects! :o)

* * *

Printable Cuttable Creatable Products Used:
Other Materials Used:
Cricut Explore Air Machine;
Recollections Cardstock;
WRMK Nesting Circle Dies.


* * *

Thanks for stopping by today!
I'll be back soon with another fun project!

* * * * *

Here are all the links for you:

Printable Cuttable Creatables Shop

Printable Cuttable Creatables Blog

Printable Cuttable Creatables Facebook    

Friday, 29 October 2021

Monochrome/Masculine Slimline Christmas Card

 Hello again friends!

I know that I've been swamping you with posts lately.
Thanks so much for coming back time and again.
I'll soon be all caught up and back to my regular schedule.
This was actually an October project that I missed sharing here.

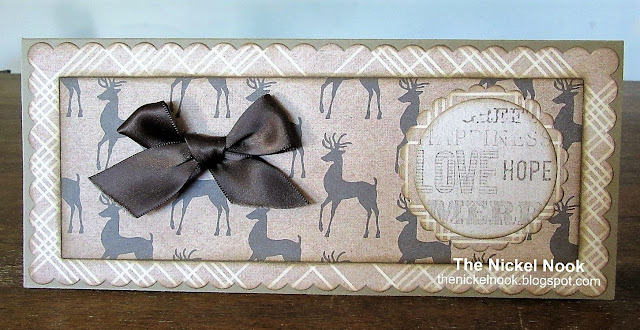
Today I'm sharing a fun monochrome/masculine Christmas card.
I've used the Slimline Essentials Die Set from Maker's Movement,
and the Reindeer Christmas Paper Collection from Relatively Thoughtful.

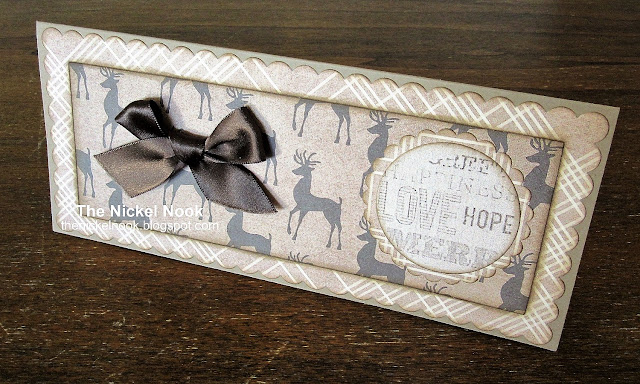
This is just the card for the men in your lives:


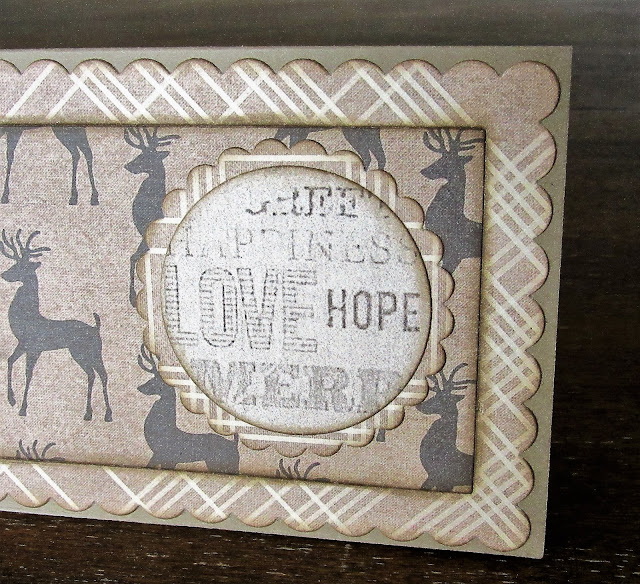
I used kraft cardstock for the base.
Then I chose several of the brown/tan papers that coordinated well.
I die-cut them, inked them, and layered them.


I die-cut the circle from the sentiment paper,
positioning it so that lots of my favorite words were included.


To finish it off I added a brown satin ribbon bow.
It's even a masculine bow, right? ;o)

This combination of products makes such a great Christmas card!

* * * * *
Products used:


* * * * *

Here are all the links for you:


Friday, 17 April 2020

Rinea Tutorial - Shooting Star Skyline Card

Hello, my friends!

Today I have a new tutorial for Rinea.
It's another great collaboration post with Poppystamps!


I have combined the wonderful foiled paper
with two great dies from Poppystamps!

Here's my card:


Here's What I Used:


Materials Used:
Poppystamps - Shooting Star Craft Die;
Poppystamps - Townhouses Craft Die;
White A2 Card Base.

 Here's How:


1. Cut a piece of the Sapphire/Gold Glossy Foiled Paper to 4 1/4" x 5 1/2". Adhere it to the front of the card base.
2. Since I wanted all my little houses to be in a variety of different colors, I reached for my Assorted Foiled Papers - Misfits Pack. I die-cut the Townhouses die from multiple colors, in both Starstruck and Glossy foiled papers. 
3. I added some small pieces of the Gold/Gold Glossy Foiled Paper behind some of the windows, so it appears that the lights are on. 
4. After assembling all my little houses, I adhered them along the bottom of my card front. 


5. Die-cut the Shooting Star from the Gold/Gold Glossy Foiled Paper.
6. Adhere the Shooting Star to the night sky above the house skyline. 


  This was such a fun card to put together!
The dies are so intricate and cut beautifully!
As always, the foiled papers just make it special!


Thanks so much for stopping by today!
I'll be back with some new inspiration soon!
* * * * *

Here are all the links for you:


Tuesday, 13 August 2019

Quietfire Creations - Even A Small Star Shines...

Hello, my friends!

I'm very excited to be sharing my first official Design Team post for Quietfire Design! 
After my two Guest DT projects I was invited to join the Team full-time!


I'm thrilled at the opportunity, 
and I can't wait to show you all the fantastic products available!
I will be giving you a little sneak here twice a month.
Once I will be directing you to the Quietfire Creations Blog.
The second time, I will be sharing a digital file project,
and directing you over to the details at the Quietfire Digital Blog.
Finally, I will share one more complete project with you here on my blog! 
There is just so much to share! 

Here's the little sneak of my card today:


I had so much fun creating this unique card!
I've used both a stamp and a digital cut file from Quietfire!

So head on over to the Quietfire Creations Blog and take a better look!
While you're over there, check out the shop and the digital blog.
They're full of fabulous inspiration!

* * * * *
Here are all the links for you:


Saturday, 14 April 2018

My Scrap Chick - Scallop and Lattice Card

Hello, my friends!

Welcome to a new DT post for My Scrap Chick! 

Before I share my new project, I want to share this:


Yes! We're having a Facebook Hop!
I've never had one before, and I'm very excited!
I know many of you are already liking my page in preparation.
It's going to be lots of fun, so please mark April 20-21 on your calendar! :o)

* * * * *

Today I am sharing a really pretty card cut!
It's called Scallop and Lattice Card with Layered Frames.
It cut so smooth and easy...I'm already planning my next one!

Here's the beautiful card it creates:


It measures 5 inches square.


The center is made up of two frames that layer one on top of the other.
These are layered over the center square in the lattice. 
I stamped a small flower in the center, using matching ink.


Finally, I added just a touch of bling.


Other Materials Used:
Paper: Recollections - Cardstock;
Machine: Cricut Explore Air;
Ink: Distress Ink - 
Stamp: Marion Smith - Flower;
Bling: Crafts - Sparkles.

From My Scrap Chick:


* * * * *
Thanks so much for stopping by!
I hope you'll head over to the shop and give it a try! 
Have you signed up for the My Scrap Chick newsletters yet?
Don't forget to do that!
You really don't want to miss out on any of the great freebies! :o)

* * * * *
Here are all the links you need:


Saturday, 5 January 2013

A Die for a Sketch - Challenge #8

Hello, my friends!
Welcome to the first Challenge of the New Year at A Die for a Sketch! We have another great sketch for you to play with, and a fun new sponsor with a great prize up for grabs! Here's the sketch:


I don't really have anything to say about it, so here's my card:


Materials Used:
Papers: K & Company - Urban Rhapsody, Recollection - Cardstock;
Dies Used: Spellbinders Shapeabilities - Floral Doily Accent, and Butterflies;
Punch: Martha Stewart Punch All Over the Page - Country Tile;
Stamp: Stampin' Up - Simple Friendship;
Ink: Martha Stewart - Forget Me Not;
Ribbon: Offray.

* * * * *
Our generous sponsor this month is:


*They are offering a wonderful Snow Globe Die as a prize!!*


So quickly pop on over to A Die For A Sketch and take a look at what the rest of the Design Team has made!
 Then make a project: a card, a layout in any size, or a gift bag. Link it up by February 4th!
You have a wonderful opportunity to win Top 3 recognition, or to win a great prize!
The only rules are to use the sketch and a die...and have lots of fun! 

I hope you all have a wonderful week full of JOY and laughter! :o)

Monday, 24 December 2012

A Very Merry CHRISTmas To You All!

To each one of you,
my dear sweet friends:

I wish you a very blessed Christmas Season!

I pray that your days will be full of JOY and LAUGHTER 

with family and friends...and perhaps strangers!

My hope is that you will find time, in all of the busyness, 

to reflect on the true meaning of Christmas 

~ to remember the precious gift that was given to us so long ago ~

Jesus Christ the Lord, our Savior!

Here's a card I made just for you!


MERRY CHRISTMAS!

Nancy :o)


(Sorry for the shadowy photo...snow, snow, snow! lol)

Thursday, 20 December 2012

A Die for a Sketch - Challenge #7 Reminder

Hello, my friends!

I hope you are all enjoying this wonderful Christmas season as much as I am! Just remember to take time during all the busy preparations to think about the real reason for the season and celebrate the birth of Jesus Christ, our Savior! That, along with making special memories with family and friends, is much more important than having everything perfectly prepared! :o)

Today I have another card to share with you for A Die for a Sketch Challenge #7. I've used a fun image from our fabulous Sponsor Bugaboo Digi Stamps, and it's called Christmas Teddy 2 Ornament. Isn't he sweet?


For some reason the green ornament on the right didn't photograph well. In person it actually looks just like the smaller green ornament. For this card I decided to have some fun with my VersaMarker and my Martha Stewart embossing glitter. I colored all of those areas individually with the marker and then heat embossed them. Here's a photo of the sparkle:


Materials Used:
Papers: Basic Grey - Eskimo Kisses, Recollection - Cardstock;
Dies: MM Slice Design Card - Fa La La,
Spellbinders Nestabilities - Labels Fourteen;
Image: Bugaboo Digi Stamps - Christmas Teddy 2 Ornament;
Prismacolor Pencils and Odorless Mineral Spirits;
Stampin' Up - VersaMarker;
Martha Stewart Embossing Glitter: sugar cube, turquoise, peridot,
florentine gold, tourmaline, and sterling;
Stamp: Papertrey Ink;
Ink: Stampin' Up - Old Olive;
Ribbon: Offray Gold Glitter;
Brads: My Stash.

* * * * *

Here is the great sketch for Challenge #7:


This challenge is open until January 5th, which means there will be lots of time to enter after your Christmas celebrations! There are only a few entries so far, so your chance of winning the prize from Bugaboo is quite good! What is the prize? I'm so glad you asked. It is 7 wonderful images! Have fun...and don't forget to stop in and visit Bugaboo. There's a great sale going on right now! 


Blog Archive