Showing posts with label My Scrap Chick DT. Show all posts

Monday, 2 November 2020

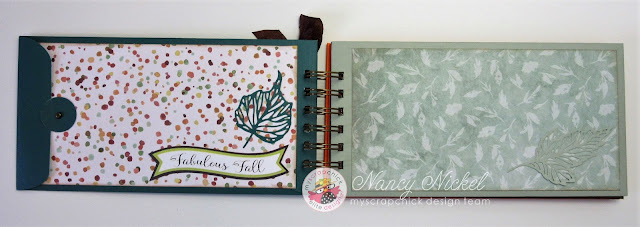
My Scrap Chick - Fall Policy Envelope Album

 Hello, my friends!


Today I have a fun new project share for My Scrap Chick!

I've made what I'm calling my Fall Policy Envelope Album.
I've done this by using pieces from these files:

Trifold card and Envelope,


and Fall Sentiments Print and Cut.

Here's the cover:


When I recently made my Trifold Card and Envelope Set,
the envelope inspired me to make this project.
I enlarged the envelope,
and folded it up so the end was open instead of the top.
The "Fall" came from the Fall Acorn Card.
It's such a pretty script!


I made a total of five envelopes for my pages.
I bound them with my Bind-It-All.
I matted them on the front and back with decorative papers.
I punched circles, and added them with brads,
to form a flap closure.
 

My pages were decorated with the Fall Sentiments Print and Cut,
and the Tim Holtz Skeleton Leaf Die.


Here's a closer look:


Here is the back cover:


Each pocket is filled with a large tag.
I punched the corners with a leaf punch, and added a file tab.
The back of each is cream coloured, so it would be a great spot for journaling.
Lots of room for photos in this album too.


Here's a look at the tags in all the pretty Fall colours!


My Scrap Chick Products Used:


Other Materials Used:
Recollections Thankful Heart Collection;
Recollections Pumpkin Spice Cardstock;
Recollections Fall Embossed Paper Pad;
Tim Holtz Skeleton Leaves Die;
Martha Stewart Fall Leaves Corner Punch;
McGill File Tab Punch;
Fiskars 1" Circle Punch;
Walnut Stain Distress Ink.

* * * * * 
Thanks so much for stopping by!
I'll be back soon with another fun project share!

 * * * * *
Have you signed up for the My Scrap Chick newsletters yet?
Don't forget to do that!
You really don't want to miss out on any of the great freebies! :o)

* * * * *
Here are all the links you need:


Saturday, 24 October 2020

Meg's Garden - Mint Card

   Hello, my friends!

Today I have a new project share for Meg's Garden!

I have created another card using the new Lavender with Mint Collection.

As I said last time, one of my favorite colour combinations is purple with green,
and this collection is just that...and more!

Last time I focused on the "Lavender" and this time I'm focusing on the "Mint"!

 Here's my card layed flat:


Here it is standing up:


The elements of this collection are ideal for an easel card.
The base is made from green cardstock,
and the layers were cut from one of the Lavender with Mint Papers.
I used a couple of layers of the Bracket with Oval Frame Card Cut File,
from My Scrap Chick, to create the card base.


I fussy cut the flowers, butterfly, and ticket sentiment,
I inked all the edges before assembling everything.


To finish it all off, I added a pretty double-looped bow and some pearls.
Although it doesn't show in the photos, 
I went over everything with my sparkle marker,
so it has a really lovely sparkle!

Meg's Garden Products Used:

Lavender with Mint Collection

Other Materials Used:
My Scrap Chick -  Bracket With Oval Frame Card Cut File;
Recollections Cardstock;
Walnut Stain Distress Ink;
Martha Stewart Green Ink;
Crafts Pearls;
Celebrate It! Ribbon. 

* * * * *

Thanks so much for stopping by today!
I'll be back soon with another fun project!

* * * * *

Here are all the links for you:

Meg's Garden Papercraft Shop

Meg's Garden Blog

Meg's Garden Facebook Page

Thursday, 22 October 2020

Meg's Garden - Lavender Card

  Hello, my friends!

Today I have a new project share for Meg's Garden!

I have created a card using the new Lavender with Mint Collection.

One of my favorite colour combinations is purple with green,
and this collection is just that...and more!

For my first card, I have focused on the purple,
and made a tri-fold card.

Here it is folded flat:


This is what it looks like standing up:


I've shared this file before, and it looks different every single time.
I cut the base from purple cardstock,
then I printed two of the Lavender with Mint Papers, and cut the card panels out.


Each panel is decorated with fussy cut images from the Collection.
The "Les Fleurs" on the front cover is from the Summer Garden Cut and Create.


Although I've made mine as a card,
I think this would make a great journal insert.
With that in mind, I added a belly band to the back panel,
and tucked in the tag from the collection.


The cut file includes an envelope.
I cut it out of purple cardstock, and added this beautiful journal card to the front of it.
I added a fussy cut flower to the back for a flap tuck.


It makes such a pretty set!


Meg's Garden Products Used:

Lavender with Mint Collection

Summer Garden Cut and Create

Other Materials Used:
My Scrap Chick - 
Trifold Card and Envelope cut file;
ScraPerfect - Best Glue Ever with No Clog Writing Cap;
American Crafts Cardstock;
Martha Stewart Ink.

* * * * *

Thanks so much for stopping by today!
I'll be back soon with another card using this beautiful collection!
For the next one, I'll be focusing on the green!

* * * * *

Here are all the links for you:

Meg's Garden Papercraft Shop

Meg's Garden Blog

Meg's Garden Facebook Page

Friday, 2 October 2020

My Scrap Chick - We Shall Eat Cake

 Hello, my friends!


Today I have a fun new project share for My Scrap Chick!

Today I'm featuring the:


I've combined these two files into a Traveler's Notebook spread.
Here it is:


Doesn't that look delicious? :o)
I don't know about you...but I LIKE cake! lol
So when I came across this cut Word Art Cut file,
I just had to use it!
 

I haven't been baking any big fancy cakes lately.
It would be a bad idea, since we're not having any company these days.
So instead of a photo of a cake I baked, I used the fun clip art file to fill my page. 


I used an appropriate paper for the background,
and then used my Cricut to print/cut the yummies!
To finish it all off I added Stickles in a variety of colors.


My Scrap Chick Files Used:

DCWV The Sweet Stack;
Recollections Cardstock;
Various Stickles;
Cricut Explore Air;
My Travelers's Notebook.


* * * * * 
Thanks so much for stopping by!
Don't forget - We Shall Eat Cake! ;o)
I'll be back soon with another fun project share!

 * * * * *
Have you signed up for the My Scrap Chick newsletters yet?
Don't forget to do that!
You really don't want to miss out on any of the great freebies! :o)

* * * * *
Here are all the links you need:


Thursday, 3 September 2020

My Scrap Chick - Once Upon a Time Album

 Hello, my friends!


Today I have a fun new project share for My Scrap Chick!

 I'm featuring a fun combination of files today.
I've used:


and Once Upon a Time 2 Clip Art.

 These are the files I used
but there are so many more options for this collection.
I used the print/cut option with my Cricut.
There are also complete cut files, and black/white digi stamps.
You can find all the various options HERE.

Here's the front cover:


Please excuse the strange white lines in some of the images.
My printer wasn't feeling well, and I didn't notice until it was too late.


Now...here's my thought process behind this album.
First of all, it was just lots of fun to put together.
Secondly, I think it's a great one to get the kids involved with.

I don't have little ones in my life these days
but I considered them as I was putting this together.
I knew that the album would be about 6 inches,
so I sized my images with that in mind.
I pulled the page colors from the images.


I cut two pages from each cardstock color.
As you can see in all my photos,
I added images on each side of the open spread.
I didn't photograph the other side of the pages because I left them blank.


I arranged all the characters with my story in mind.
You might even be able to guess at some of the storyline.


The idea I had was to involve the kids in coming up with the story.
They can choose the characters for each page,
and they can write it out on the blank pages.
If they're younger, then you can write it out for them
but it will be their own original story.
If you opted to use the digi stamps from the collection,
the kids could even color the characters.

To finish of my album,
I added sparkly glitter glue to each of the images.
I punched the binding holes, inserted the rings, and added the ribbons.


I think this would be a fun birthday party activity too. 
You could cut out the albums, and print/cut the images.
Then they could have the fun of putting them together,
and added all the sparkle - with glitter glue or actual glitter!

* * * * *

Products From My Scrap Chick:


Other Materials Used:
Recollections Cardstock;
Kaisercraft Binding Rings;
Offray Ribbon;
Pencil Crayons;
Assorted Stickles and Glitter Glues.

* * * * * 
Thanks so much for stopping by!
I hope I gave you some interesting ideas
on how to use some of these files.
I'll be back soon with another fun project share!

 * * * * *
Have you signed up for the My Scrap Chick newsletters yet?
Don't forget to do that!
You really don't want to miss out on any of the great freebies! :o)

* * * * *
Here are all the links you need:


Friday, 14 August 2020

My Scrap Chick - My Blessings Box - For Annabel

 Hello, my friends!


Today I have a fun new project share for My Scrap Chick!

This is a follow-up post to the last one I shared. 
If you missed it, you can check it out HERE.
I haven't done anything to my little picket fence box yet
but I've decided to call it "My Blessings Box."

Today I'm featuring the following files:

Words Assortment of 55 

Label Assortment

Here is what I did:


I cut all of the words out of both black and white cardstock.


Then I cut a MULTITUDE of labels.
This file includes so many great shapes.
I sized them all to fit my 4 x 4 cards.
Since some of my labels are quite dark,
I then cut some white labels, slightly smaller.
It will be so handy to have these all cut out and ready to create with.

So with all these fun goodies, I got to work on my first Scripture card.


This one was actually a special request from my sweet friend, Annabel.
She requested this Scripture verse, as well as the color yellow.
(We have this "thing" going with yellow!)
This is the version Annabel shared,
which is from The Passion Translation.
Isn't this verse lovely in this translation?
It fits in beautifully with my recurring theme of JOY too!

I used the "dear friend" and the label on the front. 
Then I decided to decorate the back too.
Here's what I did there:


My Scrap Chick Files Used:


Other Materials Used:
Momenta Cardstock;
Momento Ink - Rose Bud;
Stampin' Up Stamp Set - The Nicest Thing;
Unknown Mini Chipboard Heart.

* * * * * 
Thanks so much for stopping by!
Big thanks to Annabel for requesting this Scripture verse!
You're a dear friend, Annabel,
and you bring me much JOY!

If any of you would like to request a card made,
using your favorite Scripture verse,
just leave a comment for me!

 * * * * *
Have you signed up for the My Scrap Chick newsletters yet?
Don't forget to do that!
You really don't want to miss out on any of the great freebies! :o)

* * * * *
Here are all the links you need:


Friday, 10 July 2020

My Scrap Chick - Another Fun Box!

Hello, my friends!

Today I have a fun new project share for My Scrap Chick!

Today I'm featuring the:

 Hinged Box with 3D Flower and Belly Band

This is another really fun box to put together. 
Yes, I definitely love to make boxes!
The file includes a great flower cut that I will be using over and over. 

Here's my box:


Isn't that pretty?
I used my favorite floral paperpad...I'm down to the scraps after this.


The sample in the shop shows the pretty flower shaped and layered.
I decided to use my favorite flower making technique to change the flower up.
If you missed it, you can find my flower post HERE.
It worked perfectly for this cut file!


The box measures 3 1/2" square,
and opens like a pizz box.


The file includes a belly band,
which is what my flower is adhered to.
It's great to use pretty double sided paper for this one.


I added a large white pearl to the center of my flower.
Everything else is just the fun cut file!


My Scrap Chick File

Hinged Box with 3D Flower and Belly Band

Other Materials Used:
K  & Company - Watercolor Bouquet;
Large White Pearl;
ScraPerfect - Best Glue Ever.

* * * * * 
Thanks so much for stopping by!
I'll be back soon with another fun project share!

 * * * * *
Have you signed up for the My Scrap Chick newsletters yet?
Don't forget to do that!
You really don't want to miss out on any of the great freebies! :o)

* * * * *
Here are all the links you need:


Friday, 26 June 2020

My Scrap Chick - Fun New Project!

Hello, my friends!

Today I have a fun new project share for My Scrap Chick!

Today I'm featuring the:

Recipe Card Dividers.

Here's what my finished dividers look like:


Don't those look fun?
I've been really busy cleaning/sorting/purging. 
In the process, I came across this wood picket fence box.
Right away I thought of a use for it, and found a place for it, and got to work!


The first thing I needed to find was some tabbed dividers.
Of course I went straight to My Scrap Chick and found just what I needed.
I measured my box first, and then resized the file to fit just right.


The file has three tab options: left, center, and right.
I decided I wanted them to be black,
so I grabbed some black cardstock, and got busy.
I cut multiples of each


I then measured the dividers, and cut papers to fit them,
leaving a black border.
I used a great Bible Journaling paper pad from Recollections.
Does that give you a hint of what I'm putting together?


Yes! It's going to be my new Scripture Card Box.
I'm going to come up with a good name for it,
and I think I'll probably do some decorating of the box itself.
I'll be filling this box with fun creative cards,
that will include my favorite Scripture Verses.


I'm really excited about this new project!
I originally started my blog just to participate in an online Scrpture Challenge.
I did that for years...until it ended.
Then I got busy, and would only share a faith project now and then.
I'm excited to be getting back to something I love so much!

Of course I'll be using some great files from My Scrap Chick,
and lots of other goodies, to create my Scripture Cards.
I hope you'll continue to come by and check them out! 
Maybe you want to find a box of your own and join me! :o)

* * * * * 
Thanks so much for stopping by!
I'll be back soon with another fun project share!

 * * * * *
Have you signed up for the My Scrap Chick newsletters yet?
Don't forget to do that!
You really don't want to miss out on any of the great freebies! :o)

* * * * *
Here are all the links you need:


Blog Archive