Showing posts with label 3D Project. Show all posts

Sunday, 5 December 2021

Scrappy Tails Crafts - Dancing Ballerina Snow Globe Pop Up Card

     Hello,  my friends!

Today I have a new project for Scrappy Tails Crafts! 

I think by now you've all seen some of the fabulous spinner/snow globe projects.
I decided to make one up without the seasonal theme.
I know that many people collect snow globes of all different kinds.

I pulled out some other dies from the October Release,
and came up with this:


I assembled the A7 Snow Globe Pop Up Card Metal Die using heavy white cardstock.
I added the pretty floral panel to the front and back.


I then took the Ballerina die from the A7 theatre/Window Curtain Cover Plate Set.
I cut two ballerinas from white cardstock, and two from the pink patterned paper.
I trimmed the pink patterned paper to create the tutu - one for each side.
I then ran the ballerina through my laminator,
ensuring that the piece would be big enough to trim to my circle.


Here's a photo without the disruptive glare.
I die-cut the circle from the laminated piece.
I then cut two round frames from the decorative paper,
and adhered them in place on the front and the back,
sandwiching a strand of pearl cotton between them.
I threaded the cotton through the hole at the top and tied a knot to secure.
I didn't have an appropriate sentiment
but decided that the music notes from the A7 Music Note Cover Plate Set
were just right.
Finally, I added a pretty pink bow to each side of the top.

Here's the spinner in action:

This was so much fun to put together!
Now I'm looking at all my dies with this Snow Globe Pop Up in mind!

 * * * * *

Scrappy Tails Products Used:

 A7 Snow globe Pop Up Card Metal Dies,

A7 theatre/Window Curtain Cover Plate with Ballerina,

A7 Music Note Cover Plate with Instruments.

* * * * *

Thanks so much for stopping by!
I'll be back soon to share some more fun!

* * * * *

Here are all the links for you:

Scrappy Tails Crafts Shop

Scrappy Tails Crafts Blog

Scrappy Tails Facebook

Wednesday, 17 November 2021

12 Days of Christmas

 Hello, my friends!

I had so much fun making this new Christmas project!
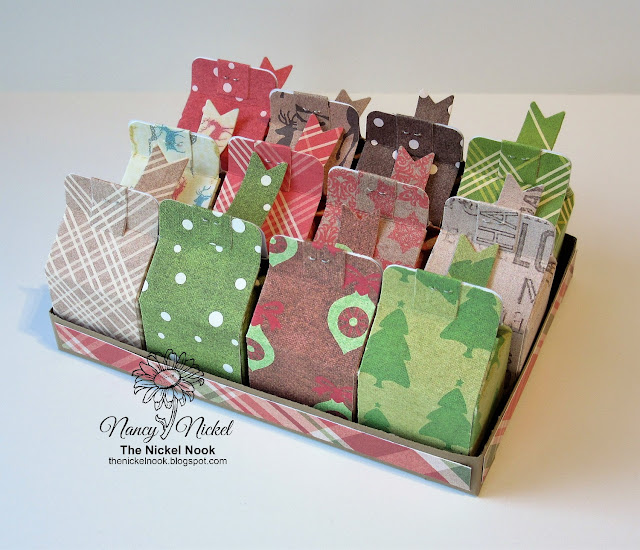
I'm calling it the 12 Days of Christmas
because I made 12 little treat boxes.
If you doubled it, and made 24,
then you would have a wonderful advent collection!

To make this project, I used the adorable Gift Carton Die Set from the Maker's Movement,
along with the fabulous Reindeer Christmas Collection from Relatively Thoughtful.

These papers all coordinate so beautifully and they're great quality,
just perfect for this little carton.
The die cuts brilliantly and they're so easy to put together.

Here's my little collection:


I cut one die and one tag from 12 different papers.
I adhered the bottom of the carton closed.
I folded the matching tag over the top of the carton,
and stapled it in place using my tiny attacher.
I then curled the tags up a little bit so that they could be placed in rows.


This is the back.
To keep all 12 cartons contained I made a little tray from kraft cardstock.
I added strips of the pretty plaid paper to finish it off.


Here's a closer look at one of the cartons.
Isn't it the cutest thing?
There's lots of room to tuck a little gift inside:
goodie, money, jewelry, etc.
It might be a bit small to fill with the actual "12 Days of Christmas" items
but there are so many creative ways to fill them!
A name or number can be written on the tag.


Here's one final view from the top. 
Let me know if you have any questions about the tray.
Another option would be to attach a ribbon to the top
and hang the cartons on the tree! :o)

* * * * *
Materials Used:

Relatively Thoughtful: Reindeer Christmas Collection,

Maker's Movement: Gift Carton Die Set.

* * * * *

Here are all the links for you:

Relative - History Shop

Relative - History Blog

Relative - History Facebook

Maker's Movement Facebook

Friday, 23 July 2021

Altair Art - Rose Garden Notecard Box

 Hello, my friends!


I'm back today with a new project share
 as Brand Ambassador for Altair Art Scrapbooking Papers.

Today I am featuring the gorgeous Rose Garden Collection!
It's such a pretty assortment of soft pinks and greens, and butterflies and flowers!
It was such a joy to work with!

Here's what I made:


It's a notecard box that contains a bundle of four pretty notecards!
I cut the Eileen Hull Post Box Die from white chipboard.
Then I decorated it with the beautiful Rose Garden Papers.


I tied a ribbon around the notecards, so they're easy to pull out.


I then fussy cut an assortment of elements from the kit,
and had fun decorating the box.


I added a little bit of Stickles to all the elements to add some pretty sparkle.


I even decorated the back with this really pretty paper lace strip.


Here are the four notecards.
They are all a white cardstock base, 
with a decorative paper adhered to the front.


Aren't those pretty?
The colours and elements are a gorgeous combination!
Another very inspiring collection!

* * * * *

Altair Art Products Used:


Other Materials Used:
Eileen Hull Post Box Die;
Tim Holtz Distressing Tool;
White Cardstock;
Offray White Satin Ribbon;
Diamond Stickles

* * * * *
Thanks so much for stopping in today! 
I'll be back soon with more projects using these pretty papers!

Oh, one more thing...
Altair Art also has a wonderful monthly Challenge,
with a chance to win some fabulous prizes!
Check it out at the blog.

* * * * *

Here are all the links for you:


Friday, 30 April 2021

Altair Art - Butterfly Box

 Hello, my friends!


I'm back today with a new project share
 as Brand Ambassador for Altair Art Scrapbooking Papers.

My project today features one of the most recent release collections.
It's called Butterfly Effect, and it's really fantastic!
It includes the most wonderful colors, designs, and elements!

Here's my project:


First, I made the box out of chipboard.
I used kraft cardstock to create a hinge, and for the punched border.
I added the border across the front, and on each side.
Then I had lots of fun decorating the box with the Butterfly Effect Collection.


These poppy papers are so gorgeous!
I fussy cut a number of poppies from the element sheet,
along with several other pieces.

I decorated the top with one of the pretty frames,
and then added several poppies, and a pretty butterfly.


I then went on to decorate the inside of the lid.
I used a beautiful poppy cluster, and another butterfly.

I have some fun plans to fill this box.
I'll share that in a future post! :o)


Altair Art Products Used:


Other Materials Used:
Eileen Hull Treasure Box Die;
Medium Weight Chipboard;
Kraft Cardstock;
Walnut Stain Distress Ink;
EK Success Border Punch.


* * * * *
Thanks so much for stopping in today! 
I'll be back soon with more projects using these pretty papers!

Oh, one more thing...
Altair Art also has a wonderful monthly Challenge,
with a chance to win some fabulous prizes!
Check it out at the blog.

* * * * *

Here are all the links for you:


Tuesday, 30 March 2021

Altair Art - Red Roses for My Darling!

Hello, my friends!


I'm back today with a new project share
 as Brand Ambassador for Altair Art Scrapbooking Papers.

I've made a pretty little shadow box display, using the:


This is such a gorgeous collection!
The roses are all such a beautiful deep dark red!
All the papers and elements are absolutely fabulous!


I used the Tim Holtz Curio Box Die for the base of my project.
I cut the base from chipboard, and covered it with the papers.
I cut the top from the Altair Art paper.
I used the oval to cut out the opening.
I wanted to make sure that the little butterfly on the top left corner


I then fussy cut two additional butterflies,
and added them to the bottom right corner.


Here's the other side.


On the back, I added one of the fussy cut tags.
I topped it with a pretty fussy cut rose.


I added several fussy cut layers to the inside of the box.
Finally, I added some pretty red Stickles and a sparkly double-looped bow!


This is such a beautiful collection!
It would be great for Anniversary, Wedding, Valentine's, or just some love! :o)


Altair Art Products Used:


Other Materials Used:
Tim Holtz Curio Box Die;
Walnut Stain Distress Ink:
Red Stickles.


* * * * *
Thanks so much for stopping in today! 
I'll be back soon with more projects using these pretty papers!

Oh, one more thing...
Altair Art also has a wonderful monthly Challenge,
with a chance to win some fabulous prizes!
Check it out at the blog.

* * * * *

Here are all the links for you:


Wednesday, 10 February 2021

Scrappy Tails Crafts - Valentine Vase

Happy Wednesday, my friends!

I'm so excited to be sharing my first DT project for Scrappy Tails Crafts! 

I'm a little bit late to the party, as there were some shipping delays.
I'm jumping right in with a fun Valentine project,
using fabulous dies from the January release.

Today I am featuring:

Flower Vase Pop Up Card Die,

and Heart Assortment Metal Dies.

This is such a fun combination of dies,
and there are so many creative possibilities!

I love versatile dies that can be used in many different ways,
and these are both that! 

Here is my project from the front:


Isn't that fun? 
I just love this Flower Vase Pop Up Card Die!
It's the same principle as a box card,
where it's a 3D piece that will fold flat.
Sabrina has made a great video showing how super simple it is to put together.
You'll find that video HERE.
This die also comes with a great variety of optional pieces.

I grabbed a variety of patterned papers and cardstock colours
and got busy cutting out all the pretty hearts.
There are so many fun designs in this die set.
You can mix and match and layer them all up.
I backed each piece, so that it looks great from all sides.
Do you see the "LOVE" and the "XOXO"?
Well those are both optional panels for Vase base.
Since I was using paper that already had a matching XOXO,
I decided to pop the words in among all the hearts!


Below is a photo of the back side of my project:


Here is one side:


Here is the other side:


It would make such a cute little table centerpiece, wouldn't it?

Below is a photo taken from the top.
It doesn't really appear that full at this angle.


Here it is all folded up and ready to pop into an envelope.
It looks much fuller in this photo! ;o)

Both of these die sets are so fun to play with!
I just used strips of matching cardstock to attach all the cards.

You could also use pretty wires, or strips of acetate.
I used the strips as another embellishing opportunity,
and chose to add some of the tiny hearts to some.

There are so many fun things you could add to all the hearts:
rhinestones, pearls, glitter, ribbons, etc.

Also, there are so many fun ways to fill the fun Vase!
You'll see some great ideas over at Scrappy Tails Crafts!

* * * * *

Scrappy Tails Products Used:

Flower Vase Pop Up Card Die,

and Heart Assortment Metal Dies.

Other Products Used:
Basic Grey Kissing Booth Papers:
Assorted Cardstocks from DCWV, and American Crafts;
Pink and Red Inks from Martha Stewart.

* * * * *

Thanks so much for stopping in!
I'll have another Scrappy Tails project share soon!

* * * * *

Here are all the links:

Scrappy Tails Crafts Shop

Scrappy Tails Crafts Blog

Scrappy Tails Facebook 

Wednesday, 30 December 2020

Altair Arts - On the Wings of the Rainbow Display Stands

 Hello, my friends!


I'm back today with a new project share
 as Brand Ambassador for Altair Art Scrapbooking Papers.

This time I am sharing some projects created with one of the newest release collections.
It's a really lovely and versitile collection.

To show you a bit of that versitility...
...I have created two photo display stands.
Although I've used the same collection for both stands, they really have a different style.
The first one is pretty, and a little bit vintage.
The second one is very whimsical.

Here is the first:


The base of the stand is made of white matboard, using a notebook die.
Both the front and back are covered with the pretty floral paper. 
Then I fussy cut a variety of the element: frames, flowers, leaves and butterflies.

Here is a closer look:


I adhered the frames in place leaving an opening at the top.
I saved the oval that I cut from the center of the frame.
I then used it as a template to cut out the sweet vintage image,
and slid it in behind the frame. 

I did the same with the frame on the other side, shown below. 
Thet it was just a matter of adhering all the other bits it place.
To finish it off, I wrapped a ribbon around the center,
and added a pretty double-looped bow.


Here is the back of the stand.
On the left side I added a cluster of fussy cut flowers and leaves.
On the right side I added one of the pretty labels.


Here is the second stand, made from the same collection:


This whimsical version pulls out the fun unicorns and fairies in the collection.
This would be great for a little girls room.
I covered the matboard with this lovely scene paper.


Here I used the same steps for the frame.
Instead of slipping a photo in, I added the cute littel fairy, sitting in place.

On the other side, I simply added a fussy cut sentiment, 
some fussy cut flowers, and a butterfly. 
I didn't wrap the ribbon around this one.
I fussy cut a couple more butterflies instead.


Here's the back side.
I covered it with the rainbow and cloud paper.
On the left side, I added a fussy cut cloud and unicorn.
On the right side, I added the "Dream on..." label.


These projects were so much fun to make,
and the papers are a joy to work with!

* * * * *

Altair Art Products Used:


Other Materials Used:
Offray Ribbon;
Eileen Hull - Notebook Die;
White Matboard;

* * * * *
Thanks so much for stopping in today! 
I'll be back soon with more projects using these pretty papers!

Oh, one more thing...
Altair Art also has a wonderful monthly Challenge,
with a chance to win some fabulous prizes!
Check it out at the blog.

* * * * *

Here are all the links for you:


Monday, 23 November 2020

Simply Crafty SVGs - JOY Gift Box

 Hello, my friends!


Welcome to a new project share for Simply Crafty SVGs!

This month I'm sharing another great gift box!

I've used the:

Joy Gift Box SVG File

It was the title of this box that attracted me.
How could I not want to make a JOY gift box?
Sandy has two wonderful samples posted in the shop;
one is Christmas themed and one is Winter themed.

I thought I would give you another creative option.

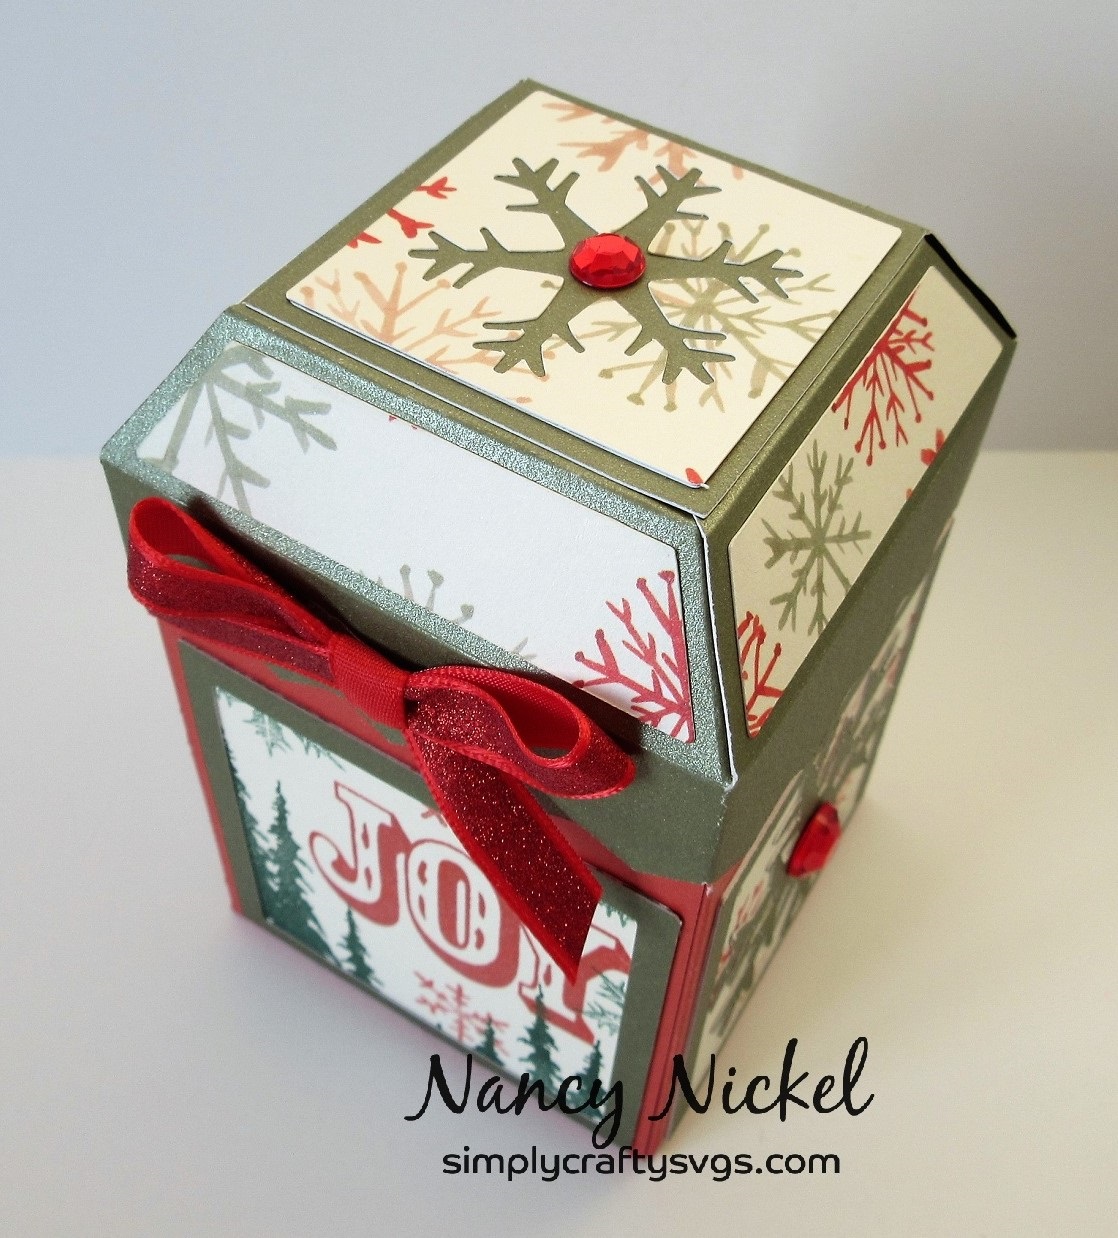
Here's my version:


As you can see, I've combined Christmas with Winter,
and added a stamped panel rather than the JOY cut panel.


I used pretty shimmer cardstock, added some big red rhinestones,
and finished it off with a big glittery bow.


The lid of this box is such a great shape!
The box base is a wonderful size to fill with some goodies!


When you look at all these great cut files,
think about how you can incorporate your other craft supplies,
like stamps, stencils and such.
It's all so much fun!


File from Simply Crafty SVGs:


Other Materials Used:
DCWV Handpainted Christmas Stack;
Recollection Holiday Shimmer Paper Pad;
Tim Holtz Holiday Joy Stamp Set;
CTMH Ink: Cranberry, Ponderosa Pine;
Celebrate It Glitter Ribbon.

* * * * *
Thanks for stopping by today!
I hope you found some inspiration!
I'll be back next month to share a brand new project! :o)

* * * * * 
Here are all the links:


Monday, 26 October 2020

Simply Crafty SVGs - Hot Cocoa Bar

 Hello, my friends!


Welcome to a new project share for Simply Crafty SVGs!

This month I'm sharing a really fun 3D gift box!
This is just great for the upcoming season.

I've used:

Hot Cocoa Bar SVG File

The shop sample has been made in a Christmas theme.
To switch things up, I made mine in a Winter theme.
Either way - it's a fabulous file.

Here's mine:


Isn't that cute?
When I was a little girl, I always loved this kind of thing for my Dawn dolls.
Does anyone else remember Dawn dolls?
Never mind a store, all they would need is this Hot Cocoa Bar! lol


I used some fun frosty papers to make my box.
Although it doesn't show in the photo, all the snowflakes have glitter treatment.
To finish it off I added a few snowflakes punched out of glitter paper.


Here you can see the back of the box.
What's this in the photo below?
Do I actually have something in my box?
After sharing so MANY empty boxes, I thought I would switch things up! lol
Here you can see my last package of my favorite After Eight hot chocolate.
It fits perfectly!


Wouldn't that make a fun gift? 
It holds quite a few hot chocolate packets.
Or you could fill it with a number of other treats.
You could even switch things up and make it into a coffee bar,
then fill it with some coffee beans!
So many fun ways to use this one!

* * * * *
File from Simply Crafty SVGs:


Other Materials Used:
American Crafts Cardstock;
Mambi Let it Snow Collection;
DCWV Glitter Stack;
Martha Stewart - Acrctic Sowflake Punch;
Cuttlebug Embossing Folder.

* * * * *
Thanks for stopping by today!
I hope you found some inspiration!
I'll be back next month to share a brand new project! :o)

* * * * * 
Here are all the links:


Friday, 10 July 2020

My Scrap Chick - Another Fun Box!

Hello, my friends!

Today I have a fun new project share for My Scrap Chick!

Today I'm featuring the:

 Hinged Box with 3D Flower and Belly Band

This is another really fun box to put together. 
Yes, I definitely love to make boxes!
The file includes a great flower cut that I will be using over and over. 

Here's my box:


Isn't that pretty?
I used my favorite floral paperpad...I'm down to the scraps after this.


The sample in the shop shows the pretty flower shaped and layered.
I decided to use my favorite flower making technique to change the flower up.
If you missed it, you can find my flower post HERE.
It worked perfectly for this cut file!


The box measures 3 1/2" square,
and opens like a pizz box.


The file includes a belly band,
which is what my flower is adhered to.
It's great to use pretty double sided paper for this one.


I added a large white pearl to the center of my flower.
Everything else is just the fun cut file!


My Scrap Chick File

Hinged Box with 3D Flower and Belly Band

Other Materials Used:
K  & Company - Watercolor Bouquet;
Large White Pearl;
ScraPerfect - Best Glue Ever.

* * * * * 
Thanks so much for stopping by!
I'll be back soon with another fun project share!

 * * * * *
Have you signed up for the My Scrap Chick newsletters yet?
Don't forget to do that!
You really don't want to miss out on any of the great freebies! :o)

* * * * *
Here are all the links you need:


Blog Archive