Showing posts with label Maker's Movement. Show all posts

Thursday, 10 March 2022

Fun Easter Pocket Card for Maker's Movement

 Hello, my friends!


I'm back today to share a fun new project for Maker's Movement

I used my wonderful Crossover II Machine for all my die-cutting on this project.
I really appreciate this machine!
It cuts every kind of die so smoothly.

I've also used:


Here's my card:


Isn't that chick the cutest? Puts a smile on my face for sure!
I began by layering my card base; with navy cardstock and a pretty patterned paper.
Then I added the Library Pocket to the front of my card.
I cut the pocket card from white cardstock and stamped it.


When I saw the images stamped out,
I thought it would be cute to make some kids coloring cards.
Actually...it would be fun to stamp a full page of chicks and eggs to color, right?


Then I decorated the front of the pocket.
I stamped, cut, and colored the chick,
layered the labels, and stamped the "Happy Easter".
Finally, I added a little yellow bow to the top of the card.


I know I've said it before but the stamps and dies 
from Maker's Movement are all so much fun to play with! :o)

* * * * *

Maker's Movement Products Used:

Crossover II Fabric & Paper Cutting System,


Other Materials Used:
Recollections Cardstock;
Making Memories Chloe's Closet Papers;
Memento Tuxedo Black Ink;
Ranger Letter It Ink - Cobalt.

* * *
Thanks so much for stopping by!
I'll be back soon with another fun project!

* * *

Here are all the links for you:

Maker's Movement Facebook  

Friday, 4 March 2022

SPRING Mini Mini Album for Maker's Movement

  Hello, my friends!


I'm back today to share a new project for Maker's Movement

This time I have created another fun little mini mini album,
using a great variety of dies and stamps from Maker's Movement.
I have also used my wonderful Crossover II Machine for all my die-cutting on this project.

You'll find all the products links below.

Here's my little album:


This album measures 4 1/2" x 3".
The base pages are made from the adorable Mini File Folder Die set.
I cut five file folders from white cardstock.
I then adhered them together, forming side pockets on each page.
The Alphabet Die Set was used to add the title to the front cover.
I have used a sweet little red clip to hold the album closed.


Here I've added a mini notebook page,
that has been stamped and decorated with a die-cut flower.


Here's the next page.
The pocket on the left holds another mini notebook page.
I've used the two little hearts to hold one of the tags,
from the Nested Round Tags Die Set.
The tag has been stamped with the Hello Spring Stamp Set.
The pocket on the right holds two more of the die-cut tags.


Here I've added two of the cute frames from the Nested Polaroid Die Set.
More stamping and die-cut flowers.
The flowers are all from the Petite Posies Die Set.


The pocket on the left holds another notebook page die-cut.
Another one has been stamped and added to the page.
Two more rounded tags are in the pocket page on the right.


Here there are two more stamped polaroid frames,
along with more pretty posies.


Here's the back cover:


Maker's Movement Stamps and Dies work beautifully
to make so many fun creative projects! :o)

Maker's Movement Products Used:


(On Sale Now)

Other Materials Used:
White Cardstock;
My Mind's Eye Lime Twist Papers;
Distress Ink - Aged Mahogany, Peeled Paint;
Offray Ribbons.

* * *
Thanks so much for stopping by!
I'll be back soon with another fun project!

* * *

Here are all the links for you:

Maker's Movement Facebook 

Monday, 14 February 2022

Happy Valentine's Day with Maker's Movement

 Hello, my friends!
Happy Valentine's Day to you!
It's a great day to let someone know that you love them! 


Today I have a fun Valentine's card for Maker's Movement

I used the fabulous Crossover II Machine for all my die-cutting on this project.

I've also combined the:


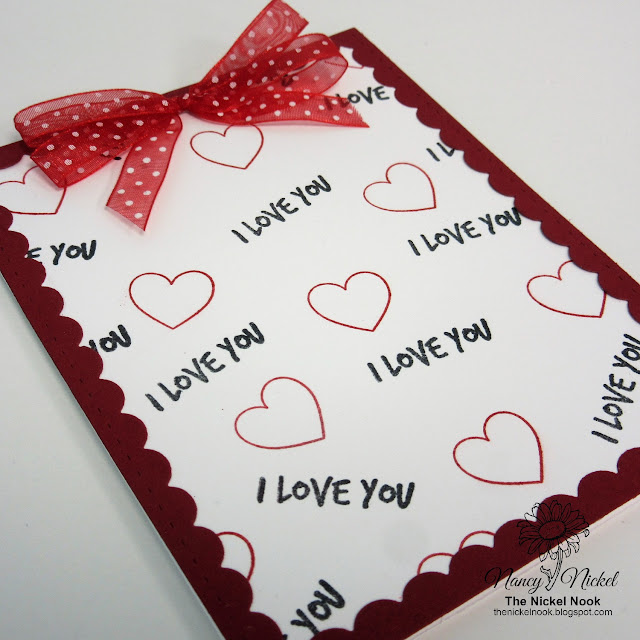
Here's my card:


I began with a white cardstock A2 card base. 
Using black ink, I randomly stamped the "I LOVE YOU"
all over the card front.
Then I went in with red ink, and randomly stamped the hearts.
The trick with making the stamping appear truly random
is to make sure you continue your stamping over the edge, 
and twist and turn your stamp to get different angles.


I then cut the largest scalloped frame from red cardstock,
and adhered it in place.
Since it is also A2 size, it is a perfect fit.

To finish things off, I made a double looped bow from some pretty ribbon,
and added it to the top of the card.


I think it makes a great card...
for Valentine's Day...
or for any other day of the year! :o)

* * * * *

Maker's Movement Products Used:

Crossover II Fabric & Paper Cutting System;

 
Other Materials Used:
Recollections Cardstock;
Memento Tuxedo Black Ink;
Stampin' Up Real Red Ink;
Unknown Ribbon.
 
* * *
Thanks so much for stopping by!
I'll be back soon with another fun project!

* * *

Here are all the links for you:

Maker's Movement Facebook   

Friday, 11 February 2022

Be Mine Card for Maker's Movement

 Hello, my friends!


I'm back today to share a new project for Maker's Movement
Since Valentine's Day is fast approaching,
I thought it would be a good idea to share a card.

I used my wonderful Crossover II Machine for all my die-cutting on this project.

I've also used:


Here's my card:


The base of my card is kraft cardstock.
Then I used the fabulous Slimline Essentials to die-cut the layers.

The heart die is also included in that set,
and I cut three of them from the checked glitter paper.


The "BE MINE" was die-cut with the Alphabet Die Set.
I cut it from red cardstock.


These dies combine so beautifully to make a wonderful card!
This one has a vintage feel to it, and it's obviously for Valentine's Day.
A change of papers and words could make a great card for any occasion!

* * * * *

Maker's Movement Products Used:

Crossover II Fabric & Paper Cutting System,


Other Materials Used:
Recollections -  Kraft and Red Cardstock;
Recollections Love Letters Collection;
Vintage Photo Distress Ink.

* * *
Thanks so much for stopping by!
I'll be back soon with another fun project!

* * *

Here are all the links for you:

Maker's Movement Facebook  

Friday, 28 January 2022

Let It Snow Card for Maker's Movement

  Hello, my friends!


I'm back today to share a fun project for Maker's Movement

I used my wonderful Crossover II Machine for all my die-cutting on this project.

I've also used:


This is such a fun combination of products to play with!

Here's my card:


Isn't that fun? A teddy bear making a snow angel!
We often see wonderful snow angels along our walking path.
They always make me smile! :o)


The Oh What Fun stamp and die set include three sweet characters,
along with the dies to cut them out,
and the snow angel shape to fit behind them.
They would work for some really cut shaker cards too
but my shaker elements are still all packed up. 


I then added the Let It Snow and banner from the Snowflake Kisses set.
It's such a lovely and intricate font. 


They all work beautifully when made from this fun Christmas Doodle paper.
The bear and banner were both adhered in place with foam tape.


Maker's Movement Products Used:

Crossover II Fabric & Paper Cutting System;


Other Materials Used:
White Cardstock;
Spectrum Noir Markers.

* * *
Thanks so much for stopping by!
I'll be back soon with another fun project!

* * *

Here are all the links for you:

Maker's Movement Facebook 

Wednesday, 12 January 2022

Maker's Movement - Winter Scene Card

 Hello, my friends!


It's time for a fun new project for Maker's Movement

I used my wonderful Crossover II Machine for all my die-cutting on this project.

I've also used:


Here's my card:


I just LOVED putting this one together!
So much fun!
...or should I say "SNOW" much fun! ;o)


The main scene has been created with the Great Outdoors Die Set,
along with some of the Christmas Doodles papers.
Then I added more sweet little trees, along with the snowflakes,
from the Shaker Ornament Die Set.
The front panel was added using foam tape.


I stamped the cute little critters out, and colored them with my markers.
I added them into the scene


I then added this sweet sentiment, and a few bits,
to the inside of the card.
Finally, I added a little snowflake bling to the center of each snowflake.


These products combined make a really fabulous Winter scene!
With just a few changes to the papers, 
these same products could be used to create a scene card for any season.

* * * * *

Maker's Movement Products Used:

Crossover II Fabric & Paper Cutting System,


Other Materials Used:
White Cardstock;
Spectrum Noir Markers;
Memento Ink - Tuxedo Black;
Distress Ink - Iced Spruce;
Crafts - Sparkle Rhinestones.

* * *
Thanks so much for stopping by!
I'll be back soon with another fun project!

* * *

Here are all the links for you:

Maker's Movement Facebook  

Wednesday, 22 December 2021

Maker's Movement - Happy Holidays Card

    Hello, my friends!


It's time for another fun new project for Maker's Movement

As always, I used my wonderful Crossover II Machine for all my die-cutting on this project.

I've also used several of the fabulous newer products:


The papers are a new product to Maker's Movement.
They're fabulous quality, double sided, and so fun to use!

Here's my card this:


I've used the new Shaker Ornament Die Set on my card.
This die makes it super easy to create a shaker element,
or even a wonderful Christmas ornament.
All my shaker bits are still packed up,
so I used it to make a fun winter scene piece on my card.


I used foam tape to add the sentiment
but kept everything else flat.


Speaking of the sentiment...
I really like this sentiment die set.
It cuts a shadow, along with the intricate script wording. 
There are several fun ways to use it.
I cut the script from the striped paper,
and the shadow from red cardstock.


To finish things off, I added some pretty Stickles and sparkle rhinestones.


I'm really liking these new papers!
They're a great weight and they have a lovely sheen to them. 

* * * * *


Other Materials Used:
Sparkle Rhinestones,
Star Dust Stickles,
White & Red Cardstock.

* * *
Thanks so much for stopping by!
I'll be back soon with another fun project!
In the meantime, go check out some of the other great new dies in the shop!

* * *

Here are all the links for you:

Maker's Movement Facebook 

Friday, 10 December 2021

Maker's Movement - Wishing You Warmth and Joy!

   Hello, my friends!


I'm back today to share a fun new project for Maker's Movement

I used my wonderful Crossover II Machine for all my die-cutting on this project.
Just a note: this is the only die-cutting machine that I have unpacked.
I kept it with me during my wanderings...and couldn't do without it!
It cuts every one of my dies beautifully, and even takes my foiling plates.

I've also used several fabulous new products:


The papers are a new product to Maker's Movement.
They're fabulous quality, double sided, and so fun to use!

Here's my card:


Isn't that just the cutest couple? 
I think I saw them when I was last outside for a walk.
I stamped/die cut them and then colored them with my markers.


I stamped the sentiment one white cardstock and then trimmed it out.
I backed it with the lovely striped banner.
It was made using the die from the set along with a paper from the collection.


I created an A2 tent fold card base from white cardstock.
Then I added the pretty red tree paper from the Christmas Doodles collection.
I cut a skating pond from another one of the papers.


I used foam tape to adhere both the banner and snowcouple to the card.
Finally, I added some little touches of Stickles.

* * * * *

Maker's Movement Products Used:

Crossover II Fabric & Paper Cutting System;


Other Materials Used:
Spectrum Noir Markers;
Memento Tuxedo Black Ink;
Star Dust Stickles.

* * *
Thanks so much for stopping by!
I'll be back soon with another fun project!
In the meantime, go check out some of the other great new dies in the shop!

* * *

Here are all the links for you:

Maker's Movement Facebook 

Monday, 29 November 2021

Maker's Movement - NOEL Card

  Hello, my friends!


I'm back today to share a fun project for Maker's Movement

I used my wonderful Crossover II Machine for all my die-cutting on this project.

I've also used the fabulous new Noel Die Set,
along with the Slimline Essentials Die Set,
which I have used often.

Here's my card:


As you can see...I have used very non-traditional colors for a Christmas card.
I thought they worked beautifully with this combination of dies.
I really like this NOEL set!


The NOEL set includes the four letters, three stars in different sizes, and a heart.
I didn't use the smallest star or the heart. 


I did use foam tape to pop up the front panel of the card
but it's still nice and flat for mailing.

* * * * *

Maker's Movement Products Used:

Crossover II Fabric & Paper Cutting System,


Other Materials Used:
Marianne Design - Silver Stars Paper Pad,
White Cardstock,
Black Cardstock.

* * *
Thanks so much for stopping by!
I'll be back soon with another fun project!
In the meantime, go check out some of the other great new dies in the shop!

* * *

Here are all the links for you:

Maker's Movement Facebook 

Wednesday, 17 November 2021

12 Days of Christmas

 Hello, my friends!

I had so much fun making this new Christmas project!
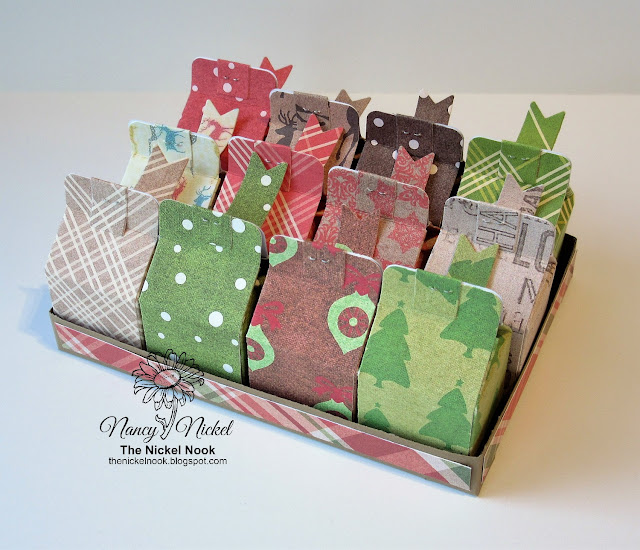
I'm calling it the 12 Days of Christmas
because I made 12 little treat boxes.
If you doubled it, and made 24,
then you would have a wonderful advent collection!

To make this project, I used the adorable Gift Carton Die Set from the Maker's Movement,
along with the fabulous Reindeer Christmas Collection from Relatively Thoughtful.

These papers all coordinate so beautifully and they're great quality,
just perfect for this little carton.
The die cuts brilliantly and they're so easy to put together.

Here's my little collection:


I cut one die and one tag from 12 different papers.
I adhered the bottom of the carton closed.
I folded the matching tag over the top of the carton,
and stapled it in place using my tiny attacher.
I then curled the tags up a little bit so that they could be placed in rows.


This is the back.
To keep all 12 cartons contained I made a little tray from kraft cardstock.
I added strips of the pretty plaid paper to finish it off.


Here's a closer look at one of the cartons.
Isn't it the cutest thing?
There's lots of room to tuck a little gift inside:
goodie, money, jewelry, etc.
It might be a bit small to fill with the actual "12 Days of Christmas" items
but there are so many creative ways to fill them!
A name or number can be written on the tag.


Here's one final view from the top. 
Let me know if you have any questions about the tray.
Another option would be to attach a ribbon to the top
and hang the cartons on the tree! :o)

* * * * *
Materials Used:

Relatively Thoughtful: Reindeer Christmas Collection,

Maker's Movement: Gift Carton Die Set.

* * * * *

Here are all the links for you:

Relative - History Shop

Relative - History Blog

Relative - History Facebook

Maker's Movement Facebook

Tuesday, 24 August 2021

Maker's Movement - Journal Fun

  Hello, my friends!


I'm back today to share a fun project for Maker's Movement

* * *

For those of you that don't know, I'm in the middle of a big move.
We're packing up the house that we've lived in for 23 1/2 years,
and leaving the town we've lived in for 36 1/2 years!
We don't know where we're going yet, as we haven't found a house we like enough to buy.
I'm finding it rather exciting...with no definite destination in mind.
Everything has gone into storage, including my craft room.
I've managed to keep out a "few" things but I don't think it will all fit in the car!
Apparently I can't take it ALL with me! ;o)
I plan to continue with my regular crafty posts.
although I am a little bit behind right now.
 I'll just need a little time to catch up once the packing is finished.
Okay...now back to our regular schedule...

* * *

This is actually a sneak at a journal I've just finished.
I'll have a video flip-through ready very soon...I hope!
The pages and images used in this post are all from Paper Craftivity .

Maker's Movement has some fabulous dies that are great journal additions
I used my wonderful Crossover II Machine for all my die-cutting on this project.

I've also used:


Here's what I've done:


First, the Library Pocket Die Set. 
I cut the pocket and card from kraft cardstock.
I folded the pocket and adhered it onto my journal page.
I then decorated it with some of the elements from Paper Craftivity.


I also decorated the library card.
The back is left plain to journal on.

Below, I'm sharing another Library Pocket Card.
It's made the same way but decorated differently.


Here's a look at the decorated Library Card. 
On the next page, I've added a tab to the envelope flap.
This tab is also included in the Library Card Pocket Die Set.


Here is another spot where I used the tab die. 
I've added it to the top of a folded coffee dyed page.


Now I'll show you how I used the Waterfall Card Die Set.
I cut the flaps out of kraft cardstock.
The set includes a few options for adding a decorative edge.
I used the bracket shape on my flaps.
I cut three flaps and added them to my journal page.
I decorated the top flap with a pretty journal card,
and added a trim across the top.


I added another journal spot to each of the next two flaps.


I left the spot under the last flap blank.
It's a great spot for some "hidden" journaling.


Here is another way I used the Waterfall Card Die Set.
This time I cut only one flap out of kraft cardstock.
I added a decorative top, and some graph paper for journaling.


I added another piece of the graph paper on the under side of the flap.
Then I positioned it in place over a journal card that had been adhered to my page.


 These fabulous dies from Maker's Movement are great additions to any journal project!
They're so versatile and easy to use too!
You'll be seeing lots more of both of these dies in coming journals! :o)

* * * * *

Maker's Movement Products Used:

Crossover II Fabric & Paper Cutting System,

Other Materials Used:

Coffee Died Papers.

* * *
Thanks so much for stopping by!
I'll be back soon with another fun project!

* * *

Here are all the links for you:

Maker's Movement Facebook 

Blog Archive