Showing posts with label Easter. Show all posts

Monday, 30 March 2026

More Easter Cards for KCS Designs by Kim

   Hello, my friends!

As I said in my last post for KCS Designs by Kim,
there are lots of products in the shop for the Easter/Spring Season.

Today I am sharing four more, with a completely different look:


Again, a closer look at each one:


Aren't they pretty?
The papers have a wonderful texture in the pretty designs!
The Flair are the perfect finishing touch!

* * *

KCS Designs by Kim Products Used:

Spring Pastel Journal Papers;

Easter Flair Buttons;

Spring Word Snippets - FREEBIE.

Other Materials Used:
Walnut Stain Distress Ink;
Textured Cardstock.

* * *

Here Are Kim's Links:

KCS Designs By Kim Etsy Shop

KCS Designs By Kim Instagram

Friday, 27 March 2026

Easter Cards for KCS Designs by Kim

   Hello, my friends!

Today I'm sharing some fun Easter cards for KCS Designs by Kim!

Kim has some great products in the shop that are perfect for the season.
Today I have used another fabulous surreal collection called:
Easter Oddities Journal Papers. 

I have these four to share today:


Here's a closer look at each one:


Aren't those fun? 
Each image has just a subtle hint of colour in them.
So all it needed was some simple layering,
and the addition of an appropriate sentiment.
 
* * *

KCS Designs by Kim Products Used:

Easter Oddities Journal Papers;

Spring Word Snippets.

Other Materials Used:
Cardstock - Grey, Pink, Cream;
Walnut Stain Distress Ink.

* * *
Thanks for stopping by today!
I'll be back next week with more Easter cards! 

* * *

Here Are Kim's Links:

KCS Designs By Kim Etsy Shop

KCS Designs By Kim Instagram

Friday, 29 March 2024

Happy Easter with Emerald Creek Craft Supplies

Happy Easter, my friends!

You may have noticed that I haven't been around much lately.
I've been struggling with some eye issues.
It's been a struggle but I'm hoping the end is in sight! ;o)
(Pun intended)
If anything looks off...it's me, not you! 

I thought I would begin with some fun Easter cards for Emerald Creek Craft Supplies

I am featuring:

Fowl Line Cling Mount Stamp;

Happy Easter Cling Mount Stamp;

Pastel Blue Embossing Powder;

Pastel Lilac Embossing Powder;

Pastel Mint Embossing Powder;

and Pastel Pink Embossing Powder.

* * *

Here are all three cards together:


Now I will walk you through how I created each one.


For this card, I cut a panel of white cardstock that measured.
Using embossing ink, along with the Fowl Line Stamp,
I stamped the image in rows.
I began and ended the stamp at different spots,
and stamping off the edge of the panel.
This gives it a nice random appearance.
I just eye-balled the stamping but a stamp positioner would work great.
I then sprinkled all four pastel shades of embossing powder. 
I began with pink in the top left-hand corner. 
I followed that with the blue, then mint, and finally lilac.
All were sprinkled in a pleasing angle.
Then I heat set the embossing powder.
To finish the card, I mounted the panel on a matching mint paper, using foam tape.
I then added it to a white card base before adding a pretty mint bow.


For this larger, tent-fold card, I followed the same process.
However, this time I stamped only three rows with embossing ink.
I used blue on the bottom two rows, and pink on the top.
I also embossed the "Happy Easter" in pink.
It's quite pale in the photos but it's lovely and shiny in real life.
I wrapped the front panel with ribbon before matting it on pink patterned paper,
and a layer of blue cardstock.
Finally, I added the bow, and some pretty matching dew drops.

Now for my final card:


I stamped/embossed the image only once on this card front.
I centered the image on the bottom, and then centered the sentiment on the top.
I used the pastel lilac embossing powder -it has a beautiful blue toned mauve colour.
I wrapped the panel with blue satin ribbon, and then added a smaller purple ribbon on top.
I used foam tape to adhere it to a decorative paper,
before adding it to my white card base.
Finally, I added a purple bow, and more pretty dew drops.


These two stamps were so fun to play with.
They would be lovely stamped with ink too
but I think the embossing adds such pretty shine and dimension!
Give it a try!

* * *

Emerald Creek Products Used:

Fowl Line Cling Mount Stamp;

Happy Easter Cling Mount Stamp;

Pastel Blue Embossing Powder;

Pastel Lilac Embossing Powder;

Pastel Mint Embossing Powder;

and Pastel Pink Embossing Powder.

Other Materials Used:
White Cardstock;
Echo Park - Springtime;
K & Company - Poppyseed;
Recollections - Backyard Table;
 Robin's Nest Creative Dew Drops - Orchid and Water;
Offray Ribbon.

* * *

Thanks for stopping by today!
I'll be back with another new project soon!

Emerald Creek Craft Supplies has such a great variety of fun products!
Head on over to the shop and check it out!

* * *

Here are all the links for you:

Emerald Creek Craft Supplies

Emerald Creek Facebook

Emerald Creek Instagram

Friday, 7 April 2023

Easter/Spring Journal for Kate Crafts

       Hello, my friends!

It's time for another fun project for Kate Crafts!

Today I have a really fun new Easter/Spring Journal,
using a lovely printable collection from Kate's Shop.

To see the full journal, and hear me talk about it, head to my youtube.

Here's the video:


* * *

Kate Crafts Products Used:

Other Materials Used:
File Folder;
Tea Stained Papers;
Prima Stencils;
Lawn Fawn Inks.
 
* * *

Thanks so much for stopping by!
I'll be back soon to share another fun project!

* * * * *

Here are all the links:

Kate Crafts Facebook Group

Kate Crafts Facebook Page

Kate Crafts Store on Etsy    

Thursday, 6 April 2023

Slimline Easter Card for Printable Cuttable Creatables

       Hello, my friends!

I'm back with another Easter Card for Printable Cuttable Creatables!

Today I'm sharing how I combined a sweet print/cut image,
along with a great cut file, to make a fun slimline card.

I have used:

 Girl Bunny Holding Easter Egg File;

and Happy Easter Title.
(Free File)

Here's the finished card:


Isn't that cute?

Here's how I did it:


I think this sweet bunny is adorable!
The collection includes an SVG file.
However, to cut it out in this size would be a little bit fiddly.
I sized it down to fit on the end of my slimline card front.
I then used the print/cut option.
Then I backed it with my card base.


I sized my title to fit on the other side of the card.
I then cut it out of these fun cardstock colors that worked well with the image.


I centered them in the space on my card, and adhered them in place.
Then all that was left was to add a bit of sparkle!


I filled in all the letters with Diamond Stickles...

and then went on to add some to parts of the image
 

There you have it!
A fun slimline Easter Card!


This was another really fun one to put together. 
A card doesn't need to be all cut out, or all printed.
Consider combining the two options to make a quick and easy card,
that looks a little bit more interesting!

I know that it's Good Friday tomorrow
but this card is simple enough that you still have time to make it!

I wish you all a Very Blessed Easter! 

* * *

Printable Cuttable Creatable Products Used:
Other Materials Used:
Cricut Explore Air Machine;
Recollections Cardstock;
Diamond Stickles. 

* * *

Thanks for stopping by today!
I'll be back soon with another fun project!

* * * * *

Here are all the links for you:

Printable Cuttable Creatables Shop

Printable Cuttable Creatables Blog

Printable Cuttable Creatables Facebook     

Monday, 27 March 2023

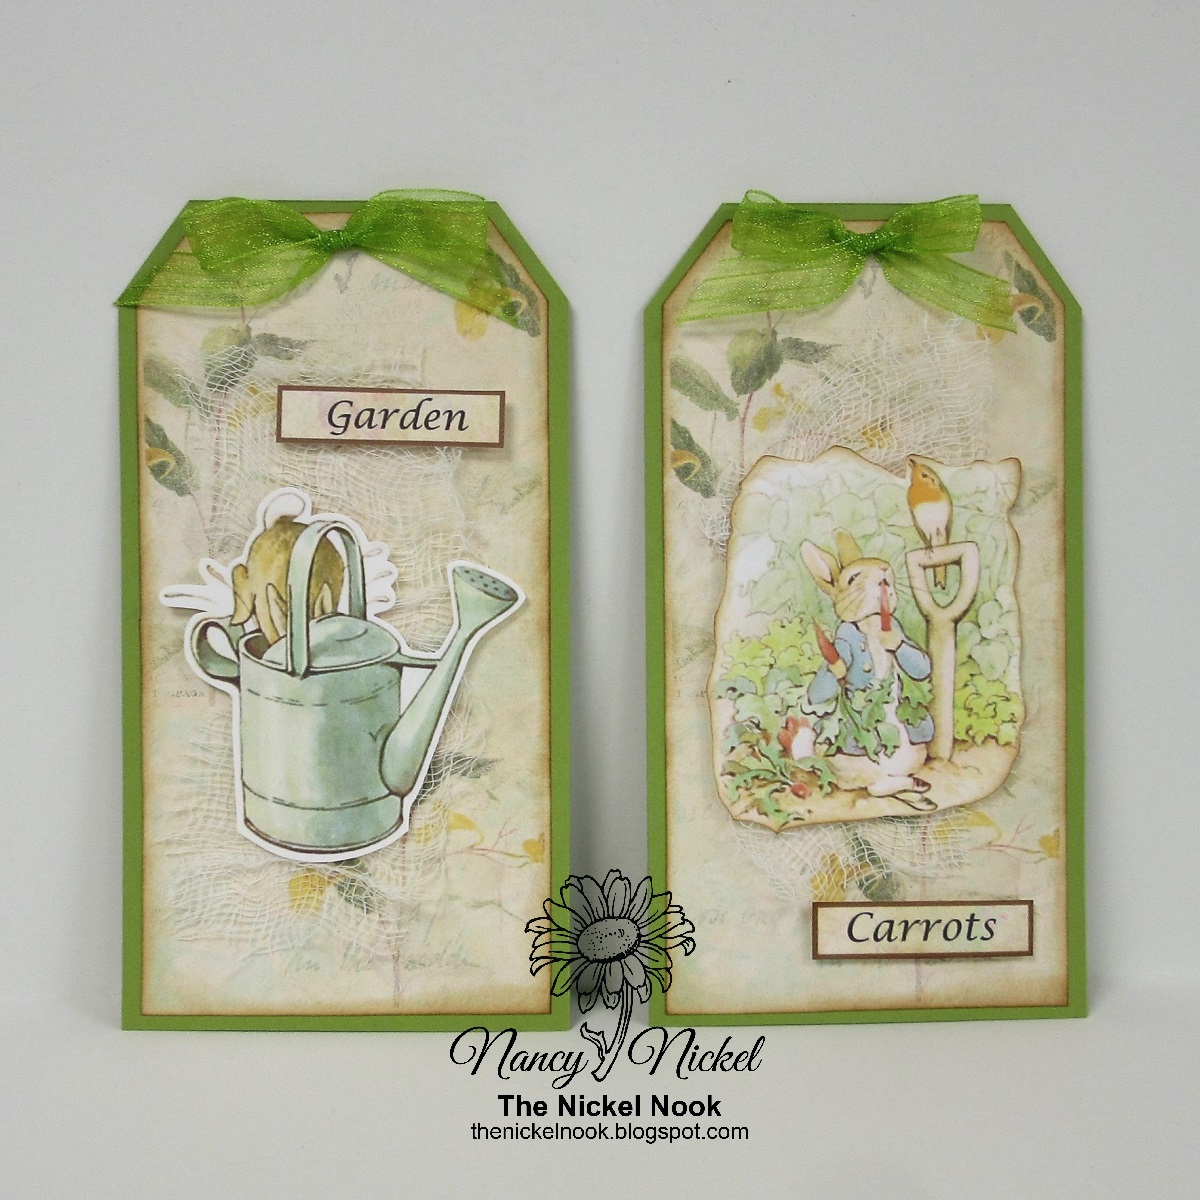
Beatrix Potter Tags for Rach and Bella Crafts

     Hello, my friends!

I'm still busy working on my journal project for Rach & Bella Crafts!

In the meantime, I have been making some additional journal bits.
This time I am sharing some fun tags, using:

The Works of Beatrix Potter

These would be lovely tucked into a Beatrix Potter journal,
or even a Spring/Easter journal!

 Here they are:


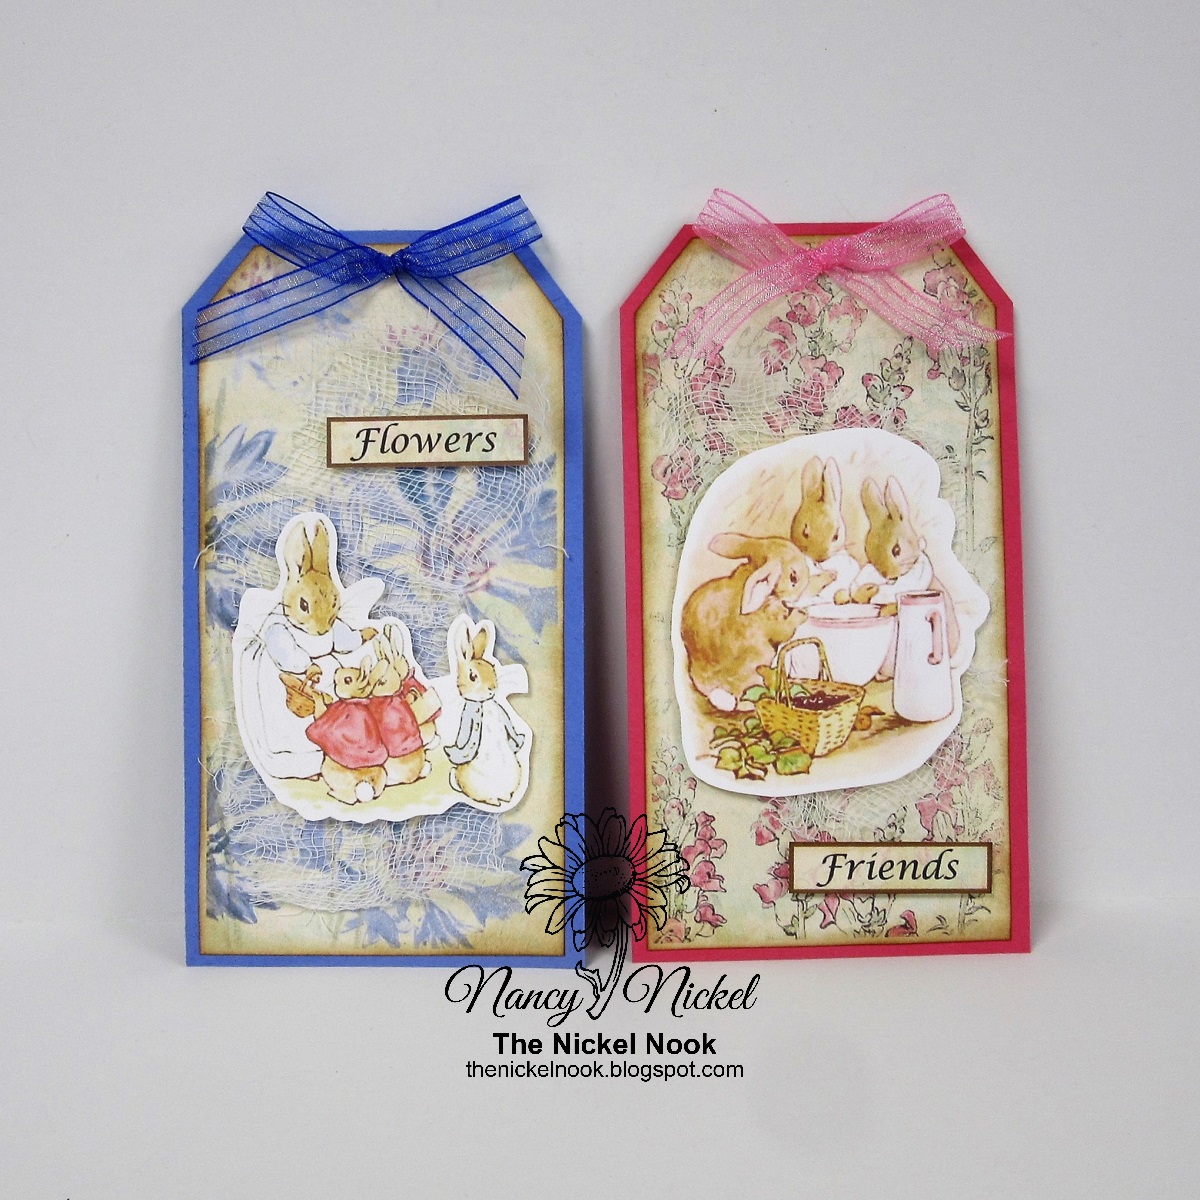
I used the tags from the kit, and backed them with cardstock.
The images and words were all fussy cut from the kit.
I tucked a bit of cheesecloth behind each image for some added texture.
To finish things off I added a sparkly ribbon bow to the top of each tag.


Quotes from the kit were added to the back of each tag.

Here's another set:


The back of those:


These were lots of fun to put together! 
There's room on the back to add some journaling too!

* * *

Rach&Bella Crafts Products Used:

The Works of Beatrix Potter

Other Materials Used:
AC Textured Cardstock;
Vintage Photo Distress Ink;
Cheesecloth;
Assorted Ribbons.

* * *

Thanks so much for stopping by!
See you again soon!

* * *

Here are all the links:

Rach&Bella Crafts Facebook Page

Rach and Bella Crafts Etsy Shop

Rach&Bella Crafts Instagram   

Tuesday, 7 March 2023

How To Add Texture and Dimension to a Simple Mini Slimline Easter Card

      Hello, my friends!

It's time for a new project share for Printable Cuttable Creatables!

Today I'm going to share some simple ways to add extra 
texture and dimension to a simple cut card.

Today I am using:

Easter Eggs in Grass SVG Cut File,

and Happy Easter Digital Paper Pack.


Here's the finished card:


See the texture and dimension?
Such a pretty cut...in all the pretty pastel colors!

Here's how I did it:


I cut out the pieces, as is, using the SVG file.
I then cut a second layer of grass, slightly shorter, in a darker shade of green.
I also chose the lovely pastel plaid paper for my background.


Here the egg layers are adhered together.
They're lovely just like that.

However, look what happens when you add some simple Stickles.


Doesn't that add some lovely sparkly texture?

In the photo below, I show the two layers of grass.
Using my fingers on the lighter piece, I curl all the blades of grass.
For the darker piece, which will be in the back, 
I curl just the tips of the longer blades.


Here they are layered together:


The extra, darker cut, along with the curling, adds wonderful dimension!
I then added the plaid paper to my pink card base,
and adhered the grass in place along the bottom.

Then it was just a matter of tucking the eggs into place:


I varied the position of the eggs in among the grass.
Some were adhered in place using bits of foam tape.
This adds even more dimension to the finished card.

Even though the card has some nice texture and dimension,
it is still relatively flat and easy to mail out. 

These steps aren't difficult or time consuming
but they do elevate a simple flat cut
into something more interesting and eye catching!

Give it a try! :o)

* * *

Printable Cuttable Creatable Products Used:
Other Materials Used:
Recollections Cardstock;
Various Stickles. 

* * *

Thanks for stopping by today!
I'll be back soon with another fun project!

* * * * *

Here are all the links for you:

Printable Cuttable Creatables Shop

Printable Cuttable Creatables Blog

Printable Cuttable Creatables Facebook     

Tuesday, 15 March 2022

Easter ATCs for White Rose Crafts

  Hello, my friends!

Here's a fun new project for White Rose Crafts LLC

I've got two Easter themed ATCs,
made with a fun collection from the shop.

It's the Pastel Spring Collection from 13@rts.
The papers are so gorgeous!
All the elements I've used to decorate my ATCs
were fussy cut from the collection.

Here are my ATCs:


I began with this very pretty paper.
It's such a lovely combination of pinks and yellows.
I cut my ATCs, then backed them with white cardstock.
I also rounded the corners and distressed the edges.


All the sweet little elements were so fun to fussy cut.
They're really tiny and so cute!
I inked around the nest in the center to give it more definition,
and then added it in place with foam tape.
The sentiment was matted with yellow cardstock,
and also added with foam tape.
Everything else was adhered flat.
Then I added some pretty glitter with Stickles.


Here I fussy cut more sweet elements,
and adhered them in place.
Again, I added Stickles for all the glitter.

Head on over to the shop and check out this wonderful collection!
It's perfect for all your Spring projects!


White Rose Crafts Products Used:

 13@rts Pastel Spring Collection
(I used the 6 x 6 paper pad)

Other Materials Used:
White Cardstock;
WRMK Corner Chomper;
Tim Holtz Distressing Tool;
Star Dust Stickles.

* * * * *

Thanks so much for stopping by!
Please come back next week to see another fun project for
White Rose Crafts LLC.

* * * * *
Here are all the links for you:

White Rose Crafts LLC

White Rose Crafts Gallery

White Rose Crafts Facebook Page

Thursday, 10 March 2022

Fun Easter Pocket Card for Maker's Movement

 Hello, my friends!


I'm back today to share a fun new project for Maker's Movement

I used my wonderful Crossover II Machine for all my die-cutting on this project.
I really appreciate this machine!
It cuts every kind of die so smoothly.

I've also used:


Here's my card:


Isn't that chick the cutest? Puts a smile on my face for sure!
I began by layering my card base; with navy cardstock and a pretty patterned paper.
Then I added the Library Pocket to the front of my card.
I cut the pocket card from white cardstock and stamped it.


When I saw the images stamped out,
I thought it would be cute to make some kids coloring cards.
Actually...it would be fun to stamp a full page of chicks and eggs to color, right?


Then I decorated the front of the pocket.
I stamped, cut, and colored the chick,
layered the labels, and stamped the "Happy Easter".
Finally, I added a little yellow bow to the top of the card.


I know I've said it before but the stamps and dies 
from Maker's Movement are all so much fun to play with! :o)

* * * * *

Maker's Movement Products Used:

Crossover II Fabric & Paper Cutting System,


Other Materials Used:
Recollections Cardstock;
Making Memories Chloe's Closet Papers;
Memento Tuxedo Black Ink;
Ranger Letter It Ink - Cobalt.

* * *
Thanks so much for stopping by!
I'll be back soon with another fun project!

* * *

Here are all the links for you:

Maker's Movement Facebook  

Wednesday, 2 February 2022

Relatively Thoughtful - Happy Easter Mini Album

    Hello, my friends!

I'm back with my final Design Team share for Relatively Thoughtful!

This week I have created a fun Easter mini album using the newly released
Happy Easter Collection!

I've put together a really sweet little mini album.
Perfect for adding some fun Easter photos and documentation.
I've used a distressing tool to distress all the paper edges.
Sally's papers are always ideal for distressing!

Here's the front cover:


The front and back cover are chipboard, and the inside pages are all pocket pages.


Aren't these bunnies adorable?
I fussy cut some of the pussy willows from the element sheet,
and added them to the cover along with two little ruffled ribbons.
I also added the "Happy Easter" with another ruffled ribbon.


On the first page, I fussy cut a pretty butterfly and placed it on top of the birdhouse.
The page on the right is a pocket page.
You can see the blue tag tab sticking out.


On the left I added some more fussy cut elements.
These create a tuck spot for the bright yellow tag.
The page on the right is another pocket page.
This time the tag is that same bright yellow.


On the left, I added a band to hold the pink tag.
On the right, some cute fussy cut eggs to hold some smaller journaling tags.
The right page is another pocket page.
This time there is a pink tag tab poking out.


Here's another band on the left to hold more tags.
On the right is a band with more fussy cut pussy willows,
and another adorable bunny.
The right side page is the chipboard back cover.


Here's a closer look at the sweet bunny!
Looks a lot like the one that comes to my yard every day.
Although my visitor is fatter and all white.

Below is the back of the back cover.


These papers are wonderful to work with!
They are ideal for Easter and Spring themed projects!
The colours are fresh and pretty...and very inspiring!

* * * * *

Relatively Thoughtful Products Used:

Happy Easter Collection 

 Other Materials Used:
Recollections Cardstock;
Distressing Tool;
Binding Rings.

* * * * *
Thanks so much for stopping in today!
There are some really fun events happening at the Relatively Thoughtful facebook page.
You'll want to head over there and take a look.
I hope that many of you will come and join in the fun!

 * * * * *

Here are the links for you:

 Relatively Thoughtful Shop

 Relatively Thoughtful Blog

 Relatively Thoughtful Facebook 

Blog Archive