Showing posts with label Scrappy Tails Crafts DT. Show all posts

Sunday, 19 December 2021

Scrappy Tails Crafts - Merry Christmas!

      Hello,  my friends!

Today I am sharing my final project for Scrappy Tails Crafts! 
It's hard to believe it's be a whole year of sharing these fun creative products!

I decided to share a more personalized card with you today.
Many of you already know that we recently moved,
and our new house has a really pretty brick exterior.
I decided to make a brick house Christmas card
and send it to each one of you here on my blog! 


The base of my card was put together using a combination of:


The birds and sentiment came from the Cardinal Blessing Stamp Set.
I stamped them, fussy cut them out, and colored them with my markers.


To decorate the top of the house,
I used the Christmas House Roof Add-On Metal Dies.
It's such a fun addition to this house!
I used the lights, the bulbs, and the snow.
There are even more options included to customize your house.


I adhered the mailbox and bird in place using foam tape.
I also put a little piece of foam tape behind the top bird.
Everything else was adhered flat.


This was such a fun card to put together!
All the dies and stamps at Scrappy Tails are so interactive,
and work beautifully together!

With that, my final Scrappy Tails project, I wish you all a Very Merry Christmas! 

 * * * * *

Scrappy Tails Products Used:

 Slimline Brick Background Metal Die,

Cardinal Blessing Stamp Set,

Christmas House Roof Add-On Metal Dies.

Other Materials Used:
Watercolor Paper;
Cardstock;
Walnut Stain Distress Ink;
Spectrum Noir Markers.
 

* * * * *

Thanks so much for stopping by!
I'll be back soon to share some more fun!

* * * * *

Here are all the links for you:

Scrappy Tails Crafts Shop

Scrappy Tails Crafts Blog

Scrappy Tails Facebook

Sunday, 5 December 2021

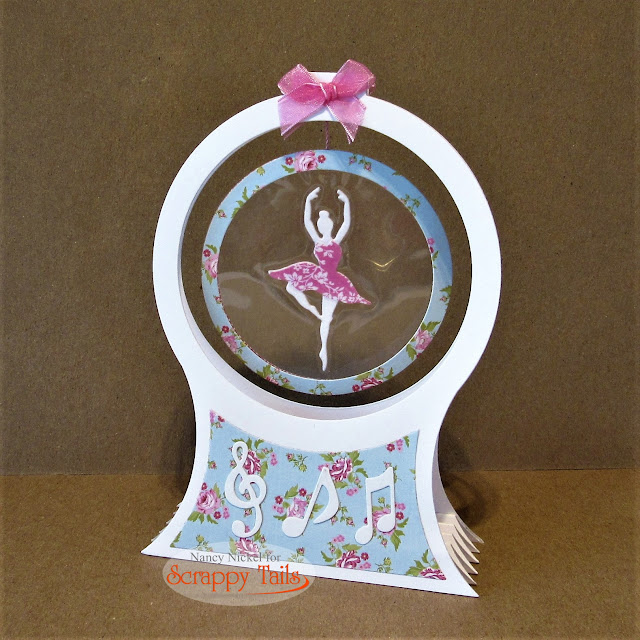
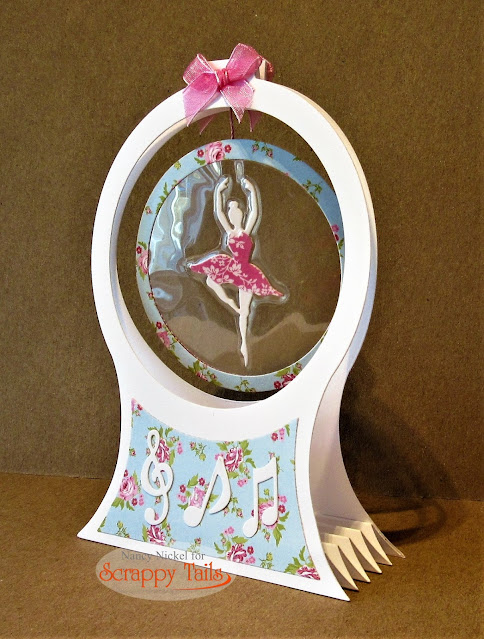
Scrappy Tails Crafts - Dancing Ballerina Snow Globe Pop Up Card

     Hello,  my friends!

Today I have a new project for Scrappy Tails Crafts! 

I think by now you've all seen some of the fabulous spinner/snow globe projects.
I decided to make one up without the seasonal theme.
I know that many people collect snow globes of all different kinds.

I pulled out some other dies from the October Release,
and came up with this:


I assembled the A7 Snow Globe Pop Up Card Metal Die using heavy white cardstock.
I added the pretty floral panel to the front and back.


I then took the Ballerina die from the A7 theatre/Window Curtain Cover Plate Set.
I cut two ballerinas from white cardstock, and two from the pink patterned paper.
I trimmed the pink patterned paper to create the tutu - one for each side.
I then ran the ballerina through my laminator,
ensuring that the piece would be big enough to trim to my circle.


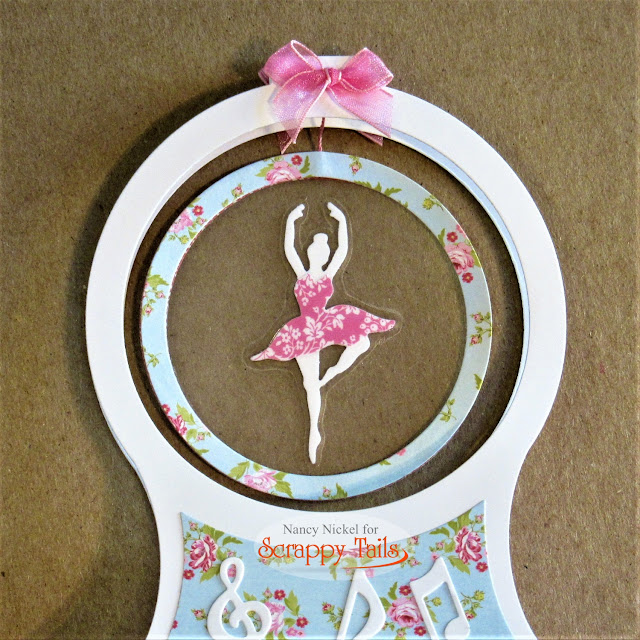
Here's a photo without the disruptive glare.
I die-cut the circle from the laminated piece.
I then cut two round frames from the decorative paper,
and adhered them in place on the front and the back,
sandwiching a strand of pearl cotton between them.
I threaded the cotton through the hole at the top and tied a knot to secure.
I didn't have an appropriate sentiment
but decided that the music notes from the A7 Music Note Cover Plate Set
were just right.
Finally, I added a pretty pink bow to each side of the top.

Here's the spinner in action:

This was so much fun to put together!
Now I'm looking at all my dies with this Snow Globe Pop Up in mind!

 * * * * *

Scrappy Tails Products Used:

 A7 Snow globe Pop Up Card Metal Dies,

A7 theatre/Window Curtain Cover Plate with Ballerina,

A7 Music Note Cover Plate with Instruments.

* * * * *

Thanks so much for stopping by!
I'll be back soon to share some more fun!

* * * * *

Here are all the links for you:
Scrappy Tails Crafts Shop

Scrappy Tails Crafts Blog

Scrappy Tails Facebook

Sunday, 21 November 2021

Scrappy Tails Crafts - Musical Merry Christmas Card

    Hello, my friends!

It's time for a fun new project  for Scrappy Tails Crafts!
I've used some great new products from the October 2021 Release.

Here's my card:


I really like this A7 Music Note Cover Plate.
Isn't it a perfect match to the background paper from my stash?
Can you believe I just happened to have that in my travel bag? ;o)
I cut the Cover Plate from red cardstock and added it to a slightly larger card base.
I then cut the middle panel and adhered it in place.


I die-cut the violin from the same red cardstock,
angled it in the corner and adhered it in place.


To finish everything off,
I just added a pretty sparkly bow to the top of the card.


This music themed die set is really fabulous!
Who doesn't love music?
There are so many fun and creative ways to use this one!
I hope you check it out!

 * * * * *

Scrappy Tails Products Used:

A7 Music Note Cover Plate Metal Craft Die with Instruments 

* * * * *

Here are all the links for you:
Scrappy Tails Crafts Shop

Scrappy Tails Crafts Blog

Scrappy Tails Facebook


Monday, 15 November 2021

Scrappy Tails Crafts - Warm Winter Wishes Card

Hello, my friends!

Today I'm back with a new project for Scrappy Tails Crafts! 

This is my first share using products from the fabulous October release!
Such a great release...again!

It's very appropriate for me to be writing this post today
because we're enjoying our first snowfall of the season. 

I send you all Warm Winter Wishes!

Here's my card:


Isn't that a wonderful Winter scene?
It was so much fun to put together,
I began with my background paper,
and then I cut my trees in coordinating colors. 


The lamp post is so charming!
Many of you know that I've been crafting on the road for the past two months
and working with what I have.
Can you believe I had no yellow or gold cardstock?
I actually used a yellow post it note for the light.


The lovely sentiment came from the Winter Essentials Metal Craft Dies set.
I cut it once from white cardstock, and then a second time from black.
I offset them slightly before adhering them in place.
This creates a very nice shadow, which adds more dimension.
Isn't it a lovely script?


These die sets are both so great for all your Winter/Christmas projects!
They make fabulous stand alone cards,
or they can be wonderful additions to your backgrounds.

 * * * * *

Scrappy Tails Products Used:

 Winter Snow Trees Metal Craft Die,

 Winter Essentials Metal Craft Dies.

* * * * *

Here are all the links for you:
Scrappy Tails Crafts Shop

Scrappy Tails Crafts Blog

Scrappy Tails Facebook

Wednesday, 20 October 2021

Scrappy Tails Crafts - Wishing You a Merry Christmas in Foil!

    Happy Wednesday, my friends!

It's Nancy back with another fun foiled project for Scrappy Tails Crafts! 

These Christmas Foil Plates are so much fun to play with!
They also make it very easy to create gorgeous cards!

Here's my card:


Isn't that foiling festive and fabulous?
I think it makes a card very special!

I chose a paper from my stash that had the red foil on kraft design.
I matted it with red cardstock before adding it to my white card base.


I took a pretty sentiment from the Hot Foil Christmas Sentiments Set of Three,
and foiled it onto kraft cardstock with gold.
I then matted that with the same red cardstock,
before adhering it to the card base with foam tape.


I then used the Hot Foil Poinsettia Flower Set of Three.
I foiled the plates on kraft cardstock; red foil for the flower and green foil for the leaves.
Then I used foam tape to adhere them in place on the card.
 

I would really encourage you to give foiling a try if you haven't yet!
It really is fun...and addicting too!

* * * * *

Scrappy Tails Products Used:

 Hot Foil Christmas Sentiments Set of Three;

Hot Foil Christmas Sentiments Set of Three.

* * * * *

Here are all the links for you:

Scrappy Tails Crafts Shop

Scrappy Tails Crafts Blog

Scrappy Tails Facebook


Wednesday, 29 September 2021

Scrappy Tails Crafts - More Foiling Fun!

   Happy Wednesday, my friends!

I'm back with a fun new project share for Scrappy Tails Crafts! 

Today I have another foiled Christmas card to share with you.
I've used some more fabulous Hot Foil Plates from the 2021 August Release

Here's my card:


Doesn't that foiling make a lovely card?
I began with a white card base.
I chose a decorative paper from my stash that resembled snowflakes.
I covered my card base with a panel of this paper.
I then foiled the Hot Foil A2 Snow Background Plates onto the blue cardstock,
using a pretty pearl foil, and added that to the front of the card.


I took my favorite sentiment from the Hot Foil Christmas Sentiments Set of Three,
and foiled it onto another piece of the blue.
I then layered that on top of another strip of the designer paper.
To finish things off I added some pretty snowflake rhinestones.


Here is a photo that shows off all the pretty foiling!
I have to say that I'm having a lot of fun playing with 
my new foil plates!
I'm sure you will too! 

* * * * *

Scrappy Tails Products Used:

 Hot Foil A2 Snow Background Plates; 

 Hot Foil Christmas Sentiments Set of Three.

* * * * *

Thanks so much for stopping by today!
I'll be back soon with another fun project share!

* * * * *

Here are all the links for you:

Scrappy Tails Crafts Shop

Scrappy Tails Crafts Blog

Scrappy Tails Facebook


Wednesday, 22 September 2021

Scrappy Tails Crafts - A Little Birdy Told Me...

    Happy Wednesday, my friends...
...and Happy First Day of Fall! :o)

I'm back today with a fun new project for Scrappy Tails Crafts! 

I thought I would interrupt my run of foiled Christmas cards,
to share a card that celebrates the first day of Fall! 

Here's my card:


The inside of the card...which I neglected to photograph...
says: "...it's Fall!"
I actually began with cutting the A2 Forest Tree Cover Plate Metal Die,
from kraft cardstock.
I then cut it out again, and fussy cut out the larger horizontal branch.
I turned it upside down and adhered it in place to the frame.
I then adhered the cut frame onto my background paper.
Pulling out the Fall colors from the background paper,
I added two more matts before adhering it to my kraft card base.
 

and stamped several birds onto watercolor paper.
I colored the birds in with watercolor paints,
and then fussy cut them out.
I also stamped the sentiment out on watercolor paper,
and added some of the colored matts behind it.
Finally, I added the birds to the scene using foam tape.


Here's a closer look at the birds.
I chose colors that would work well with my scene,
and then settled each of them on their own branch.


All the great dies and stamps from Scrappy Tails Crafts work so well together.
You can combine pieces from different sets and create such fun projects!

This is the first project that I have finished and photographed in my temporary location.
It was tricky trying to get some good photos,
as it's quite dark here with higher than usual windows. 

* * * * *

Scrappy Tails Products Used:

 A2 Forest Tree Cover Plate Metal Die;

 Spring Birds 6 x 8 Stamp Set.

Other materials used:
Recollections Cardstock;
Doodlebug Papers;
Ranger Archival Ink;
Watercolor Paper;
Watercolor Paints.

* * * * *

Thanks so much for stopping by today!
I'll have another fun project share very soon!

* * * * *

Here are all the links:

Scrappy Tails Crafts Shop

Scrappy Tails Crafts Blog

Scrappy Tails Facebook

Wednesday, 1 September 2021

LineDotArrow - Feeling Blue Journal

Hello, my friends!

Today I'm sharing a new journal project for LineDotArrow!

I'm afraid this one is long overdue and late!
The move was really interfering with my crafty time! lol
We are now in our temporary location and I've had time to finish it up.  

I call this journal my "Feeling Blue Journal".
I've used a couple of beautiful blue kits from the shop,
along with a really beautiful ephemera kit.

As always, I've added some extra bits.
I've also added some pretty blue doily pages that I made myself.

Here's my video:


I have left lots of journaling space in this one,
and you don't have to be feeling blue to do so!
Please let me know if you have any questions about anything!


LineDotArrow Products Used:

Botanical Nature Kit;

Delfts Kit;

Ephemera and Fussy Cut Set 4.


* * * * *
Thank you so much for stopping by today!
I'll be back soon with another fun project.

* * * * *

Here are all the links for you:

LineDotArrow Shop

LineDotArrow Facebook Group

LineDotArrow Youtube

Tuesday, 31 August 2021

Scrappy Tails Crafts - May Your Heart Be Filled...with foiling!

   Happy Tuesday, my friends!

It's time for a another new project share for Scrappy Tails Crafts! 

Today I'm sharing a second foiled card with you.
If you missed my first foiled card, you'll find it HERE.
Again, I've used some fabulous foil plates from the
Countdown to Christmas Release,
along with some other great dies!

Here's my card:


I just love the shine of that pretty silver foiling!
This time I have used another one of the sentiments from the
I foiled it in silver, onto black cardstock.
I then used the plain oval die,
to cut it out.
I also cut the fancy frame oval out of the same black cardstock.


The oval and frame were then adhered to my card front,
which was cut from a pretty Wintery paper.
The stars on the paper just happen to be silver foiled.


To finish my card off, 
I added three pretty snowflake looking bling
to the top and the bottom of the oval. 
This was a simple card to put together
but I think the foiling makes it extra special!

* * * * *

Scrappy Tails Products Used: 

Hot Foil Christmas Sentiments Set of Three,

A7 Book Add-On and Fancy Oval Die Set.

* * * * *

Here are all the links:

Scrappy Tails Crafts Shop

Scrappy Tails Crafts Blog

Scrappy Tails Facebook

Thursday, 26 August 2021

Scrappy Tails Crafts - From Our Home to Yours Foiled Christmas Card

  Happy Wednesday, my friends!

It's time for a new project share for Scrappy Tails Crafts!  

Have you got your hands on any of the fabulous products from the
Countdown to Christmas Release?
I have to say that Sabrina really outdid herself with this one! 

I've created my first foiled card, and it was so easy and fun to do!

Here's my card:


Aren't those foiled poinsettias gorgeous?
I used my new GoPress and Foil Machine to do all the foiling.
I foiled the poinsettias with red foil onto kraft cardstock.


I trimmed this piece down using the slimline die from the
Slimline Shadow Box Craft Die Set.
Then I adhered it to a red cardstock card base.


I also foiled the sentiment. 
Using one of the pieces from the Hot Foil Christmas Sentiments Set of Three,
I foiled it in gold onto kraft cardstock.
I then trimmed it down and cut out only "From Our Home to Yours".
I matted it with red cardstock and adhered it to the card front with foam tape.


Here's one more angle showing all the gorgeous shine of the foil!
I've got more of these pretty foiled pieces coming soon!

* * * * *

Scrappy Tails Products Used:

 Hot Foil Poinsettia Flower Set of Three,

Slimline Shadow Box Craft Die Set,

Hot Foil Christmas Sentiments Set of Three.

Other Materials Used:
GoPress and Foil Machine;
Couture Creations - Red and Gold Foil;
Cardstock - Kraft and Red;
Crafts - Red Bling.
 

* * * * *

Here are all the links:

Scrappy Tails Crafts Shop

Scrappy Tails Crafts Blog

Scrappy Tails Facebook

Wednesday, 28 July 2021

Scrappy Tails Crafts - Butterfly Pop Up Card

  Happy Wednesday, my friends!

It's time for a fun new Scrappy Tails Crafts project!  

This week I'm combining several fabulous dies,
into one super fun pop up card!. 

Here's my card:


Isn't that cute?
I started with the Flower Vase Pop Up Card Die.
However, instead of cutting the base twice, to form an octagon,
I cut it only once.
This makes an adorable little vase.
(Sabrina taught me this trick!)


The "Hello" and shadow, came from the Slimline Shadow Box Craft Die Set.
to cut all the filler from double-sided papers.
That way there is still color and pattern from the back side.


To finish things off, I added the gorgeous butterfly from the Flying Butterflies Die Set.
 I cut both of the butterfly pieces from blue textured cardstock.
I left the shadow piece alone, but heat embossed the intricate piece,
using a pretty blue glittered embossing powder.
I then adhered just the body portion of the two butterfly pieces together,
before tucking it into the vase.


Finally, here's a look at the Butterfly Pop Up Card folded flat.


Scrappy Tails dies are so much fun to play with!
They all work with each other to make fun new creative projects!

* * * * *
Thanks for stopping by today!
See you again very soon!

* * * * *

Here are all the links:

Scrappy Tails Crafts Shop

Scrappy Tails Crafts Blog

Scrappy Tails Facebook

Wednesday, 14 July 2021

Scrappy Tails Crafts - You're Toad-ally Amazing!

     Happy Wednesday, friends!

It's time for another project share for Scrappy Tails Crafts! 

Today I have a new slimline card,
using a fun combination of stamps and dies.

Here's my card:


I began by stamping all the sweet frog images onto watercolor paper.
I colored them with watercolor paints, and fussy cut them out.
For those of you that don't like to fussy cut like I do,
coordinating dies are also available.


I made the slimline card base from white cardstock.
I added a layer of black cardstock to the front of the card base.
I then cut the Slimline Woodgrain Background from brown cardstock.
I added the grass die across the bottom of the card,
and then adhered all the images in place.
I'm hoping it looks like a tree fallen in the forest.
The mushrooms and critters have turned it into their home! 


I then stamped the sentiment onto watercolor paper,
and cut it into strips before adhering them in place.


This is a sweet stamp set to work with,
and it's loaded with options!
The Woodgrain Background is totally fabulous,
and one that I'll be using again and again.
 
* * * * *

Scrappy Tails Products Used:

* * * * *

Thanks so much for stopping by today!
I'll be back soon to share another fun project! 

* * * * *

Here are all the links:

Scrappy Tails Crafts Shop

Scrappy Tails Crafts Blog

Scrappy Tails Facebook

Wednesday, 30 June 2021

Scrappy Tails Crafts - Once Upon A Time...

     Happy Wednesday, friends!

I'm back to share a new project for Scrappy Tails Crafts! 

I have to tell you that the June Release is absolutely fantastic fun!
I had the BEST time making this project!

I used the A7 Book Pop Up Metal Craft Die
to make my fun fairytale book.

Since I wanted to include the complete "Once Upon A Time" on my cover,
I extended the cover to measure 7" x 7".

Here's the front cover:


In keeping with the glitter gloss treatment on the papers,
I edged everything with pretty gold gilding.

Here's a look at the gold gilded edges:


Here's the back:


Here's the inside:


Isn't that fun? 
I cut the complete A7 Ivy Branch Cover Plate Metal Die several times out of green cardstock.
I added some of the ivy pieces to the front cover.
the rest I placed into the shadow box.


Here I added the "Far Far Away" paper,
along with one of the corners cut from green cardstock.


I die-cut four more corners from kraft cardstock
and gilded them with the gold.
They're such beautiful and intricate cuts!


This die is seriously fun to create with!
The options and sizes are endless, so you'll be seeing it again very soon!

* * * * *

Scrappy Tails Products Used:

 A7 Book Pop Up Metal Craft Die;

A7 Ivy Branch Cover Plate Metal Die.

Other Materials Used:
Recollections Cardstock;
DCWV Once Upon A Time Stack;
Cosmic Shimmer - Gold Treasure Gilding Polish.

* * * * *

Thanks so much for stopping by today!
I'll be back soon with another fun project share!
 
* * * * *

Here are all the links for you:

Scrappy Tails Crafts Shop

Scrappy Tails Crafts Blog

Scrappy Tails Facebook


Blog Archive