Showing posts with label Rinea. Show all posts

Sunday, 17 May 2020

Rinea Tutorial - A Pretty Pair of Foiled Teacups

Hello, my friends!

Today I have a new tutorial for Rinea.
Sadly, this is my last project for the DT at Rinea.
After two years, I've made the tough decision to step down.
It won't be my last project using these wonderful foiled papers.
I'll continue to use them in future projects.

Today I'm sharing a fun little set of foiled teacups.
These foiled papers are perfect to use with a 3D die project.
They hold their shape beautifully!

Here are my teacups:


Here's how I did it:


Materials Used:


Sizzix Brenda Walton Teacup Die.


1. I wanted to make my teacup a combination of Sapphire and Gold. I went ahead and stacked both colors of the foiled paper on the die, and then ran it through my die-cutting machine. 
2 Simply assemble the die-cut pieces.

Since I had cut 2 of each pieces, I went ahead and assembled both the teacups. The die also includes a little tea tag but I didn't use it.


Aren't they pretty little cups?
I like the color combination, and think they look very elegant.


Although I decided to leave my teacups plain,
there are many ways you could embellish them:
add flowers, trim, lace, etc.
They are a really good size for adding treats too.


I think they would be really lovely decor pieces for a teaparty!
There could be one at each place setting, filled with treats,
along with the names on the tea tags.
Such a fun project!


* * * * *
Thanks so much for stopping by today!
See you again very soon!
* * * * *


Here are all the links for you:


Sunday, 3 May 2020

Rinea Tutorial - Bee Card

Hello, my friends!

Today I have a quck and easy tutorial for Rinea.

I'm going to show you how I made this fun Bee Card,
using these fabulous foiled papers!

All I needed was one piece of Ebony/Gold Glossy Paper.
Gorgeous glossy black on one side...and gold on the other.

Here's my card:

Here's how I did it:


Materials Used:
Tim Holtz Alterations Thinlits Die - Mixed Media;
Tim Holtz Alterations Thinlits Die - Geo Insects;
Black Cardstock;
Crossover II Fabric and Paper Cutting System.


1 Create a 5 1/2" square card base from the black cardstock. Set it aside.
2. Cut a piece of the foiled paper to measusre 5 1/2" x 5 1/2". 
3. With the gold side up, place the bee hive die from the Mixed Media set into one of the corners. Run it through your die-cutting machine. I used the Crossover II Machine to do my die-cutting. The benefit of using this machine is that you can alter the pressure. I didn't want the die to cut out in it's entirety. I wanted to just pop out several of the pieces and leave the rest intact. If you don't have an option like that, just cut them all out. It will still look great!
4. Once the one corner is cut out, place the die in a second corner and repeat the process. Continue around the card. Don't worry about where the die-cutting overlaps. It's fine!
5. Flip the remaining piece of foiled paper over, so the black side is facing up. Place the bee die on it, and run it through your die-cutting machine.
6. Adhere the gold foiled piece onto the black cardstock base.
7. Adhere the bee in place onto the gold bee hive background. I used my Best Glue Ever with the No-Clog Writting Cap. I find it really cuts down on blue smears.

There you have it...a quick and easy card!


* * * * *
Thanks so much for stopping by today!
See you again soon!

* * * * *

Here are all the links for you:


Wednesday, 29 April 2020

Dies R Us - Thinking of You

Happy Wednesday, my friends!

It's my turn to share a new inspiration post, over on the Dies R Us Blog.

Today I'm sharing a new card,
just to let you know I'm Thinking of YOU!


Here is what I needed to make it:


Here's how I did it:


I began with the gorgeous Rose Frame die from Tutti Designs.
Using the die on a gorgeous piece of Rinea Lavendar/Gold Glossy Foiled Paper
I ran it through my die-cutting machine. 
The die is so intricute!
It does a fabulous job on the foiled paper.


Then I took the "Thinking of You" from the Impression Obsession die set.
I die-cut that from the left-over center piece, of the Rose Frame cut.

Isn't it a beautiful font?


I mounted a piece of black cardstock onto the white cardstock card base.
Then I adhered the Rose Frame in place.
Finally, I adhered the words in place, and added a pretty ribbon bow.


All you need is some shiny foiled paper and some fabulous dies!

I hope you enjoy my fun project!
I'll be back soon with more!

* * * * *

Dies R Us Product Used:


* * * * *
Don't forget to come join in the fun at the Dies R s Challenge Blog
 There's a new challenge theme offered on the 1st and 15th of each month 
and one lucky randomly drawn winner will receive a gift voucher prize to the Dies R Us Store.  
For your convenience, all the important Dies R Us links are provided below.


click below for:
FRIENDS OF DIES R US PINTEREST PAGE

Thanks for stopping by!

Friday, 17 April 2020

Rinea Tutorial - Shooting Star Skyline Card

Hello, my friends!

Today I have a new tutorial for Rinea.
It's another great collaboration post with Poppystamps!


I have combined the wonderful foiled paper
with two great dies from Poppystamps!

Here's my card:


Here's What I Used:


Materials Used:
Poppystamps - Shooting Star Craft Die;
Poppystamps - Townhouses Craft Die;
White A2 Card Base.

 Here's How:


1. Cut a piece of the Sapphire/Gold Glossy Foiled Paper to 4 1/4" x 5 1/2". Adhere it to the front of the card base.
2. Since I wanted all my little houses to be in a variety of different colors, I reached for my Assorted Foiled Papers - Misfits Pack. I die-cut the Townhouses die from multiple colors, in both Starstruck and Glossy foiled papers. 
3. I added some small pieces of the Gold/Gold Glossy Foiled Paper behind some of the windows, so it appears that the lights are on. 
4. After assembling all my little houses, I adhered them along the bottom of my card front. 


5. Die-cut the Shooting Star from the Gold/Gold Glossy Foiled Paper.
6. Adhere the Shooting Star to the night sky above the house skyline. 


  This was such a fun card to put together!
The dies are so intricate and cut beautifully!
As always, the foiled papers just make it special!


Thanks so much for stopping by today!
I'll be back with some new inspiration soon!
* * * * *

Here are all the links for you:


Friday, 3 April 2020

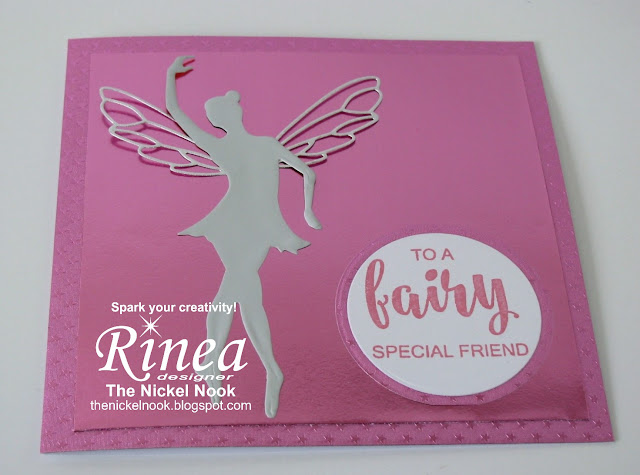
Rinea Tutorial - Fairy Special Friend Card

Hello, my friends!

Today I have a fun tutorial for Rinea.
This month we are enjoying a wonderful collaboration with Poppystamps!


I'm going to show you how to make this fun fairy card,
using these fabulous foiled papers,
along with a stamp and die from Poppystamps!
I'm also introducing the fabulous new Arctic Foiled Paper.
It's just been released...and it's fantastic!


Here's what I used:


Materials Used:
Poppystamps - Fairy Die;
White Card Base - 5 1/2 x 5 1/2;
Small piece of White Cardstock;
Pink Ink;
Circle Die or Punch.

Here's How:

1. Cut a piece of the Blush/Blush Starstruck Foiled Paper to 5 1/2" square. Adhere to the card base.
2. Cut a piece of the Blush/Gold Glossy Foiled Paper to a 5" square. Adhere to the center of the foiled card base.


3. Die-cut the fairy from the Arctic foiled paper.
4. Die-cut the fairy wings from the Silver/Silver Starstruck Foiled Paper


5. Using matching pink ink, stamp the sentiment onto white cardstock. Cut out using a punch or circle die.
6. Cut or punch a circle of the Blush/Blush Starstruck Foiled Paper slightly bigger than the stamped piece. 
7. Add the sentiment circle to the center of the larger circle.


8. Adhere the fairy in place to the left side of the card front. Adhere the wings in place behind the fairy, leaving the rest of the wing free of glue. 
9. Finally, adhere the layered sentiment in place on the bottom right corner.


This is such a lovely combination of products!
The fairy is lovely in the new Arctic Foil,
and the wings are so delicate and pretty!
The stamp set offers a really great variety of sentiment options!


Thanks so much for stopping by today!
I'll be back later in the month with another fun project,
combining Rinea with Poppystamps! 
* * * * *

Here are all the links for you:


Tuesday, 17 March 2020

Rinea With Creative Embellishments - Birdhouse Branch Tag

Hello, my friends!

Today I have a fun tutorial for Rinea.
Again, this post is in collaboration with Creative Embellishments!

This time I have created a really fun Birdhouse Branch Tag,
combining fabulous foiled paper
with wonderful chipboard pieces!

Here's my tag:


Here's how I did it:


Materials Used:
Creative Embellishements - Large Tag, Branches, Bird Cage;
Brown Acrylic Paint;
Stampendous Embossing Ink;
Ranger Liquid Platinum Embossing Powder;
Brown and Green Grosgrain Ribbon.


1. I began by painting the chipboard branch, and the outside edges of the Large Tag, with brown acrylic paint.
2. I inked the birdhouse with embossing ink, liberally covered it with the embossing powder, and heat set it. 


3. Once the paint was dry, I measured and cut the Mocha/Mocha Starstruck Foiled Paper to fit the tag, and adhered it in place.
4. I cut a piece of the Jade/Jade Starstruck Foiled Paper slightly smaller, and adhered it in place on top of the Mocha. (refer to photo below)


5. Next, I adhered the branch in place on the tag, ensuring that the birdhouse would fit well under it. 
6. I adhered the birdhouse in place, ensuring the "chain" was placed on one of the branches.  


7. I cut multiple little leaves from the Jade/Jade Starstruck Foiled Paper, and adhered them on the branch leaves. I curled the leaves up to add some extra dimension.
8. Finally, I added a green ribbon loop through the hole at the top of the tag, and added a brown ribbon bow in place.


This was such a fun tag to make...and such a great combination of products!

* * * * *
Thanks so much for stopping by today!
I'll be back with more very soon!
In the meantime,
check out the Creative Embellishments Shop.
* * * * *

Here are all the links for you:


Tuesday, 3 March 2020

Rinea with Creative Embellishments - Easter Album Cover

Hello, my friends!

Today I have a fun tutorial for Rinea.
All month long, we are partnering with Creative Embellishments.
They have such incredible products in their shop!
It was so fun to combine them with Rinea foiled paper!

For my first project this month, 
I've created a pretty Easter Album Cover. 


Here's how I did it:


Materials Used:

Creative Embellishments - Junk Journal Cover 2, Easter Frame, Egg Word Set;
Purple Ink;
Stampendous Embossing Ink;
Embossing Powders - Green and Purple;
WRMK Corner Chomper;
Sticker Paper.


1. I began by inking up all the edges of the chipboard cover with purple ink. I set it aside to dry.


2. Next, I laid the Easter Frame over a piece of the Glossy Turquoise/Gold Foiled Paper. I used my craft knife to cut around the egg shape. You could also trace it with a pencil and cut it out with scissors. 
3. I then inked the frame with embossing ink, covered it with green embossing powder, and heat set it.
4. I then followed those same steps to emboss the word "Easter" in purple.


5. I cut two pieces of sticker paper to the size I wanted for the front and back covers. 
6. I rounded the corners to match the cover.
7. From the Starstruck Foiled Papers in Lavender, Jade and Turquoise, I cut multiple one inch strips.
8. I removed the backing from the sticker paper, and applied one of the strips in a pleasing angle. 
9. I continued laying down strips, alternating colors, until the sticker paper was completely covered.
10. I turned the paper over and trimmed all the excess foiled paper.
11. I cut a strip of Jade Starstruck Foiled Paper to fit the spine.


12. I adhered the front and back covers to the inked cover. I then adhered the spine strip in place.
13. I adhered the embossed frame over the Glossy Turquoise egg shape.
14. I adhered the Easter Frame in place on the cover.
15. Finally, I adhered the "Easter" in place on the egg


I can't wait to fill this pretty album with all kinds of Easter items!


* * * * *
Thanks so much for stopping by today!
I'll be back soon with another collaboration project!
In the mean time,
head over to Creative Embellishments and check it out!
* * * * *

Here are all the links for you:


Blog Archive