Showing posts with label Dies R Us. Show all posts

Wednesday, 23 September 2020

Dies R Us - Girl in the Garden Card

  Happy Wednesday, my friends!

Today I'm sharinng my final Design Team project for Dies R Us!
Although I've really enjoyed sharing these projects with you the past few months,
 I've decided not to stay for a second DT term.

I have to tell you that I had the BEST time putting this one together!

Here's my card:


Isn't that the sweetest image?
I used the "Tremendous Friend" stamp set from AALL & Create Stamps.
Unfortunately, this particular set has sold out since I made my card.
You'll find more sets just as cute as this one HERE.
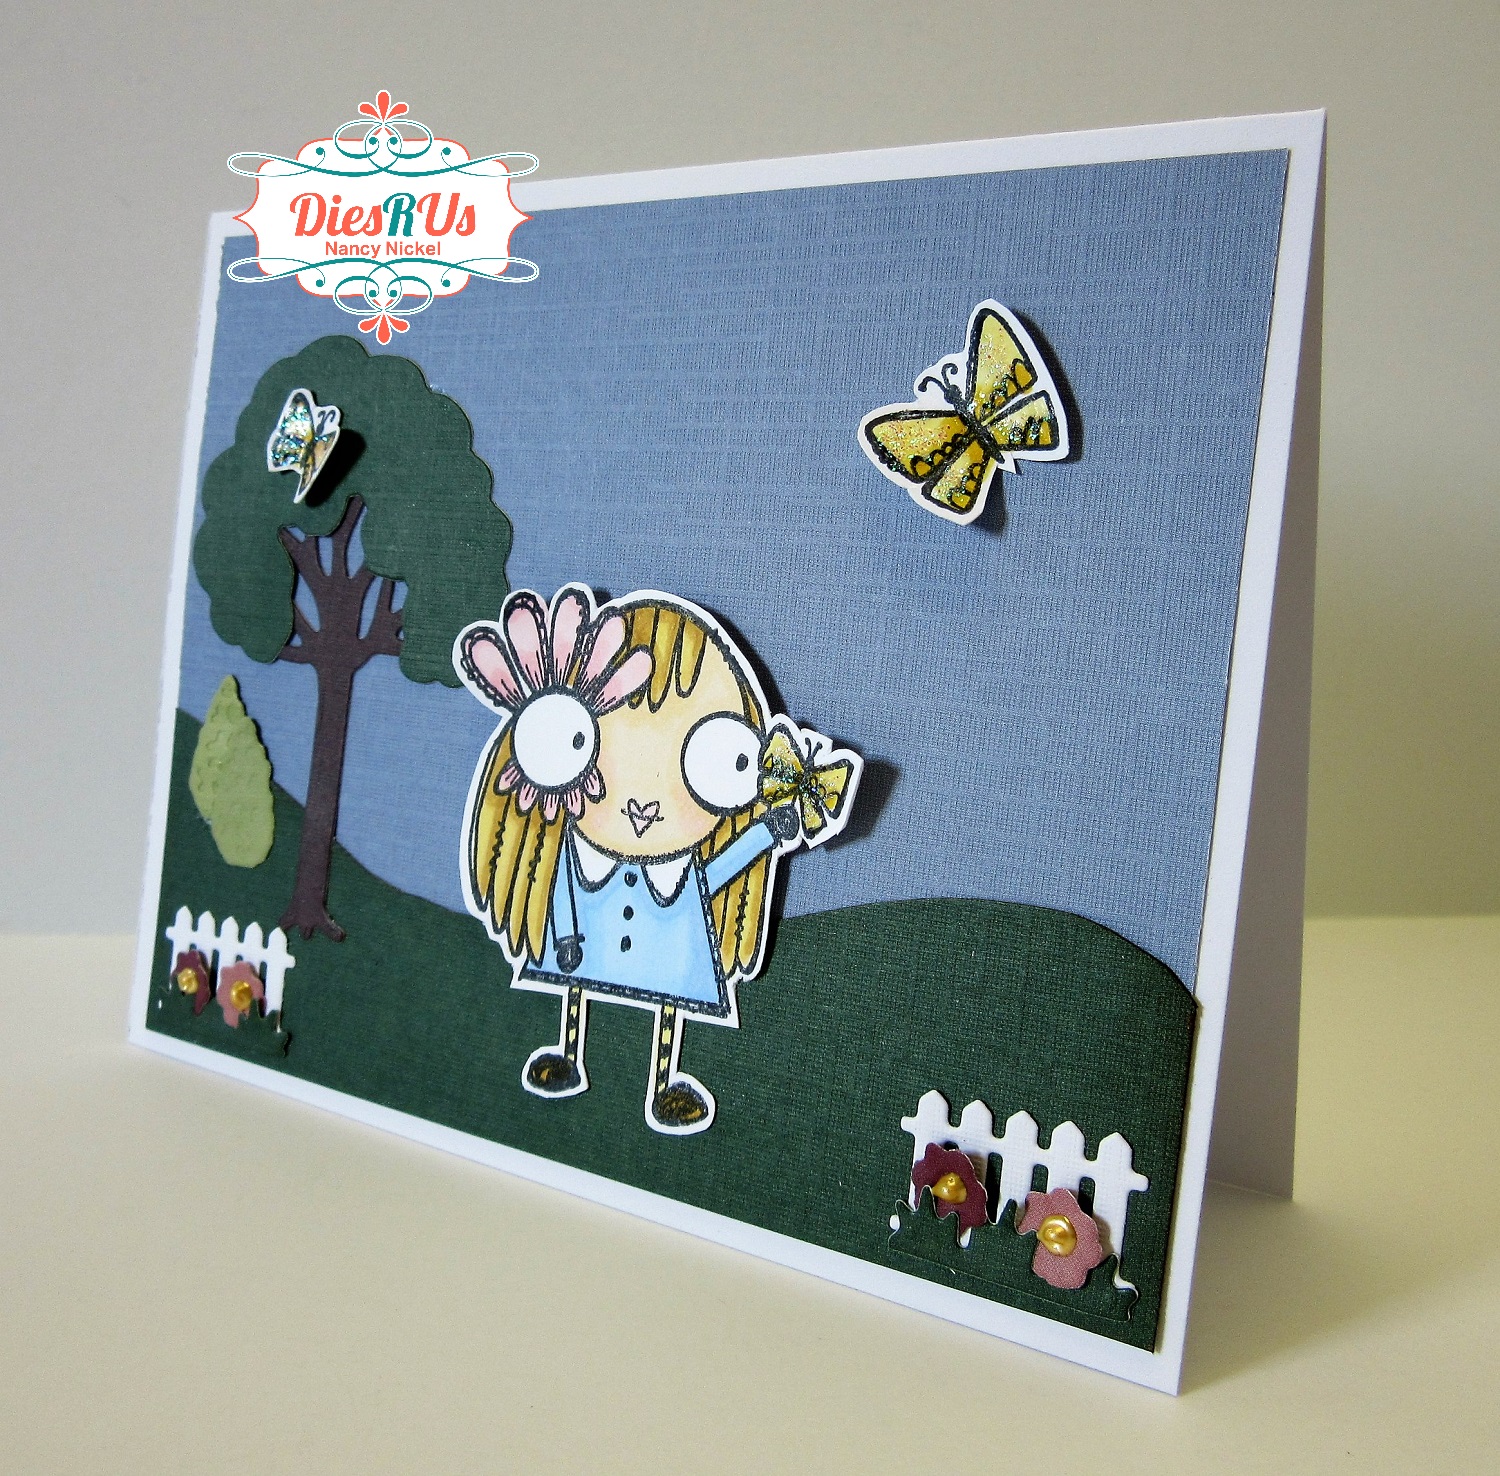

I stamped the little girl and the butterflies, colored them, and fussy cut them out.


Then I went about creating the fun scene.


This is the sentiment that came with the stamp set.
It's stamped on the inside of the card.


Here's one last look at the finished card:


Thanks so much for stopping in today!
I hope you found some inspiration in my fun card!

* * * * *

Dies R Us Products Used:


Other Materials Used:
DCWV Textured Cardstock Stack;
Buttercup Liquid Pearls.

* * * * *
Don't forget to come join in the fun at the Dies R Us Challenge Blog
 There's a new challenge theme offered on the 1st and 15th of each month 
and one lucky randomly drawn winner will receive a gift voucher prize to the Dies R Us Store.  
For your convenience, all the important Dies R Us links are provided below.


click below for:

Thanks for stopping by! 

Wednesday, 16 September 2020

Dies R Us - Birthday Wishes Card

 Happy Wednesday, my friends!

It's time for another new project share for Dies R Us!

 This week I'm sharing another CAS card,
using some fun dies from the shop!

Here's my card:


It's such a quick and easy card,
a nice flat one that is easy to mail.
I just thought it was a lovely combination of dies.
Who doesn't love to wish on a shooting star?

To make it special, I used Yellow Bazzill Bling cardstock 
for the card base, as well as the die-cutting. 


Here's a closer look at the glittery shooting star.


It was just a simple matter of cutting and gluing
but I think it makes a very special birthday card!


Dies R Us Products Used:


Other Materials Used:
Bazzill Bling Cardstock;
Recollectios Cardstock;
ScraPerfect Best Glue Ever.

* * * * *
Don't forget to come join in the fun at the Dies R s Challenge Blog
 There's a new challenge theme offered on the 1st and 15th of each month 
and one lucky randomly drawn winner will receive a gift voucher prize to the Dies R Us Store.  
For your convenience, all the important Dies R Us links are provided below.


click below for:

Thanks for stopping by! 

Wednesday, 26 August 2020

Dies R Us - Whimsical Love Tree

 Happy Wednesday, my friends!

It's time to share some new inspiration for Dies R Us!

Just before I get started on my card,
I wanted to remind you that Dies R Us is having a DT Call!
You'll find all the details HERE.


Here's my card:


I began with a cream colored card base,
to which I added a panel of blue cardstock.

I die-cut the tree out of the same cream cardstock,
and then cut just the butterfly area out of more blue cardstock.

Once the tree was adhered to the card,
I fussy cut the blue buttrfly, and adhered the body only.
I bent up the wings to give it some lovely dimension.


Finally, I added several drops of Bisque Liquid Pearls to the butterfly body.


This is a really fun die to play with. 
There are several elements that can be cut out and layered.
There are also multiple options for embellishment. 
It would be a lovely card for any occasion! 

Products Used:


Other Materials Used:
Bazzill Textured Cardstock;
Bisque Liquid Pearls.
 
* * * * *
Don't forget to come join in the fun at the Dies R s Challenge Blog
 There's a new challenge theme offered on the 1st and 15th of each month 
and one lucky randomly drawn winner will receive a gift voucher prize to the Dies R Us Store.  
For your convenience, all the important Dies R Us links are provided below.


click below for:

Wednesday, 19 August 2020

Dies R Us - Happy Birthday Card

 Happy Wednesday, my friends!

It's time for some new Dies R Us Inspiration!

This week I'm sharing a simple but special birthday card!
The dies make it simple, and the choice of paper makes it special!

Here's my card:


I used the Bazzill Basics Bling cardstock for my card. 
It is so sparkly and full of glitter.


I started with a white card base, to which I added a green front.
Then I cut a slightly smaller piece of the white bling.


I die-cut both the branch, and the words, from the same green,
and adhered them in place on the white.
Finally, I added some sparkly rhinestones to the center of the flowers.


So simple and yet so special! 
 

Products Used:


* * * * *
Don't forget to come join in the fun at the Dies R s Challenge Blog
 There's a new challenge theme offered on the 1st and 15th of each month 
and one lucky randomly drawn winner will receive a gift voucher prize to the Dies R Us Store.  
For your convenience, all the important Dies R Us links are provided below.


click below for:

Wednesday, 29 July 2020

Dies R Us - Christmas in July

Happy Wednesday, friends!

Today we're celebrating Christmas in July with Dies R Us!

Here's my card:


Shaped cards are so much fun to make!
This die set from Yvonne Creations includes several layers,
as well as many fun elements.


I layered my base cut with some pretty Christmas paper.
Then I added a lovely oval die-cut shape,
to which I added some pretty decorative elements,
along with a stamped sentiment.
Finally, I added some Nuvo drops for the berries.


Products Used:

Yvonne Creations - Holly Jolly - Card Set


Tutti Designs - Stitched Nesting Ovals Die


Other Materials Used:
Recollections White Cardstock;
Pebbles Home for Christmas Collection;
Gina K Sentiment Stamp;
CTMH Ponderosa Pine Ink;
Red Nuvo Drops.

* * * * *
Don't forget to come join in the fun at the Dies R s Challenge Blog
 There's a new challenge theme offered on the 1st and 15th of each month 
and one lucky randomly drawn winner will receive a gift voucher prize to the Dies R Us Store.  
For your convenience, all the important Dies R Us links are provided below.


click below for:
FRIENDS OF DIES R US PINTEREST PAGE

Thanks for stopping by!

Wednesday, 22 July 2020

Dies R Us - Octopi Fun!

Happy Wednesday, my friends!

It's time for some new inspiration for Dies R Us!

 I had intended to create a Christmas in July project for you today.
However, I was totally distracted by this fun stamp and die from Lawn Fawn.

Here's the card I made:


Unfortunately, the stamp set has sold out since I last looked,
but I have the dies linked below.


I stamped and die-cut the octopus, and then added the little die-cut bowtie.
I chose some blue water looking paper for my background,
and cut it to fit my A2 card base.
I used the oval dies to cut out a frame piece.
I then adhered the octopus to the oval,
and adhered it in place with foam tape.
I then stamped the sentiment on a smaller oval,
and used more foam tape to adhere it in place.
Finally, I stamped some of the water bubbles around the card,
and added Glossy Accents to them. 


Isn't he cute?
I think you could easily make this card without the stamps,
and using only the dies.
What do you think?

* * * * *

Thanks so much for stopping in today!
I'll be back soon with another fun project!

* * * * *

Dies R Us Product Used:


Other Materials Used:
Momenta Designer Paper;
White Cardstock;
Memento Tuxedo Black Ink;
Glossy Accents.

* * * * *
Don't forget to come join in the fun at the Dies R s Challenge Blog
 There's a new challenge theme offered on the 1st and 15th of each month 
and one lucky randomly drawn winner will receive a gift voucher prize to the Dies R Us Store.  
For your convenience, all the important Dies R Us links are provided below.


click below for:
FRIENDS OF DIES R US PINTEREST PAGE

Thanks for stopping by!

Wednesday, 1 July 2020

Dies R Us - Lily of the Valley Edger Card

Happy Wednesday, friends!

It's time for another inspiration project for Dies R Us!

 This is another quick and easy card
but the choice of die makes it look like so much more!
I've used the Creative Expression - Paper Cuts Collection -  Lily of the Valley Edger.
The edger die is so beautiful and intricate!

Here's my card:


Isn't that die-cut edge pretty?
I simply made an A2 card base from turquoise cardstock. 
I cut a piece of black cardstock slightly smaller than A2.
I laid the edger die along one side and ran it through my machine.


Then I simply adhered the die-cut piece in place, on the front of the card.
To finish it off, I added a glittery ribbon bow!


There are so many beautiful edger dies in this Paper Cuts Collection!
Head over to the shop and take a look at the selection HERE!

* * * * *

Thanks so much for stopping in today!
I'll be back soon with another fun project!

* * * * *

Dies R Us Product Used:


Other Materials Used:
Recollections Cardstock;
Celebrate It! Ribbon.

* * * * *
Don't forget to come join in the fun at the Dies R s Challenge Blog
 There's a new challenge theme offered on the 1st and 15th of each month 
and one lucky randomly drawn winner will receive a gift voucher prize to the Dies R Us Store.  
For your convenience, all the important Dies R Us links are provided below.


click below for:
FRIENDS OF DIES R US PINTEREST PAGE

Thanks for stopping by!

Wednesday, 24 June 2020

Dies R Us - Quick and Easy Flower Tutorial

Happy Wednesday, friends!

It's time for a new project share for Dies R Us.

I've used the  Sizzix Tim Holtz - Small Tattered Florals die for my samples.
They were in stock when I began this project,
but I see now that they're out of stock.
These ideas will work well with many other flower dies too.
I follow the same steps for the Tim Holtz Bigz Tattered Florals die.


I like to cut multiples of these, and put them together in front of the tv.
I also like to make them from white cardstock.
Since I don't have a specific project in mind, 
I'm not sure what color I will need. 
Making them all white gives me any option of color,
with inking, spraying, or painting.


For the first flower, I cut two each of the three largest flowers.
I spritz them with a little bit of water,
and then roll them up into tight little buds.
Then I set them aside to dry completely.


Once they're dry, I carefully open the flowers out.
Then I use liquid glue to adhere the petals together,
from largest to smallest, off-setting the petals.


As you can see in the photo of my finished flower,
I actually re-rolled the final die-cut layer before adhering it into the center of the flower.
This flower has lovely texture and dimension.
It's ready to be sprayed any color.
It also looks really pretty with just the tips all inked up.


For my second flower sample,
I die-cut two each of a large, a medium, and a small.
I then use my stylus and my foam pad to shape the flowers.
First, I lay it face side down on the foam,
and run the stylus over the back of each petal.
Then I turn the flower over, 
and apply pressure to the center of the flower with the stylus.
This gives each flower petal a lovely shape.


Then I adhere my flowers together with wet glue, 
from largest to smallest, off-setting the petals. 
I decided that I wanted to use just one of each size for this flower.
So the layers I cut made two complete flowers.


These still have wonderful texture but not as much bulk as the first sample.
Again, they're ready to be colored any way you want. 
This flower also offers a lovely center to add a pearl, rhinestone, or bead.


There you have it...two different quick and easy flowers.
Great to have on-hand for whenever you need a flower.

* * *

Thanks so much for stopping in today!
I'll be back soon with another fun project!

* * * * *

Dies R Us Product Used:


* * * * *
Don't forget to come join in the fun at the Dies R s Challenge Blog
 There's a new challenge theme offered on the 1st and 15th of each month 
and one lucky randomly drawn winner will receive a gift voucher prize to the Dies R Us Store.  
For your convenience, all the important Dies R Us links are provided below.


click below for:
FRIENDS OF DIES R US PINTEREST PAGE

Thanks for stopping by!

Blog Archive