Wednesday, 2 April 2014

All Dressed Up - Challenge #12 - MONOCHROME

Hello, my friends!

I'm back again with another new post for you!

Today begins a new challenge at All Dressed Up.
Our theme for this challenge is *Monochrome.*
For my card for this challenge I used the image called "A Little Me Time", 
which you can find in the All Dressed Up Shop right HERE.


Can you tell I had lots of fun playing with this one?
Using my Cricut I created a little scene card. 
Taking a cue from the little sign on the table that reads "tea & cakes" I added some little cupcakes and a teapot to the shop window. The little cupcake in the image has a sweet butterfly treat on the top, so I also added butterflies to my cupcakes.
The cupcakes are frosted with stickles, and the teapot is covered with a coat of Glossy Accents to look like pretty china. 
Then I gave that sweet puppy his very own cupcake to enjoy!
I think I'll have to include a Tim Horton's gift card for the recipient of this card!


Materials Used:
Papers: Recollections - Cardstock;
Image: All Dressed Up - A Little Me Time;
Dies: Cricut Cartridge - Love You a Latte;
Punches: Fiskars - 1" Circle, Martha Stewart - Branch,
Recollections - Mini Flower Punch,
EK Success - 1 1/4" Circle, Mini Cupcake Punch Set;
Stampin' Up Embosslit - Beautiful Wings;
Pearls: Liquid Pearls - Platinum Pearl;
Stickles: Antique Linen Distress Stickles;
Ribbon: Offray;
Glossy Accents.

* * * * *


This fun monochrome challenge will run until April 15th, 
so you have lots of time to participate! 

Head on over to All Dressed Up Blog to check out the rest of the teams creations, 
and link up a project of your own!
 **Please note** 
To enter our challenges you MUST use an All Dressed Up Image or paper.
Don't forget to stop by our Facebook Group to keep up to date with all the latest All Dressed Up news, and chat with fellow crafters. 

Monday, 31 March 2014

Lia Stampz Challenge #62 - Congratulations or Good Luck

Hello, my friends!

I'm back...kind of! It seems to be taking me a little while to get back into the swing of things! 
I want to thank you VERY MUCH for all the wonderful birthday wishes!
They were lovely to read and truly appreciated! :o)

Today is the start of a new challenge over at Lia Stampz!
It's time to make a "Congratulations" or "Good Luck" card!
For my pocket/tag/card I used this fun image called "Harry".


This is a birthday card that I am sending to my brother. 
His favorite drink is Dr Pepper and he's opening the bottle that I just shook up! lol 
I forgot to take a photo of the tag alone but it says...
"Congratulations...you made it through another year!"


Materials Used:
Papers: Recollections - Cardstock;
Image: Lia Stampz - Harry
Prismacolor Pencils and OMS;
Punch: EK Success - Scalloped Scallop;
Stamp: Stampin' Up - Itty Bitty Banners;
Ink: Memento - Tuxedo Black;
Twine: WRMK - Sew Easy Baker's Twine.

* * * * *

Come on over to Lia Stampz and join in the fun!
You could win an image or be chosen as our Featured Artist!


You can find all of Lia's great stamps in the Whimsy Shop HERE.


Thursday, 27 March 2014

Jellypark Friends Challenge - Mother's Day/Important Female

Hello, my friends!
This is my last scheduled post before I return to blog land! :o)

There's a brand new challenge starting today over at Jellypark Friends Challenge Blog! It's "Mother's Day or Important Female"...isn't that an easy one for you? 

For my card I used the newly released image called "Lady with sewing machine" that you can find in the Jellypark Shop right HERE! It was so fun to play with, and you know how much I like anything with a sewing theme! I embossed two different colours of cardstock and then put them together to form the quilted background. I then stitched it all together onto the card base. I added a few buttons and the coloured image. Then I discovered I didn't have a sentiment stamp that said what I wanted, so I wrote it out myself. The image and sentiment were both cut out using my pinking shears! :o)


Materials Used:
Papers: Recollections - Cardstock;
Image: Jellypark - Lady with sewing machine;
Embossing Folders: Crafts Too - Small Flowers,
Sizzix - Square Lattice;
Buttons, Thread: My Stash.

* * * * *
Please pop on over to Jellypark Friends Challenge 
and check out what my fellow DT members have created!
Then make your pretty cards and link them up!

You might be lucky enough to win some fabulous Jellypark Images! 

* * * * *

Thanks for stopping by! 
I look forward to visiting you soon! :o)


Thursday, 20 March 2014

All Dressed Up - New Image Inspiration


Hello, my friends!

It is launch time at All Dressed Up, and we have four fantastic new images to share with you!

A Little Me Time


A Time To Share


Looking Gorgeous


We Make a good team

Aren't they fabulous? To purchase any of the images, please head on over to the Shop.

For my design team card I have used "A Time To Share" which is right HERE.


Materials Used:
Papers: K & Company - Sweet Necar, Recollections - Cardstock;
Image: All Dressed Up - A Time To Share,
Prismacolor Pencils and OMS;
Dies: Spellbinders Nestabilities - Classic Scalloped Circles (LG),
Spellbinders Shapeabilities - Fair Isle Pendants;
Bling: Unknown.

* * * * *

The current All Dressed Up Challenge theme is "Use a button"  
and these images would be perfect for it. 
If you link up your project using an All Dressed Up image, 
you have a chance of winning 3 images of your choice !
Don't forget to stop by our Facebook Group to share your All Dressed Up creations 
& to chat with  fellow crafters.
Also, keep an eye out for more inspiration from 
the rest of The Dressy Girls throughout the month. 

Sunday, 16 March 2014

Lia Stampz - Challenge #61 - Green

Hello, my friends.

There's a fun new challenge going on over at Lia Stampz
It's another easy one too..."GREEN"! 
I think you should all be able to handle that, right? 
It's so appropriate with St. Patrick's Day fast approaching!

For my card I used the fun image called "Ice Cream Love
which you can find at Whimsy Stamps right HERE.


Materials Used:
Papers: Recollections - Cardstock;
Image: Lia Stampz - Ice Cream Love,
Prismacolor Pencils and OMS;
Dies: Sizzix Framlits - Label, Ornate #2, 
Cuttlebug Corner Dies;
Flowers: Recollections - Boutique Fleur Mini Roses;
Ribbon: Offray;
Bling: Kaisercraft Rhinestones;
 Doily: My Stash.

* * * * *

Come on over and join in the fun at Lia Stampz.
You are not required to use a Lia Stampz image to enter the challenge!
You might win an image or be chosen as our Featured Artist! 

Friday, 14 March 2014

Ephemera's Vintage Garden - Follow Your Bliss #1

Hello and happy Friday to you all!

Okay...on to the fun new project I have for you. 

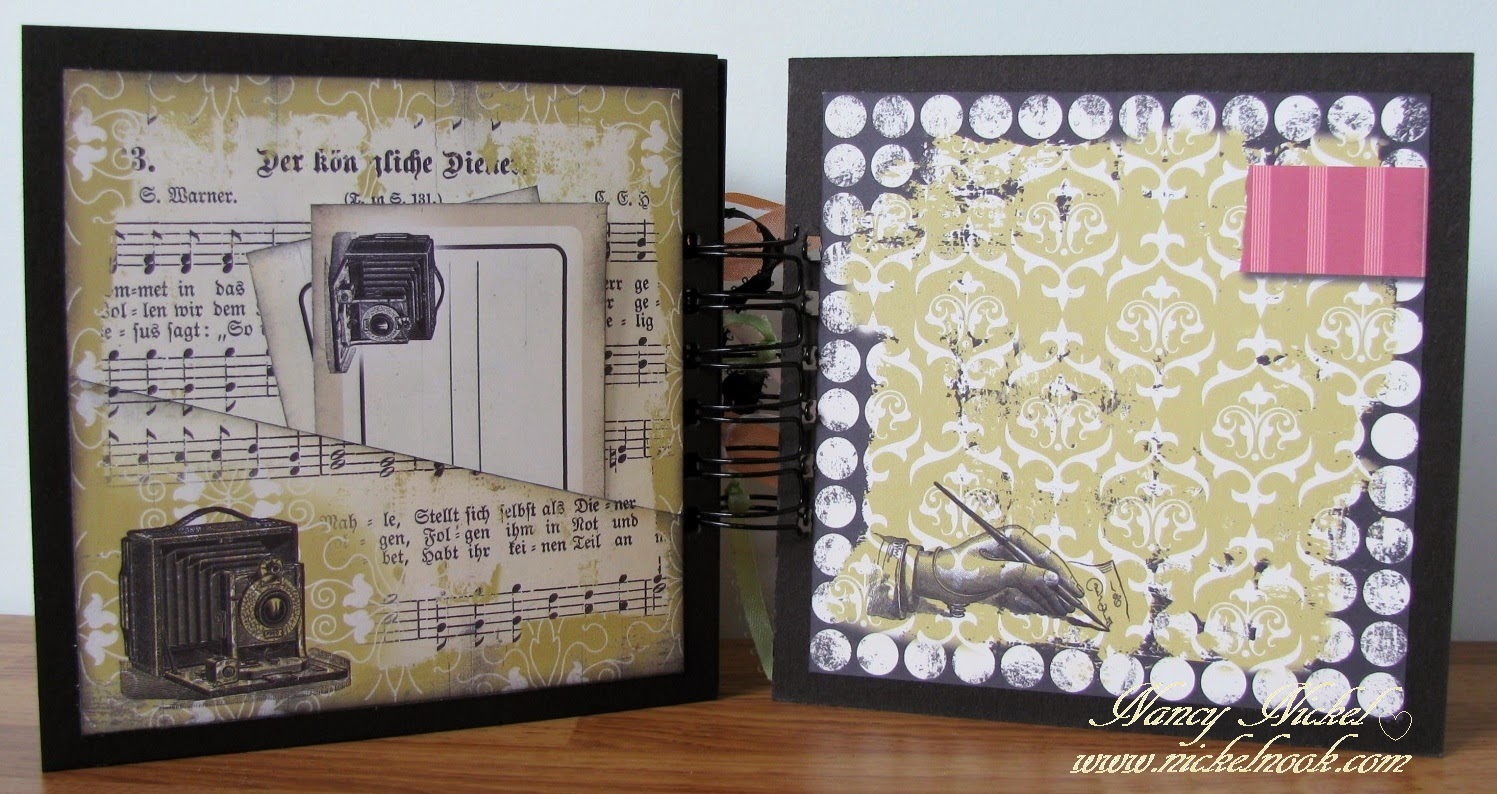
I have created a mini album using the Follow Your Bliss Digital Kit from Ephemera's Vintage Garden. The great thing about this mini album is that any one of you can make it in an hour or less! Yes, that's right! 

How do you do it in less then an hour? It's so easy and I will tell you how...the printables do all the work for you! Now, keep in mind that I started the timer AFTER I had printed out all the papers. As always, my papers were printed out on the affordable white Recollections cardstock using my plain old inkjet printer. I printed out the whole kit but only used a portion of it for this album. I used 6 pieces of 6" X 6" black chipboard. The kit would look great with naked chipboard too, and you could ink up the edges with black...or another color from the kit. After cutting out the pages I wanted to use, I did a quick inking of the edges...just to cover up the white cut edge. The great distressing is already on the images. When I was finished I bound it with my Bind-It-All but you could easily punch three holes and use rings or ribbons. 

Okay, here's the front cover. Isn't it pretty? I simply adhered it to the center of the chipboard.


Two more pretty pages. On the left I adhered the sweet petal pocket. I added a piece of seam binding  under it before gluing it down, then tied it in a bow.


Here is the pocket open. I filled it with the square that matches the background paper.
Then there's another one to use as a journaling spot.


A great spot for a photo on the left, and a pocket page on the right. 
The pocket holds some of the kit tags.


More pretty pages. The left is plain, and perfect for another photo.
On the right I added a small white doily from my stash, 
as well as another pocket from the kit. 
I added a ribbon bow and a velvet button to tuck the flap under.


Here's a close-up photo of the pocket. 
This side of the pocket was white so I did some inking.
Then I added a couple of the matching journaling spots.


These pages are so soft and pretty. They are both pocket pages with added tags.
I added a picot ribbon along the edge of the pocket. 
All the other lovely embellishing is on the papers.


These are the last two inside pages. The left is another pocket page, and the right is ready for a photo.


Finally, we have the back cover. I added a few ribbon bits to the binding rings.


What do you think? Isn't it fabulous...and fast...and fun??
 It would make such a wonderful last-minute gift, wouldn't it?
A fun album for a teen girl, a brag book, a quick hostess gift. The possibilities are endless!
It looks like lots of time was put into creating it, but it's complete and ready for photos and journaling in under an hour.Other than the kit, the only materials I used were some ribbons, a doily, a button, the chipboard and binding rings.


As I said earlier, this kit is loaded with lots more pieces that I didn't use. 
I'll be back soon with another project using the same kit.

In the meantime, head over to Ephemera's Vintage Garden 
and pick up the Follow Your Bliss Kit.
You'll be able to make this mini album too! 

Oh, and don't forget to go to Debbie's blog HERE to sign up for her newletter. 
Debbie is very generous with her gorgeous freebies! :o)

Wednesday, 12 March 2014

Before It's All Over!

Happy Wednesday, friends!

The sun is shining brightly and the snow is quickly melting...Spring is right around the corner! So I thought I better post this card before it's too late! I did consider saving it until we have one of your typical Spring snow storms but I don't want anyone to hold me responsible for more snow! :o)

This is a super cute image by StampArt Design by Kathryne! It's called "Alannah & Snowball" and you can find it in the Whimsy Stamps store right HERE. It comes with a bonus sheet of lovely sentiments. I opted not to use one since I'm not sure yet who will be receiving this card. 

I know that blue is the typical frosty card colour. I used green instead because I love the way the green starts peeking through all the snow in Spring! The change of season is so exciting...every time! :o)


Materials Used:
Papers: Basic Grey - Jovial;
Image: StampArt Design by Kathryne - Alannah & Snowball,
Prismacolor Pencils and OMS;
Punches: EK Success - Stars Border Punch,
Martha Stewart - Arctic Snowflake;
Stickles: Diamond;
Bling: Unknown;
Liquid Applique.

* * * * *

Linking Up To:


Blog Archive