Showing posts with label Creative Inspirations. Show all posts

Monday, 27 January 2014

Creative Inspirations #6 - Tim Holtz Assemblage Clock Project

Hello, my dear sweet friends!

Thank you ALL so much for your kind words of encouragement and your "get well" wishes! I am finally feeling much better, and hope to be around to visit you soon! :o)

Today I want to share a fun project that I made my daughter for Christmas. This is the same daughter that got married in June. She has a really great collection of vintage clocks, and I thought this would be a fun addition. All the materials to make your own clock can be found at Creative Inspirations. 

I kept the outside of the clock completely plain. This daughter is not into the fancy froo-froo style of decor. I traced the backing of the Tim Holtz Assemblage Clock onto turquoise cardstock, cut it out, and adhered it to the back of the clock. I then cut the Picture Wheel die using white cardstock. I made a black and white copy of the photo proof sheet from some of the wedding pics that we had printed. I cut the tiny pictures out and adhered them in position on the back of the picture wheel, then adhered the picture wheel to the backing. I cut some clock hands out of black chipboard using a Sizzix die, and positioned them between the photos. I circle cut one of my favorite of their engagement photos, and popped it up on dimensionals. Finally, I stamped "SWEET MOMENTS", cut it out, adhered it in place across the photo, and added some bling from my stash. Here is what it all looks like: 


Here is the finished clock. 
I simply added an assortment of Prima flowers in coordinating colours. 
They have metallic brads in them to add some sparkle. 
I also added a pretty turquoise ribbon bow. 


I hope you like it...my daughter really did! :o)
All supplies to make this project can be found at Creative Inspirations!

Friday, 13 December 2013

Creative Inspirations

*** If you missed my Jellypark post from earlier today, please scroll down and take a peek when you're finished with this one! ***


Hello again, my dear friends! 

Some of you might remember this mini album project from the last time I posted it...and some of you won't. I am re-posting it now because because there is a wonderful kit now available at Creative Inspirations that includes everything you need to make an album for yourself. It's the perfect place to put all those fun photos you're taking these days, and will continue to take in the days ahead.

We've had a bit of a break from Creative Inspirations posts. I'm very happy to report that I will be continuing to design for this great store.  We have some super fun things coming up in 2014!

This mini album is a sweet little layered Christmas tree. Sue has another version of it, along with a kit supply list in the shop right HERE. You should pop over there and order the kit. Then come back here and bookmark this post. You can use my photos, and the photos in the shop for inspiration for your own creation! 

So here's what I did:

This is the cover. After adhering all the papers, I went around both sides of each piece with the gold paint dabber. I also made my first swivel clasp charm to hang from the binding ring.


Here are pages 1 and 2. I decided to decorate all the back pages "upside-down" so that when you flip them over they are actually right side up! lol  
On page 1 there is a ticket stamped with the date. 
Page 2 has a little swivel ornament set. It's actually some diecut tags. 
These are just the right side to document special seasonal events.

Page 3 had two ribbon bands that hold an assortment of stamped tags. 
There's also another ticket stamped with "Merry Christmas!"


Page 4 holds a stamped label. 
It opens up and has lines with a heading that says "Dear Santa". 
A wonderful little spot to list all the gifts received for Christmas. 
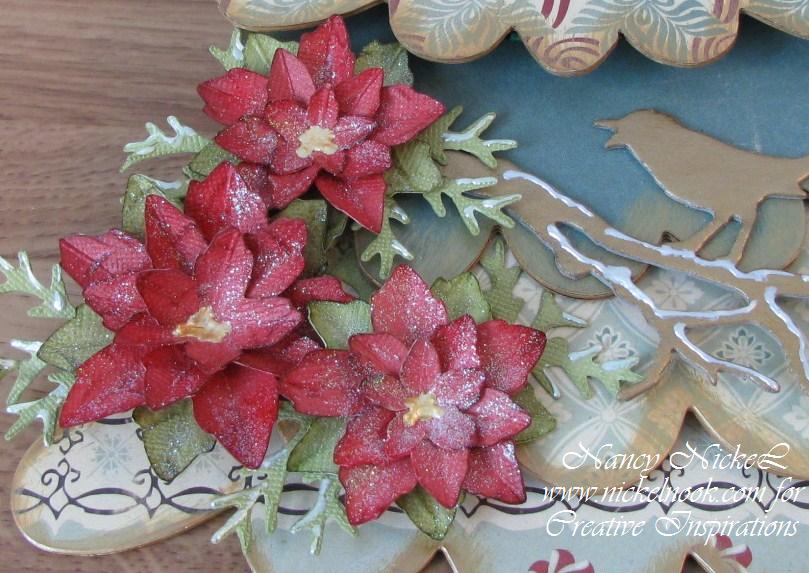
The bottom of the page also holds one poinsettia 
and a gold painted chipboard bird on a branch.


Here is a close-up of the pretty poinsettias that I made.  


Page 5 holds a large label that has pine cone branches stamped around the edge. 
A few pine branch punches with buttons creates a nice embellishment. 


Page 6 holds another mat that's been stamped with snowflakes, 
and two more of the poinsettias.


Page 7 is another Baroque mat page. 
This one has been stamped with a tree.


Page 8 has a seam binding band that holds a little booklet of  the Baroque die. 
These are large enough to add photos on the front and the back. 
There's also a little dangly charm set hanging from the binding ring. 
These charms are also made from tags and have sweet star eyelets.


Here is the back cover. 
The seam binding from the previous page is tied in a bow. 
I've glued on a sweet little Christmas wreath 
and a banner that says Merry Christmas. 
Another ticket filled out with my info is adhered to the bottom.


Here is a close-up of my swivel clasp charm. 
It holds buttons, mini ornaments, and some jingle bells. 
At the bottom is more stamped tags that look like ornaments. The only jump rings I had were a bright silver. 
So I turned them red with the help of some alcohol ink.


 So there you have it...again! :o)
If you want to see my original post and a list of all the materials used you can go HERE.

* * * * *

So head on over to Creative Inspirations 
and take a look at all the fabulous goodies in the shop.
There is even a wonderful free gift with the purchase of $60 or more!
If you have any questions just ask me or use the contact form in the store.
Then check out the Christmas Tree Mini Album Kit for yourself!

Happy Shopping! :o)


Wednesday, 29 May 2013

Moment by Moment Wedding Mini - Creative Inspirations #5

Hello, my friends!
You probably have been wondering why I haven't been posting anything wedding related, right? I've been too busy with DT work and wedding projects to do that! lol However, today I am combining my DT project for Creative Inspirations with a wedding mini.Usually when I make a mini album I just play with products that I love! This mini album is a little bit different. I put quite a bit of thought into what I will actually be putting in it! This album is for me to fill with some of my favorite photos from my daughter's wedding. I really like the elegant vintage style. My daughter's tastes run more toward bright colors and retro style, so this one is just for me!
When I had the flu recently I spent a little bit of time going through my favorites on YouTube. This mini album was inspired by this video HERE. These Imaginisce Now and Forever papers from the Creative Inspirations shop were just perfect for this project. I combined them with two different shades of kraft cardstock. The album measures 5" X 7" and it will actually hold a total of 36 photos that measure 4" X 6". Or I can put in less photos and do lots of journaling. As with all my mini album posts, I have quite a few photos to share. Let's begin!
Here is the front cover:

Everything is edged with either Vintage Photo Distress Ink or Tarnished Brass Distress Stain. 
That stain is my new favorite - hand's down! I embossed the spine paper and ran more stain over it.
I made all the flowers and sprayed them with Perfect Pearl Mist in Biscotti. 
I then added a few little ribbon roses and punched leaves.

Another view of the entire cover:

The "moment by moment" tag is part of the Now & Forever collection.


 Here is a close-up of the spine embellishment:

I wrapped crinkled ribbon right around the spine of the book and tied it in a bow.
 I then added another crinkled ribbon double bow on top of it. 
I added several Tim Holtz Baubles to a Trinket Pin that says "TREASURE" and pinned it onto the bow.

Here you can see the six pages:

This album is a pocket page design with a total of six pocket pages. 
Each pocket holds two tags that have been cut with two different Tim Holtz On the Edge Dies. 
The Vintage Doily cut tag is folded over the pocket page and embellished with lace and a flower.
The back tag is cut longer so that the decorative edge sticks out.
Again, everything has been edged with that beautiful metallic stain.

This is the inside front cover and the first page:

On the left is a strip of lace that holds some tags that were made from the sticker collection.
On the right is the Hanging Sign. It's the perfect place for the wedding information.
The sign is loose so a photo can go behind it if I want.


All the elements on the inside pages are adhered only on the edge so that a full-size photo will fit behind.
One the left is the "time to get ready" page. 
We're all going to the salon together in the morning and the photographer will be there to capture the fun!
On the right will be my daughter in her wedding dress!


These two pages are for the ceremony. 
I'm noticing that the right and left pages look like different colors on these 2-page photos. 
They are actually identical but it was very dreary weather when I took these photos.
Pretend you don't notice that! ;o)


The married couple will be driven around in a very cool vintage muscle car...not an old jalopy! lol
These pages will be for photos of them leaving after the ceremony!


On these pages I've added some embossed chipboard dies that I cut using a variety of Movers and Shapers.
On the left is the Lock and Key with a Muse Token that says "FOREVERMORE".
On the right is the Postage Stamp and some Mini Tickets.
All these elements were added using my paper tagger through an eyelet.


These two pages are for FAMILY photos.

 Last page and inside back cover:

On the left is a piece of embossed chipboard flourish with a flower. 
On the right is the rest of the embossed flourish with a tag made from one of the stickers. 
There is room for journaling on the back.

The two tags that fit in each pocket:

I stamped all of the tags exactly the same way. There are six of each tag.

One final photo:

This photo shows you the completed mini album from the page side.

So there it is! I really had fun making this one...although it did take me forever! I had to keep leaving it to take care of other things. This is a design that I will be using again and again! The way it's constructed it has room for all the embellishments and photos without over extending the cover. It will continue to lie flat and I really like that! 
I did list many of the materials that I used throughout my description. Most of the item used in this project can be found at the Creative Inspirations Design Team post. If you have any questions about anything...please ask!
Thanks so much for stopping by! I hope you come back on Friday for my next post...I'm quite excited about it! Now I must get back to work! Happy days to you all! :o)

* * * * *

Monday, 15 April 2013

Pretty Purse Project - Creative Inspirations #4

Hello, my fine friends!
I have a new DT project to share with you for my favorite store...Creative Inspirations! Yes, it's another mini album! I did take lots of pictures but the first few show you everything if you don't want to look at ALL of them! ;o)
I used the 7gypsies Accordion Purse Kit in the small size. The purse is super easy to put together! I started by staining the edges of the chipboard with Distress Stain. All of the papers were distressed with a distress tool and then inked before being adhered. I ran some ribbon through some lace and added it for the handle. I also added a strip on the bottom and a little piece through a metal buckle. Then I added three punched flowers.
For the album itself I followed the same process; stained, distressed, inked and adhered. I kept the pages all very simple and flat. I made a few little pockets, and added some small tags with ribbons. I've also added several 7gypsies stickers that match perfectly. They are just big enough to add a date or a few words. These papers are so pretty that they don't need any further embellishments!
Here is the closed purse and the mini album beside it:

I didn't use the closure that came with the kit; I added some velcro tabs instead.
When closed, the purse itself measures 41/2" wide X 43/4" high X 11/2" deep.


This is the entire front of the album:


This is the entire back of the album:


These are the next pages after the front cover. All the papers were distressed and then inked.
The album pages measure 4" X 4" each, and there are 16 pages in all. 


Finally, here is the back of the box and album.


Materials Used from Creative Inspirations:

7gypsies Accordion Purse Kit - Small
Prima Pixie Glen Collection - 6 X 6 Paper Pad
Distress Stain - Forrest Moss
Distress Ink - Peeled Paint, Vintage Photo
Tim Holtz Alterations Die - Tiny Tabs & Tags
Tim Holtz - Tiny Attacher
7gypsies Label Sticker Book - CHIC
7 gypsies Assorted Buckles - SEA

Extras From My Stash:
Lace, ribbon, brads, punches.

* * * * *
Sue has loads of fabulous goodies filling up her store!
Pop on over and take a look!
To find the products that I used in my project, just click on "Design Team" in the menu and it will take you to the list of my DT projects. This is the "Pretty Purse Project". Or just click HERE! :o)
Don't forget that you can pick one of the free gifts with a purchase of $60.

* * * * *

Wednesday, 13 March 2013

A Card...For Me? Creative Inspirations #3

*Before I begin my post today, I just want to let you all know that I have added an email notification in my sidebar. I never could have imagined anyone wanting my posts emailed to them! Thank you very much!

Good morning, my friends!
I'm having a birthday next week, so I thought I better get busy and make a card for my husband to buy FROM me to give TO me! lol For those of you that don't know, that's what my husband did for my Valentine's Day card. He really liked one I made and asked if he could buy it and give it to me! :o)
I made this card using the March Cut-Aparts page from Graphic 45 Place In Time Collection from the  Creative Inspirations Store. I'm not really counting it as a full Design Team project. It's more of a filler project until I post the bigger DT project I'm working on. I'll add links to the store in the materials list so you can take a look. Don't forget...with any $60 purchase from the store you get to choose a FREE gift!
With green and purple being one of my favorite color combinations, this page was lots of fun to play with. Here's a picture of it:


Here's my simple card:

It measures 5 X 7 inches. I added a tag on the inside so my husband can write some sweet words to me! lol I considered making a double pocket card so he had lots of room  to include gift cards and money...but decided I liked this size and layout better! :o)


Materials Used:
 Ribbon, Brad: From My Stash.

* * * * *

Sue's been loading her store up with fabulous new goodies, so it's really worth a visit! I'll be back with more soon! :o)

* * * * *


Wednesday, 27 February 2013

Creative Inspirations #2 - Place In Time Pocket Album

Happy Day to all of you!
I'm back with another fun project for Creative Inspirations!
 I made an entire album using only two of the sheets from the Graphic 45 Place in Time Collection, and some neutral cardstock. Here are the two pages I used:


 I decided to use the back of each of these pages and challenged myself to make a book using only the colors on these pages...which is no color at all! lol I used cardstock in black, kraft, and manilla. It was fun to add interest and texture without bright and happy colors!

Originally I had thought to use this book for keeping track of my year. I don't do any of the Project Life albums, so this was going to be my version. When it was finished I realized it would be a really great album to keep track of all the birthdays I have to remember. The pocket would be a great place for cards that are ready to send. The tags could be used for listing parties, gifts given, or anything else.
So here's the cover of my album:

The cover is made from naked chipboard. I've stamped and embossed it using a Tim Holtz stamp. 
I had lots of fun making all the embellishments. I made the big flower myself, and layered it up with some swirls and leaves. Then I flattened a bottle cap and used some Glossy Accents to adhere the stamped image to it. I added a Swivel Clasp and Time Word Stick to the binding. 
Here's a close-up of the embellishments:


On the inside front and back cover I added a border strip to hold some extra tags. 
These tags are ready to be added to the book wherever they are needed.
Each of the six pocket pages are made using one 12 X 12 sheet of black paper. 
It is folded to form a pocket on the front and back page, as well as a large pocket at the top for a #10 tag.


Each calendar month is matted on black and then on a folded piece of kraft cardstock.
The kraft is lined for you to add whatever you want. Here it is with the calendar open:


The rest of the pages are going to be rather repetitive! 
Each one holds the small calender that opens up, a pocket with a die-cut tag in it.
The black photo mat behind each calendar is also a pocket. There is a small journaling tag in each one of these pockets. 
Also, on each page I've added the month and whatever other words from the collection work for that particular month. 
February is "Be Mine" for Valentine's Day. March is "Birthday Girl" and "Make a Wish" because it's my birthday month. I took the tag out and tucked it in the side of the photo so you could see all the words. 


The next page is made the same way. The pocket tags are all stamped.


I used only two dies for the pocket tags.


These pages have a couple of extra images from the page.


Again, the last page and inside back cover follow along the same lines as the rest:


I made only six different tags but multiples of each. 
The book holds six #10 tags, and 12 of the die-cut tags, plus the six #8 tags that are tucked into the covers. That's a total of 24 larger tags, and then the 11 smaller tags behind the little calendars. 


So there's my album! It's another long post but I wanted you to know that I did include every month! lol 
Whether I fill it with photos of my life, or cards for my family and friends; it's going to be a really fun album to fill up! If you have any questions about how it's put together just let me know! :o)

* * * * *
Materials used are all available at Creative Inspirations.
Here's a link to the complete list in the store itself:


* * * * *
Linking Up To:

Blog Archive