Showing posts with label Inspired by Stamping. Show all posts

Friday, 4 November 2016

Inspired By Stamping - Product Release Blog Hop - Garden Roses


Welcome to Inspired by Stamping’s last release of 2016! We are so happy you are here. 
This week Inspired by Stamping is releasing 3 new stamp sets to their store. 
All new products are already available in the store! 

* * * * *
I'm thrilled to have been invited to join this fun blog hop today!
I have two cards to share with you...showcasing the beautiful new Garden Roses Stamp Set.

First up is this pretty card featuring a yellow rose.
I began with a piece of white cardstock.
I embossed it with a script embossing folder using the Tim Holtz oval embossing diffuser. 
This gave me the perfect smooth oval space to stamp my rose.
I stamped the rose with black ink, and colored it with my markers.


I did some simple layering, and added one of the sentiments.
I finished it off with some ribbon and pearls.


Here's a closer look:


For my second card I used the other lovely rose in this set.
This time I also used the Garden Roses Cut File that is also available in the shop.
I used the rose and the sentiment cut.
It was my first time using one, and it worked like a charm.
I stamped the rose, and colored it with my makers.
I positioned them on a pretty decorative paper that I die-cut,
adhering them with foam tape.


I extended the die-cut off the card base.
Finally, I added a ribbon bow and some bling.


* * * * *
I hope you enjoyed seeing my cards today!
Here's some more fun information for you:


Inspired by Stamping has a new free stamp of the month! 
Spend $50 and receive this 4x4 Big Thanks stamp set for free! 
For more details on their free stamp of the month, click here.


This month’s release giveaway contains over $75 worth of goodies. Here’s what you have to do…
*Leave a comment below
*Or leave a comment on Inspired by Stamping Instagram page
*Or leave a comment on Inspired by Stamping Facebook page

Deadline is November 9th, 2016. 
Winner will be announced on Instagram, Facebook and Joanna’s Blog on November 10th!


Thank you so much for stopping by! 
Your next stop is Crystal .
Here is the lineup of amazing designers joining us today!

You are here > Nancy <You are here 


Other Materials Used:

First Card:
Papers: Recollections - Cardstock;
Coloring: Spectrum Noir Markers;
Embossing Folder: Cuttlebug - Script;
Tim Holtz Oval Embossing Diffuser;
Ink: Memento - Tuxedo Black;
Ribbon: Celebrate It;
Pearls: Kaisercraft.

Second Card:
Papers: Recollections -Cardstock, Basic Grey - Kissing Booth;
Coloring: Spectrum Noir Markers;
Ink: Memento - Tuxedo Black;
Die: Spellbinders Nestabilities - Fleur de Elegance;
Bling: Prima - Say it in Crystal;
Ribbon: Celebrate It.

Thursday, 20 October 2016

Guest Design Team Project for Inspired by Stamping - Part 2


Hello, my friends!

Today is my second Guest DT spot over at Inspired by Stamping!

I would like to give Joanna a BIG thank you for having me.
It’s been lots of fun creating and sharing my projects with all of you.

Also, Joanna has generously offered a special DISCOUNT CODE to my blog readers! 
Read to the bottom for all the details! ;o)

Today I am sharing a masculine themed card.
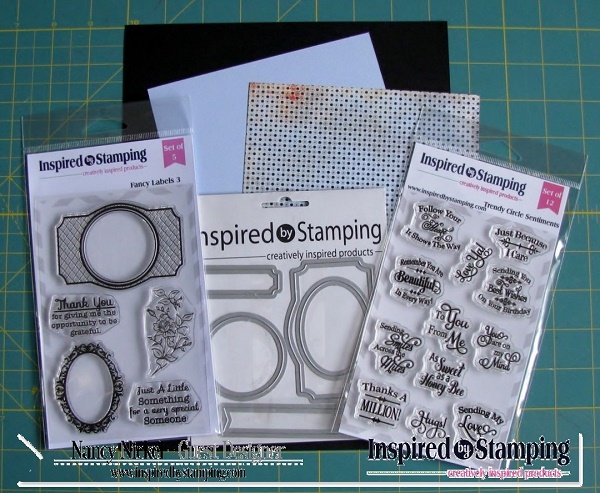
I combined two stamp sets from Inspired by Stamping:

Here is the card I created:


Here's how I did it:

First, I gathered some of my supplies.


I began with my solid piece of blue cardstock.
I chose the sentiment “Sending You Best Wishes on Your Birthday” and stamped it in black ink,
leaving lots of space around it for the next step.


I brushed the entire cardstock with my powder tool.
I stamped the label with Versamark ink, centering it over the stamped sentiment.
Then I sprinkled it with black embossing powder and heat set it.


Next, I cut it out using the Fancy Labels 3 Die from Inspired by Stamping.


Then I cut all the pieces for the card.
From the black cardstock I made a tent-fold A2 card base,
which is a 4 ¼” X 11” piece scored at 5 ½”.
From the patterned paper, I cut a piece measuring 4” X 5 ¼”.
Since the die-cut label left a blue edge, I cut another label of black cardstock.
I inked the edges of the label and patterned paper with Walnut Stain Distress Ink.


Now I’ll show you what I did with the black label I cut.
Since the die left a blue edge around my label, it disappeared into the patterned paper.
I wanted to frame it with black to make it stand out, and give it more weight.
I cut another set of blue and black labels to demonstrate.


I began by cutting the black label in half lengthwise.
Then I trimmed off the ends from the curve to the center cut, as shown here:


Discarding the little end bits, I adhered the other pieces behind the label,
leaving about 1/8” exposed.


Here is how it looks on my finished card:


The final step was to create a simple bow to add behind the label.
I did this using the matching ribbon from the 
Autumn Ribbon Collection
from Inspired by Stamping.
I LOVE this ribbon!
Then it was just a matter of adhering it all together.


Again, here is my finished card:


I hope you like my masculine themed card!
Both of the stamp sets I used are very versatile,
and perfect for any style of card!

Thanks for stopping by!
Please let me know if you have any questions! :o)

* * * * *
Inspired by Stamping Materials Used:

Fancy Labels 3 Stamp Set

Trendy Circle Sentiments
* * * * *

Other Materials Used:
Black Cardstock
Basic Grey – Oxford 6 X 6 Paper
Blue Cardstock
Versamark Ink
Memento – Tuxedo Black Ink
Walnut Stain Distress Ink
Ranger Super Fine Detail Embossing Powder – Black
EK Success Powder Tool
Martha Stewart Score Board
Fiskars Trimmer
Acrylic Blocks

Heat Gun

* * * * *
Now for information on the special DISCOUNT CODE:
The code is thenickelnook20.
It is good for 20% off all orders of $20 or more at Inspired By Stamping
...excluding clearance items.
This discount code will expire November 20, 2016.
Thank you again, Joanna!
Happy Shopping, my friends! :o)

Thursday, 6 October 2016

Guest DT Project for Inspired by Stamping - Blessed Beyond Measure

Hello, my friends! 

I’m so excited to be the October Guest Designer over at Inspired by Stamping!  
I will be sharing two projects with you this month.
Today, I’m happy to be sharing an Autumn themed card using 
the fabulous “Autumn Blessings” stamp set from Inspired by Stamping.

First, here is a look at the card I created:


I had so much fun putting this card together! 

Here’s how I did it:
I began with a 5 ½ “ X 7 ½” kraft card base. 
Using a brick stencil and Red Mahogany Distress ink, I inked up the entire card front. 
(Yes, I see that the ink pad is upside down in the photo)
I followed this with Walnut Stain Distress ink in random areas. 
Then I set this aside to dry.


Next, I went on to cut the rest of the pieces. 
The door, cut from woodgrain paper:  one piece that measures 3” X  5 1/2”.
The steps from kraft cardstock: one piece that measures 5 ½” X 1” and once piece 5 ½” X ½”. 
Using Walnut Stain Distress ink, I inked along the 5 ½” edge of both of these strips – on one side only.


From chipboard: 2 strips that measure ¼” X 5 1/2”. 
If you can’t easily cut strips of chipboard, kraft cardstock can be substituted.
Also from chipboard: one Tim Holtz Alterations Pediments Die. 
Any of these great pediments would work but I used the middle one.


I inked all these chipboard pieces with Walnut Stain Distress ink.


Now it’s time to do some stamping and heat embossing.
I never do any heat embossing without first brushing my powder tool all over the paper. 
It prevents any stray bits of embossing powder from staying where it shouldn’t.
Using Versamark ink, I stamped the wreath about ½” from the top, and centered on the woodgrain paper. 
I covered it with gold embossing powder, tapped off the excess, and heat set it.


Then using the little branch stamp, 
I stamped around the wreath shape randomly with both Spiced Marmalade and Peeled Paint Distress Ink. 
It’s subtle but effective.


Then while I had all my heat embossing things out, 
I went ahead and heat embossed all the individual leaf stamps in a variety of Fall colors. 
I do love to heat emboss!


I then decided which colors I wanted to use, and fussy cut the little leaves out. 
Then using my flower shaping tool and a foam pad, I gave all the little leaves some shape.


Next I did some final stamping. 
I stamped two of the pumpkins using Spiced Marmalade Distress ink.  
For the placement of the words on the steps, I began with the ½” strip positioned with the inked edge along the top.  
Using Color Box Espresso ink, I inked only the words “beyond measure” and stamped them in the center. 
Moving on to the 1” strip, again with the inked edge along the top, 
I inked up the word “Blessed” and stamped it in the center of the strip.
After fussy cutting the pumpkins, all that was left to do was adhere it all together.


I began with the larger step piece that says “Blessed” and adhered it to the bottom of the card. 
Before adhering the door, I added a brad for a door knob. 
Then I centered the door piece right above the step, centering the pediment above it, 
and adding the two chipboard strips to frame the door. 
The bottom step was adhered with foam tape to add the dimension that a step would have. 
See how the top edge being inked adds to the illusion of steps? 
One pumpkin was adhered flat on the top step. 
The bottom pumpkin was again adhered with foam tape. 
Lastly, the embossed and curled leaves were adhered to the wreath. 
Then, finally, I added some little colored rhinestones to serve as berries on my wreath.


I hope you’ve enjoyed reading how I put my card together! 

This wonderful “Autumn Blessings” Stamp Set from Inspired by Stamping holds so many creative opportunities.   
Pick it up for yourself and see what it inspires you to create!


Materials Used:

Inspired By Stamping Autumn Blessings Stamp Set
Kraft Cardstock
Woodgrain Paper – MME Dilly Dally 6” Paper
Prima Brick Mask – Item #550011
Distress Inks: Walnut Stain, Aged Mahogany, Spiced Marmalade, Peeled Paint
Color Box Ink – Espresso
Tim Holtz Alterations Die – Pediments
Graffix Chipboard
EK Success Powder Tool
Stampendous Embossing Powder – Gold, Green, Rose
Versamark Ink
Heat Gun
McGill Flower Shaping Tools
Foam Mat
 Brad
Mini Rhinestones

* * * * *
I’ll be back again on October 20th to share another project with you!
Please let me know if you have any questions about my card!
Thanks so much for visiting today! :o)

* * * * *
Here are all the Inspired by Stamping links for you:


There's also a Classroom, a Gallery, and all kinds of other fun!
Head on over and take a look! :o)

Blog Archive