Sunday, 2 February 2014

All Dressed Up Challenge - LOVE

Hello, my friends!

It is time for a new challenge at All Dressed Up.
Our theme for this challenge is *Love*
Here is my project for this challenge:


I have created a canvas that measures 8 X 10.
The background paper was actually torn from an old Bible. 
It was one of those huge coffee table Bibles that somebody was getting rid of, 
and I rescued it knowing I could put it to good use! :o)


The Bible page I used contains 1 Corinthians 13...the LOVE chapter.
The bible page was quite thin, 
so I adhered it to a piece of cardstock and ran it through the printer.


The image I used is called "Amore" and it's found HERE.
The fabulous image actually comes with three files: 
the girl holding the balloons, the girl, and the balloons.

I did some stitching around the page with red thread, and then adhered it to the canvas using Claudine Hellmuth Studio Matte Multi-Medium.
 I then brushed another coat of the medium over the top of the entire page.
When it was all dry I did some coloring using my water soluble wax pastels.
The balloons were colored red, and the area around the balloons was colored blue.
I then used a wet paintbrush in the wax pastel.
The result is this lovely pale and translucent color!


* * * * *
This challenge will run until the 15th of February!

Head on over to the All Dressed Up Challenge Blog to check out the rest of the DT creations, 
and why not enter the challenge while you are there.

 **Please note** 
To enter our challenges you MUST use an All Dressed Up Image or paper.

There is a link there to some fabulous freebies!

Don't forget to stop by our Facebook Group to keep up to date with all the latest All Dressed Up news, and chat with fellow crafters. 

Friday, 31 January 2014

Lia Stampz Challenge #58 - Red/Pink/White

Hello, my friends!

I have another new challenge for you today! 
This one is over at Lia Stampz and it's "Red/Pink/White"
For my card I used this fun image called "Muffin" 
that you can find in the Whimsy Store right HERE.
Now, just to clarify...I do not like mice on my food.
It is only acceptable in an image! :o)


My card is pretty self explanatory! 
In this photo you can see the stickles I added to the image:


Materials Used:
Papers: Recollections - Cardstock;
Image: Lia Stampz - Muffin,
Prismacolor Pencils and OMS;
Dies: Just Rite Custom Dies,
Spellbinders Nestabilities - Standard Circles (LG),
and Classic Scalloped Circles (LG);
Stamp: Hampton Art - Sweet;
Ink: Stampin' Up - Cherry Cobbler;
Stickles: Cotton Candy, Candy Cane;
Doily, Ribbon and Bling: My Stash.

* * * * *
Come on over to Lia Stampz and link up some of your beautiful Valentine's Projects!
I hope to see you there! :o)

New Challenge at Jellypark Friends - Lots of Love

Hello, my lovely friends!

Today is the beginning of a new challenge over at Jellypark Friends! Wow... have we ever had lots of fabulous entries for the last couple of challenges. Thank you all very much for participating! I hope you will join us again for our new "Lots of Love" challenge!

For my card I used the new release image called "Romantic Meal for Two" that you can find in the Jellypark Shop HERE. I really like all the detail in this image and had lots of fun colouring it! This will be my sweetie and me on Valentine's Day. We'll be drinking the bottle of Sparkling Pear Juice that we received for Christmas...and forgot to drink at New Year's! Some of you may remember that last year my husband bought the card I made from me to give to me! He wants to do the same thing with this card this year! lol Who am I to say "no"...he pays VERY well! :o)

To put my card together I cut an oval in my card front and framed it with a lacy die. Then I simply added some black rhinestones and a pretty sheer bow. 


On the inside you see the complete image. 
I added a punched border, some fancy corner dies, and some more black rhinestones. 


Here's a close-up look at the coloured image:


Materials Used:
Papers: Momenta - Textured Cardstock,
Crate Paper - On Trend;
Image: Jellypark - Romantic Meal for Two,
Prismacolor Pencils and OMS;
Punch: EK Success Border Punch - Arrow Border;
Die: Cuttlebug - Decorative Corner;
Bling and Ribbon: My Stash.

* * * * *

Head on over to Jellypark Friends and see what my fellow designers have created!
Then get busy making something fun...and link it up!

Hope your weekend is full of joy and laughter! :o)


Monday, 27 January 2014

Creative Inspirations #6 - Tim Holtz Assemblage Clock Project

Hello, my dear sweet friends!

Thank you ALL so much for your kind words of encouragement and your "get well" wishes! I am finally feeling much better, and hope to be around to visit you soon! :o)

Today I want to share a fun project that I made my daughter for Christmas. This is the same daughter that got married in June. She has a really great collection of vintage clocks, and I thought this would be a fun addition. All the materials to make your own clock can be found at Creative Inspirations

I kept the outside of the clock completely plain. This daughter is not into the fancy froo-froo style of decor. I traced the backing of the Tim Holtz Assemblage Clock onto turquoise cardstock, cut it out, and adhered it to the back of the clock. I then cut the Picture Wheel die using white cardstock. I made a black and white copy of the photo proof sheet from some of the wedding pics that we had printed. I cut the tiny pictures out and adhered them in position on the back of the picture wheel, then adhered the picture wheel to the backing. I cut some clock hands out of black chipboard using a Sizzix die, and positioned them between the photos. I circle cut one of my favorite of their engagement photos, and popped it up on dimensionals. Finally, I stamped "SWEET MOMENTS", cut it out, adhered it in place across the photo, and added some bling from my stash. Here is what it all looks like: 


Here is the finished clock. 
I simply added an assortment of Prima flowers in coordinating colours. 
They have metallic brads in them to add some sparkle. 
I also added a pretty turquoise ribbon bow. 


I hope you like it...my daughter really did! :o)
All supplies to make this project can be found at Creative Inspirations!

Tuesday, 21 January 2014

Scripture Lessons and Lyrics 2014 #1 and Some New Fun!

Hello, my friends!

First of all I want to apologize for not visiting your blogs in the last little while. I'm afraid I've been hit by the flu bug...twice...and have just not been up to it. I hope to be back at it again very soon!

Secondly, I want to thank all of you for your lovely comments on my recent posts! Your kind words have been such an encouragement to me!

I haven't been up to doing anything lately but I had been working quite far ahead. That means I do have something new to show you. I must say that I am really excited about this new year of Scripture Challenges...this is my fifth year participating. For two years I did 6 X 6 pages, one year of 8 1/2 X 11, and last year I did 8 1/2 X 8 1/2 pages. I was just not sure what I was going to do this year...and then it hit me! :o)

I have been totally inspired to get into doing some pocket page scrapping by my sweet friend Alexandra. She creates the most incredible Project Life albums, using various products and techniques. I have decided to use my new 6 X 8 Simple Stories Snap album for the challenge this year. One of the exciting things about this format is that every page can be a different configuration, depending on which pocket page I use. I had so much fun making my first page! I hope that you like it too, and that you'll come back to see more! :o)

I know I'm doing a lot of "talking" here but there's on more thing I want to mention before I show you my page. When I became interested in this style of scrapping, I became aware of all the incredible Project Life Kit subscriptions that are available. I was very tempted by many of them. However, with the cost of shipping to Canada, and the way our dollar is right now, it just didn't make sense. I have been subscribing to the Simon Says Stamp Card Kits for some time now and really love them. So I am planning to use the items from these kits to make my Scripture challenge pages. 

Oh, one more bit of info for you...this year's challenge is called Scripture Lessons and Lyrics. Patter is continuing to share a different song with us every two weeks. The difference this year is that it may be a traditional hymn, or it may be a contemporary Christian song. This first one is a contemporary song by Jeremy Camp called "You are the Lord", and yes...it's one of my favorites! 

Okay, I'm finished all my rambling introduction for the year! Here is my first pocket page:


This page format works perfectly for the present challenge. One pocket is the song title..."You are the Lord". One pocket is my chosen Scripture from the song. The last pocket shows some of the lyrics from the song that inspired my choice of Scripture...or that spoke to me. 

This is one of the songs that often plays on my favorite Galaxy channel. It's a beautiful song of praise and worship. My chosen Scripture is found in Romans 8:31. The second half of the verse says "If God is for us, who can be against us?" This Scripture is also quoted in the song directly before the part that I've shared. Isn't it a great verse of encouragement? The truth is that God IS for us...and with Him...nobody can be against us! :o)

This is a crazy long post but I'm going to tell you a bit about what I've done. For the title I used some letter stickers, stamped the borders, and added the little acrylic heart embellishments. For the Scripture pocket I used a Spellbinders die and layered a circle in the center for my verse. I adhered some sequins in the corners. For the final pocket I die-cut some more layers and just added some black pearls. Super fun to put together!

Here is my page in the Snap binder:


Materials Used:
Simon Says Stamp July Card Kit;
Other various SSS Card Kit supplies;
Spellbinders Nestabilities: Standard Circles (LG), Labels Fifteen;
Spellbinders Shapeabilities: Lotus Pendants;
Simple Stories Snap: Binder and Pocket Page;
Black Pearls from My Stash.

This is the binder I'm using. At some point I will decorate it:


* * * * *

Linking Up To:


* * * * *
This great challenge is open to everyone...
maybe you'd like to participate too! :o)

* * * * *
Here's a video for you to enjoy:


Friday, 17 January 2014

All Dressed Up - Inspiration Post

Hello, my friends!

Thank you all so much for your wonderful comments on my All Dressed Up blog hop post! It has been great to see so many of you stopping by, and a very warm welcome to all my new friends! The blog hop will continue until January 22nd.

If you have already participated in the hop, you will have seen this darling image a number of times. I just had to use her for my monthly inspiration post! This is another one of the newly released images, and is called "Little Bookworm". You can find it in the store HERE, along with all the other fabulous All Dressed Up Images.

For my card I simply coloured up the image and fussy cut it all out. Then I settled her into this sweet little library scene, and attached the included sentiment! Working on this card, I was reminded of many visits to the library with my girls when they were little. We'd all leave carrying bags full of wonderful reading material! :o)


Materials Used:
Papers: Basic Grey - Oxford;
Image: All Dressed Up - Little Bookworm;
Prismacolor Pencils and OMS;
Dies: Spellbinders Nestabilities - Lacey Ovals.

* * * * *
I hope I've given you some fun inspiration today! 
I'll have another All Dressed Up post next month! :o)


Wednesday, 15 January 2014

All Dressed Up - Blog Hop and Anything Goes Challenge!

Our first All Dressed Up challenge & release of 2014 is here...and what a fantastic release it is! 

Both our teams have joined together for this Challenge/Release, and we are also having a blog hop! 

We have four new releases this month, all of which can be found over at the store 
Our theme for the the challenge is "Anything Goes". A nice and easy theme to start the new year with. 
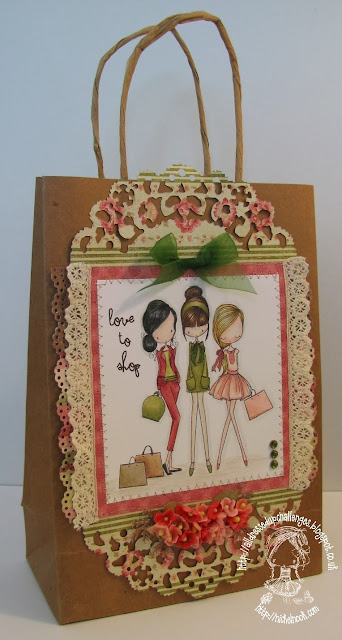
For my design team project for this challenge I have decorated a kraft gift bag.


Here's a close-up of the image:


Materials Used:
Papers: K & Company - Classic K McKenna;
Kraft Gift Bag;
Die: Tim Holtz - On the Edge - Doily;
Punches: Martha Stewart - Doily Lace, Branch, Rose Leaf;
Lace: Gift from Susan;
Flowers: Gift from Joy;
Unknown Ribbon and Bling.

* * * * *

I have used **Love To Shop** which you will find  here. 
The challenge will run until 2nd February and the winner will receive 3 images of their choice from the store
Please make sure you stop by the blog to check out the rest of the talented Dressy Girls creations. 

Now as I said earlier we are also having a blog hop for this challenge, two lucky winners will receive 2 images of their choice from the store.  In order to be in on a chance of winning you have to visit every blog on the hop list and leave a comment by the date shown below. Two winners will be picked at Random by two of the Dressy Girls on Wednesday 22nd January . We know we have quite a few Dressy girls, so we have spread the hop over a week to give you all plenty of time to hop along. 

If you have been following the hop list you have arrived here from **Christine R's blog** 
Here is the hopping list so you don't get lost along the way. 
Good luck on the hop and make sure you check out the blog for the winners & all the challenge details.

Blog Archive