Saturday, 16 January 2016

Scrapper's Delights Introduction Post

Hello, my friends!

I've been waiting to share this fun news with you!
I was thrilled to be invited to join the Scrapper's Delights Design Team!

I am on the Thrifty Thursday Team.
Beginning on February 11th I will be sharing a project with you every other Thursday.

Today is my introduction day over on the Scrapper's Delights Facebook Group.

I created a frosty card using this fun "Winter Elf Digi" which you can find HERE.


Here's a closer look at the sparkle:


Materials Used:
Papers: Recollections - Cardstock, Shiny Blue Metallic Paper;
Image: Scrapper's Delights - Winter Elf Digi,
Spectrum Noir Markers;
Punches: Martha Stewart - Aspen Snowflake Punch Around the Page;
Dies: Echo Park - Snowflakes, Sizzix  Framelits - Tags, Rounded;
Stickles: Stardust;
Ribbon: Offray;
Bling and Rhinestones: My Stash.

* * * * *
Thanks for stopping by to see my announcement!
Oh, one more thing to share...
Janice has a big sale going on right now.


Scrapper's Delights always has lots of fun events happening.
You're going to want to investigate further! :o)

Here are all the links:


Friday, 15 January 2016

Scrap N' Dipity - Announcement and Very First Challenge!

Hello, my friends!

 I am so happy to be on the Scrap N' Dipity Design Team
This is a brand new Canadian Digital Image Company!
Woohoo, right? 
I'll be sharing projects using some really fun images!

 Look at the fantastic DT announcement Alisha made.
She personalized it for each one of us. Aren't we adorable?


My friend Leslie says the sunflowers are my crown!  :o)

Okay...let's get on to today's business.

Today is the start of the very first Challenge at the Scrap N' Challenge Blog!
The challenge this month is "Snowball Fight".

I used this fabulous image called Tanya - Snowball Fighter.
You can find it in the shop right HERE.
Don't you love her?
Guess what? You can get this image FREE over at the facebook page! 
Read all the details HERE.

I have decided to make a calendar this year,
and this is the page for January.
In a future post, I will show you how I will be displaying my calendar. 


Here's an angle shot that shows more of the sparkle:


Materials Used:
Papers: Tim Holtz Vintage Shabby Paper Stash;
Image: Scrap N' Dipity - Tanya Snowball Fighter,
Spectrum Noir Markers;
Printable Calendar: Maya Road;
Dies: WRMK - Nested Circles Die,
Tim Holtz Decorative Strip - Mini Snowflake Rosette;
Punches: Fiskars - 1/2" Circle, MS - Arctic Snowflake;
Ink: Distress Ink - Iced Spruce;
Stickles: Star Dust;
Rhinestones: My Stash;
All Sequins and Garment Pin: Where Ideas Bloom Shop.

* * * * *


I do hope that many of you will head over to join and follow everything! 

Here are all the links you're going to need:


* * * * *

Linking Up To:

The Paper Nest Dolls Challenge #01 - Anything Goes

Eureka Stamps Challenge #175 - Use Something New
(New Digi Image, New Mini Snowflake Rosette)

Clear It Out Challenge Blog - Theme: Winter, Stash: Snowflake

Fan-Tastic Tuesday Challenge #119 - Anything Goes - Warm and Cozy
(She's outside but she's bundled up nicely!)

* * * * *

I'll be back very soon with another fun announcement!
I hope to see you then! :o)

Tuesday, 12 January 2016

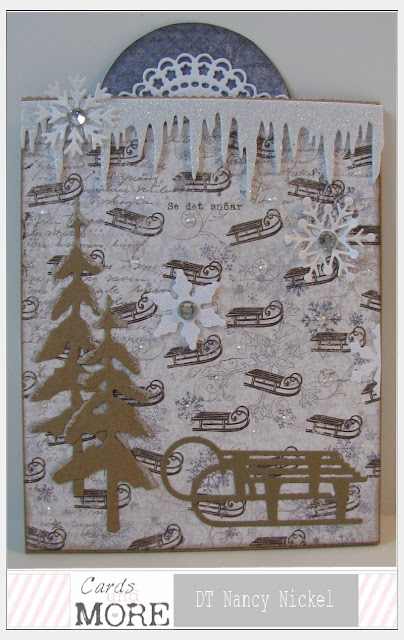
Cards and More DT - Paper Bag Pocket Card

 Hello, my friends! 

I have a new Cards and More Shop DT project to share with you.
I have created a fun Winter Paper Bag Pocket Card!
It's a paper bag folded and decorated.
The pockets are filled with tags for all your messages.
It was lots of fun, and I'm sure I'll be making many more!

The wonderful sentiment strips, shown on the bottom of the photo above, 
and along the bottom of the largest tag shown below, 
are actually the back of the company strip.
Aren't they perfect?

Here you can see the large tag from the big pocket,
and the two smaller tags that fit in the front pocket.


Here is the back.
It's decorated with several fun winter die-cuts


This photo shows the back of all the tags.


Isn't it fun how all the papers and dies work well so well together.
Lots of winter sledding fun! 


 This project was made using these wonderful products from the Cards and More Shop


* * * * *
I hope you like my Paper Bag Pocket Card!
Please pop on over to Cards and More Shop to see all the great products they carry.
Also, check out the Cards and More Shop blog.
It's full of fun inspirational projects! :o)

Have a happy day! :o)

Friday, 8 January 2016

ScrapMuch? - Sketch-y Friday!


Hello, my friends!

Happy New Year to you all!
It's already a week into the new year, and I finally have my first post! 

It's Friday, which means it's Sketch-y Friday at ScrapMuch?
and I have another layout to share with you! :o)

Here's another fabulous sketch that Laura created:


Isn't it great?

I'm finding it so much fun to play with these old photos.
Here's another series where my Mom was trying to get a good shot of the girls in their little sailor outfits!
My Mom had a habit of taking pictures in the entrance, just when everyone was on their way out the door. 
Don't you love the glare of the flash against the old paneling? lol
Andrea found the shoehorn much more interesting than smiling for the camera! ;o)


Materials Used:
Papers: American Crafts - Cardstock, Pink Paislee - Atlas,
My Mind's Eye - On the Bright Side, Simple Stories - Color Vibe;
Slice Design Card - Under the Sea;
Recollections: Enamel Dots.

* * * * *

To join in the fun, simply create a layout using this sketch, 
and link it up in the sidebar at ScrapMuch? before January 29th. 
You'll find all the rules, and lots more great sketches, on the ScrapMuch? blog.
Make sure you follow the blog so you don't miss out on any of the great inspiration and tutorials. 
Also, join the ScrapMuch? facebook page

* * * * *
Thanks so much for stopping by! 
Have a wonder-full weekend! :o)


Sunday, 27 December 2015

Thankful for you!

Hello, my friends!

I hope you've all enjoyed a wonderful Christmas with your family and friends! 
We have a few days now to catch our breath before we ring in the New Year. 

I've been wanting to play along with Paper Smooches for a while now but things have been a little busy.
I finally managed to snatch enough time to create a card for their December Challenge.
The challenge is "Flowers", 
and I'm linking it up in the nick of time! ;o)

I used a couple of the Paper Smooches freebies offered on their blog.
I combined the flower image, and two of the sentiments.
Then I printed out more of the flowers, fussy cut them out, 
and layered them up with dimensionals. 
I pierced the design and stitched it with embroidery floss.
Finally, I layered everything up, with the top layer adhered with foam tape.


Here's an angle that shows the dimension:


As always, at this time of year, we spend time reflecting on the happenings of the past year.
I know that for many of us it's been a year of both joys and sorrows.

One of my greatest joys is that you continue to visit my blog, 
and leave me your sweet words of encouragement!
So, this card is for each one of you...because I am thankful for you! :o)

I look forward to the New Year with hopeful anticipation!
God is good, and ever faithful, and He has much goodness in store for all of us!
EnJOY the rest of your holidays! 

Tuesday, 22 December 2015

Oh Christmas Tree Card - Cards and More DT

Hello...and HAPPY last Tuesday before Christmas!

Today I have a fun Christmas tree card to share with you.

I used a fun template from Dutch Doobadoo,
and traced and cut two of the second largest tree.


I had fun decorating it!
I added a poinsettia and framed it with the beautiful die-cut.
Then I used an assortment of stickles and liquid pearls to add the sparkle and glitter.
A punched and glittered star on the tree top, and a pretty ribbon bow, and it's finished!


To turn it into a card...
I scored across the back tree piece.
Then I added glue above the score line and adhered it to the front piece.
Now it opens up, and stands nicely.


* * * * *

I used these items from the Cards and More Shop:


Monday, 21 December 2015

Miss Daisy Stamps - HollyBelle

Happy Monday, my friends!

Today I have another project for Miss Daisy Stamps!
This one uses the sweet image called "HollyBelle",
which you can find right HERE.

I made a different kind of card for today.
I'm not sure what it's called...maybe a bendi frame?
It was lots of fun, and works great with this sweet image. 


Here's a nice angle shot to show the dimension.


You can see it even better from the top.


Materials Used:
Papers: Recollections - Cardstock;
Image: Miss Daisy Stamps - HollyBelle,
Spectrum Noir Markers;
Die: Your Next Stamp - Jingle Bell Border,
WRMK - Nested Circles;
My Stash: Ribbon, Bells, Sprig.

* * * * *
Head on over to Miss Daisy Stamps and look around!

Here are all the new links:


You won't want to miss any of the fun!

Blog Archive