Hello, my friends! Guess what? My big project is complete! It's actually not really that big...it's mini since it's a mini album! lol It's a special mini album that I made for a special event. I was invited to be the Guest DT Diva at the Creative Scrapbooking Divas Mansion for the month of November! So I made a special house mini just for them. When you're finished here pop on over there and take a look. I even answered some questions for them! :o) You'll find their bright pink button just to the left of this post! Today I'm going to share a little bit about my process of putting this mini album together. First though, here's a peek at the finished product:

This album is entitled "OUR HOME IS FILLED WITH..." I'll share more about that in later posts, but for now we'll just talk about the construction. The first thing I did was gather up some supplies that I decided I wanted to use.

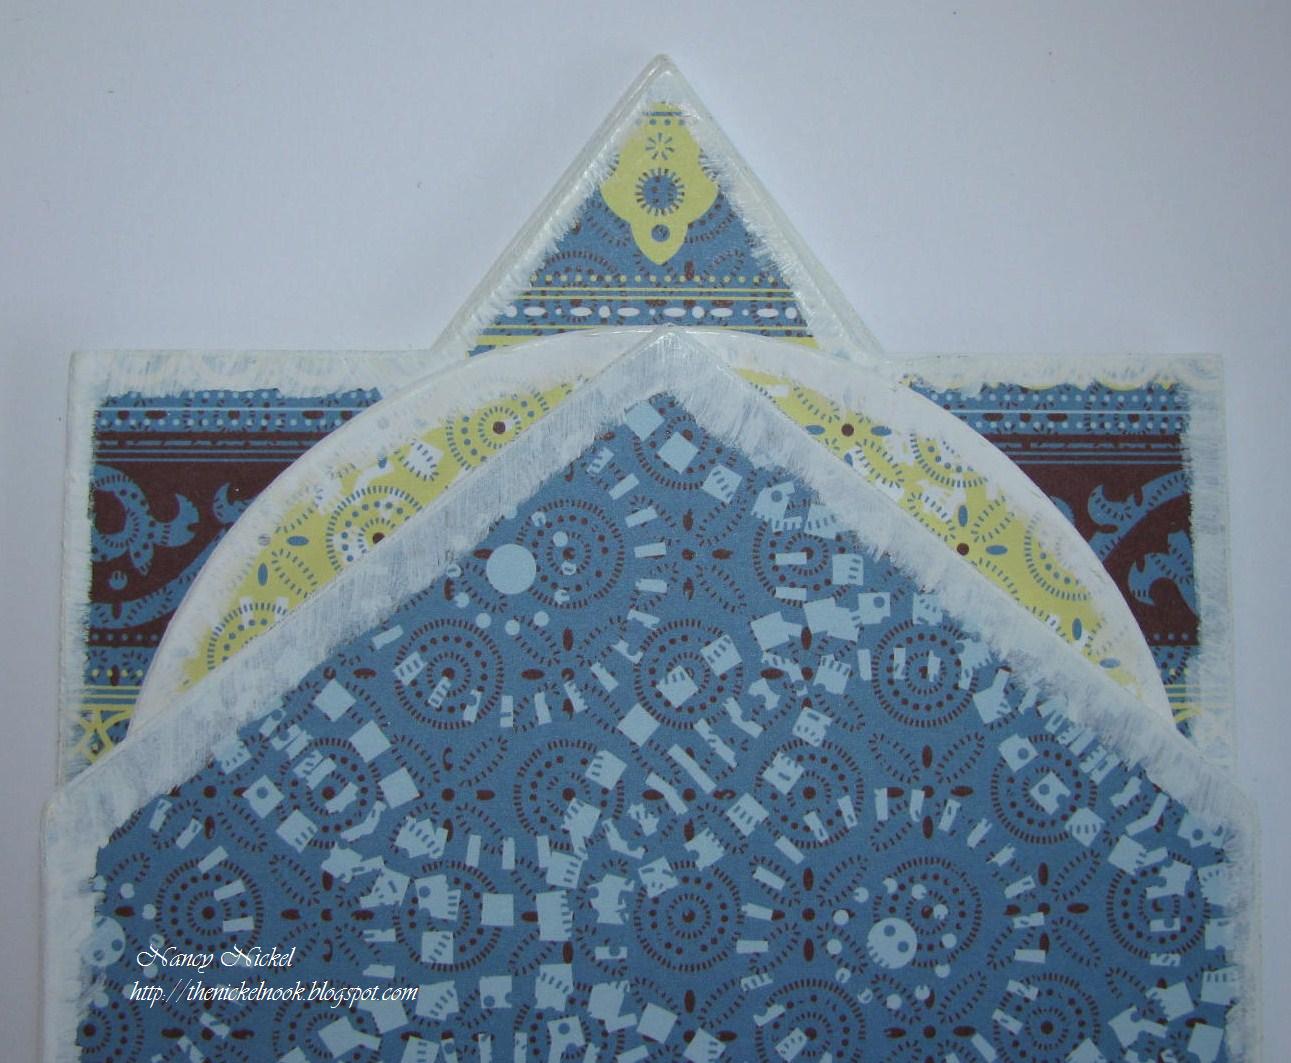
Then it's time to cover the base pieces with the paper. I covered my house pieces liberally with my ATG adhesive, laid my chosen paper over, and used my craft knife to trim around. I did this on all the pieces of the album. Some careful planning was involved due to the varying sizes of the album pieces. Next, it's time to smooth all the edges of the album. I've discovered a quick and easy tip when it comes to the sanding all the edges...I use my Dremel Tool. I used to use my sanding block and emery board, but when I saw the Imaginisce d-stress tool it reminded me of my Dremel sanding tip and I tried that. It works like a charm...so quick and easy! I just have to remember to keep it on a LOW speed, or I have a completely new shape! lol
Usually I ink all my edges but this time I wanted to try something different. I thought white would look nice so I painted all the edges with white acrylic paint. When using acrylic paint on paper products, try to use a good quality paint because it has less water in it. Also, use a dry bush and don't ever add water. I applied the paint and set the pages up on some paint bottles until it was dry. When you paint with acrylic paint it leaves quite a "tooth" or a texture. My solution for this is to take a little piece of brown paper bag and give it a quick sanding. This does a fabulous job of removing all the tooth but not taking away any of the color. It leaves it as smooth as the paper.

For the front cover I used one of the great house stickers as it fit the shape perfectly. I backed it with cardstock and popped it up on dimensionals. I then punched out a few tiny flowers and glued them along the fence. A few tiny bling and it was finished.

Since I bound my album along the bottom, and it's made to open forward, I really needed to make a closure of some kind. I also want to have the flexibility of adding more to this album as time passes, so it couldn't be a solid closure. Here's what I came up with:

The title is a label placed in a Grungeboard book plate that has been heat embossed in white and backed with a tulle ruffle. I took a long piece of tulle and tied random knots along it's length. A loop is sandwiched between the title and a chipboard circle with velcro adhered on the back. The other end of the tulle is looped through another chipboard circle with the other side of the velcro. This end of the tulle is then tied in a bow and can be tightened or loosened as needed. This fastener can just be wrapped around the album and placed above the house to look rather cloudish!
So that's my mini album construction! Thanks so much for sticking with me for such a LONG post! Hey, wake up...it's over!! lol Next Sunday I'll start showing you the inside pages! If you have any questions please leave a comment! In the meantime give some thought to what your house is filled with and have a JOYFUL week! :o)

This album is entitled "OUR HOME IS FILLED WITH..." I'll share more about that in later posts, but for now we'll just talk about the construction. The first thing I did was gather up some supplies that I decided I wanted to use.

Then it's time to cover the base pieces with the paper. I covered my house pieces liberally with my ATG adhesive, laid my chosen paper over, and used my craft knife to trim around. I did this on all the pieces of the album. Some careful planning was involved due to the varying sizes of the album pieces. Next, it's time to smooth all the edges of the album. I've discovered a quick and easy tip when it comes to the sanding all the edges...I use my Dremel Tool. I used to use my sanding block and emery board, but when I saw the Imaginisce d-stress tool it reminded me of my Dremel sanding tip and I tried that. It works like a charm...so quick and easy! I just have to remember to keep it on a LOW speed, or I have a completely new shape! lol
Usually I ink all my edges but this time I wanted to try something different. I thought white would look nice so I painted all the edges with white acrylic paint. When using acrylic paint on paper products, try to use a good quality paint because it has less water in it. Also, use a dry bush and don't ever add water. I applied the paint and set the pages up on some paint bottles until it was dry. When you paint with acrylic paint it leaves quite a "tooth" or a texture. My solution for this is to take a little piece of brown paper bag and give it a quick sanding. This does a fabulous job of removing all the tooth but not taking away any of the color. It leaves it as smooth as the paper.
For the front cover I used one of the great house stickers as it fit the shape perfectly. I backed it with cardstock and popped it up on dimensionals. I then punched out a few tiny flowers and glued them along the fence. A few tiny bling and it was finished.

Since I bound my album along the bottom, and it's made to open forward, I really needed to make a closure of some kind. I also want to have the flexibility of adding more to this album as time passes, so it couldn't be a solid closure. Here's what I came up with:

The title is a label placed in a Grungeboard book plate that has been heat embossed in white and backed with a tulle ruffle. I took a long piece of tulle and tied random knots along it's length. A loop is sandwiched between the title and a chipboard circle with velcro adhered on the back. The other end of the tulle is looped through another chipboard circle with the other side of the velcro. This end of the tulle is then tied in a bow and can be tightened or loosened as needed. This fastener can just be wrapped around the album and placed above the house to look rather cloudish!
So that's my mini album construction! Thanks so much for sticking with me for such a LONG post! Hey, wake up...it's over!! lol Next Sunday I'll start showing you the inside pages! If you have any questions please leave a comment! In the meantime give some thought to what your house is filled with and have a JOYFUL week! :o)
Materials Used in Book Construction:
7 gypsies Home Sweet Home binderie board kit;
My Reflections Paper Packet - Sweet Home;
My Reflections My Stickease Assortment - Sweet Home,
Bind It All & 1 1/4" O-Wires, ATG gun & Adhesive,
Folk Art Acrylic Paint - Wicker White,
Dremel MultiPro Tool & Sanding Tip;
Flowers: Stampin' Up Itty Bitty Shapes Punch Pack, Mulberry paper,
Crystal Fire BeJeweler & i-Rock Hot Rocks Metal Accents;
Title Band: Dymo Letra Tag & label, blue tulle,
Grungeboard bookplate, chipboard circles,
Stamp'n Stuff Embossing Powder - detail white opaque,
Recollections Brads, Self-Adhesive Velcro, Unknown Bling.
19 comments:
Nancy this is fabulous! The shape of the album is so different and the paper and embellishments colours etc are great.I love the way it is bound at the bottom too. Do we really have to wait a whole week to have a peek inside!! Looking forward to it!
Hi my sweet friend,
your project is .... I am speechless in front of enthusiastic, Nancy. I can not believe my eyes when I've just discovered it. You have done a great job. My compliments. A detailed breathtaking creation. Absolutely brilliant.
Love and hugs
Dunja xxx
Nancy this is amazing and so much work went into it. What a beautiful job you did and thanks for the little tutorial on how you did it. Again, beautiful work!
oh wow! This is gorgeous! I love the details. So super cute.
cheers
Hey Nancy, I want to say congrats and what an awesome mini you made. Love it. TFS...
Congrats on Guest Designer!!!
Nancy, you did an AWESOME job with your House Mini!! I {heart} everything about it, can't wait til next week to take a "sneaky peek" at the inside...
Wow! Albums, even mini ones always intimidate me, so this stunning little number really has me impressed! The cover is so sweet and inviting, I can't wait to see inside!
Have a blessed day, sweet friend.
Your mini album is just stunning! I love the blue and I could look for hours and still miss some of the wonderful details you've added.
Definitely something to cherish.
Hey Nancy! Great mini. The datails and colors are all that. The closure is super creative and cute. Congrats on being the guest DT member. Inquiring minds want to see inside the mini(LOL) Great job.
Nancy, this looks beautiful. Well done and congratulations on the guest DT spot.
O MY GOSH O MY GOSH U need a TV SHOW...I would watch U every day!! CONGRATULTIONS ON DT U R FANTASTIC!! I m on my way to hunt for my MIni Dremel I think I know where it is too...:O)
THANK UUUUU!!
Oh boy! I can't wait to see what the inside looks like after seeing the amazing outside! You clever girl you. :-) All those great tips and that over the top closure--how cute is that! Oh Nancy my girl, this is one beautiful project! Hugs!
Beautiful mini album. This is absolutely gorgeous and adore the blue tulle you have used.
HUgs
Lynn xx
Beautiful mini Nancy! You really out did yourself, looks like you've invested so much time with it, it was well worth it! I really like that you bound it on the bottom and that closure is so pretty and very clever. I can't wait to see the inside.....
Nancy this is the sweetest thing...can't wait to see more! I love your clever closure, and the sticker on the front looks like a chipboard piece that was made for this!! Good thinkin' darlin'! LOVE it!!! Congrats on your guest DT spot, too!! (Loved your cozy little bird house!!)
Nancy, this is stunning. I love it! Your tips on sanding and acrylic paint are great - sometimes we just need reminding....and sanding with a paper bag?? wow, that is a great idea. Your cover is beautiful! and the cloud closure - how unique!! Can't wait to seethe rest of the book - you have me in suspense.
Great job!!
~ rubber hugs ~
Wow Nancy, this is gorgeous and what a fab project! Looks like you have invested quite a few hours into this and your attention to detail is amazing. Good job!
SO pretty Mom! Maybe one in the works for me?
Wow nancy I have missed you! I just was browsing around after a terribly filling Thanksgiving dinner. I thought I would check in on some blogs. The book you have made it very pretty. Love the paper (of course!) Thanks for sharing! hope all is well.
Post a Comment