Saturday 30 November 2013

Lia Stampz - Challenge 54 - CAS

Hello again, my friends!

It's time for a new challenge at Lia Stampz. This time you need to make it CAS...or "clean and simple."

For my card I used an image called "Igor and Ilinca" and you can find it in the Whimsy shop right HERE. This image was among the first Lia Stampz images I ever purchased. It made me smile and I couldn't resist! Isn't it fun? 

My card looks a little busy for a CAS card but I think it's the paper. I just matted the image, added a bit of Washi tape and the sentiment, and then a touch of stickles. Not only CAS but QAE...quick and easy! 


Materials Used:
Papers: Recollections - Cardstock, Crate Paper - Peppermint;
Image: Lia Stampz - Igor and Ilinca;
Prismacolor Pencils and OMS;
Stamp: October Afternoon - Home for the Holidays;
Ink: Momento - Tuxedo Black;
Punch: Stampin' Up - Scallop Circle;
Washi Tape: My Stash.

* * * * *

Why don't you make a CAS card and come on over to Lia Stampz!
You could win an image or be chosen as the Featured Artist!

Friday 29 November 2013

Some New Yummies and a Month Long Challenge

Hello, my friends!

There are going to be a few exciting changes happening around here in the next couple of months. Today I get to tell you about one of them!

I know that many of you are familiar with my fondness for Jellypark digi images. I have used them regularly for a long time. Well, I am very happy to share that I am now part of the Jellypark Design Team! I've been a fan of Claire's sweet images ever since I first saw them, and I'm so excited to have joined the team! :o)

For my first project I have used this brand new Jellypark release called "Gingerbread Dress Up" that you can find in the Jellypark Store. As soon as I saw it I had an idea of what I wanted to make. Since this is for my introduction at the  Jellypark blog I wanted my project to be special. Here it is:


Here it is open:


Yes, I made a little gingerbread easel card for my gingerbread man! The trick came in putting my plan into action. I only have a few Cricut Cartridges...nothing Christmas themed...and nothing that could be adapted. My Slice Cards have gingerbread houses but they were too small. So I had to make this one from scratch...which was lots of fun! I drew out the house in the size I wanted. Then I cut the icing trim and used the goo punch on it. The candy was made from a circle punch and the modern label punch. I then covered it with Glossy Accents. It looks a little bit cloudy in my photos because it was still wet.


Materials Used:
Papers: American Crafts - Merrymint, Kraft Cardstock;
Image: Jellypark - Gingerbread Dress Up;
Dies: Sizzix Framelits - Tags, Rounded;
MM Slice Design Card - Fa La La;
Punches: Martha Stewart - Drippy Goo Punch,
Fiskars - 1" Circle, Stampin' Up - Modern Label,
WRMK  Corner Chomper - Cloud;
Stamp: Tim Holtz - Mini Holidays;
Ink: Memento - Tuxedo Black, Distress Ink - Walnut Stain;
Buttons & Ribbon: My Stash;
Other: Enamel Accents - White, Glossy Accents, Clear Glitter Glue.

* * * * *

Please head on over the the Jellypark Friends Friday Challenges where we're having a month long Christmas Challenge. Then make something and join in the fun! :o)

Sunday 24 November 2013

Hymn and Scripture Challenge #20 - I Need Thee Every Hour

Happy Sunday to you all, my friends!

I'm here with my latest Hymn and Scripture Challenge page. The new one starts today but I saved this one to share with you on this beautiful Sunday morning!

It's another very beautiful and meaningful hymn today. Here are the words:


I need thee every hour, most gracious Lord;
no tender voice like thine can peace afford.
Refrain:
I need thee, O I need thee,
every hour I need thee!
O bless me now, my Savior--
I come to thee!

I need thee every hour; stay thou near by; 
temptations lose their power when thou art nigh[Refrain]
 I need thee every hour; teach me thy will,
and thy rich promises in me fulfill. [Refrain]

I need thee every hour, Most Holy One;
O make me thine indeed, thou blessed Son. [Refrain]


I know that I need my Lord every hour of every day! As one who lives with almost constant pain...I could not make it through the day without His strength. I could not enjoy the day without His JOY! The Scripture verse I used is found in Psalm 86: 3-4. It says:

Have mercy on me, O Lord,
for I call to you all day long.
Bring joy to your servant,
for to you, O Lord, 
I lift up my soul.


No matter what we struggle with in life...physical pain, emotional pain, loss, trying circumstances...we all need God! He is always there for us, waiting to shower us with blessings!

My page is very simple. I printed out the music sheet but I had to cut it down so it would fit on my 8 1/2" page. Black and pink is one of my favorite colour combinations, so I matted everything in pink and then layered it on a black base. I've had this stamp & punch set for quite some time but I think this is the first time I've used it. Well, I stamped and punched! lol I used some of the extra strips cut off the music sheet for the leaves. I added the pretty pearl butterflies and some extra black bling...and there you have it!

I pray you all have a Sunday full of Joyful Blessings! :o)


Materials Used:
Papers: Recollections - Cardstock;
Stamp: Stampin' Up - Mixed Bunch;
Ink: Momento - Tuxedo Black, Distress Ink: Vintage Photo;
Punches: Stampin' Up - Blossom Punch, Blossom Petals,
Fiskars - 1" Circle;
Dies: Sizzix Framelits - Label, Ornate #3;
Butterflies: Prima - Say it in Pearls;
Other Bling: My Stash.

* * * * *
Linking Up To:


* * * * *
This is fabulous! I hope you can take the time to listen:


Wednesday 20 November 2013

A Die for a Sketch - Challenge #18 - Reminder

Hello, friends!

Just a quick reminder that Challenge #18 that is going on over at A Die for a Sketch! Our wonderful sponsor this month is:


* * * * *

Here is the fun sketch created by Dunja:


* * * * *

For my card I used the super sweet Jellypark image called Girl in Coat. I coloured it up with my pencils and had fun with punches and dies.  A fun sentiment and it's done!

I wish you all JOY! :o)


Materials Used:
Papers: Hot Off the Press - Ultimate Christmas Creative Pack;
Image: Jellypark - Girl in Coat,
Prismacolor Pencils and OMS;
Ink: Momento - Tuxedo Black;
Stamp: Unknown;
Punch: EK Success - Stars;
Spellbinders Nestabilities - Labels Six;
Pearls: My Stash.

* * * * *

Head on over to A Die for a Sketch and join in the fun!

Sunday 17 November 2013

All Dressed Up - Inspiration Post

Hello, my friends!

Today it's my turn to share an inspiration post over at the All Dressed Up Challenge Blog. Besides the two challenges a month, there are also tutorials and inspiration projects posted almost every day. It's really worth taking a look if you haven't stopped by yet!
Most of you have already seen the stitchery that I made using one of Wendy's lovely images. I have another stitched project for you but this time I stitched on paper instead of fabric. I used the "Cute Just Got Cuter" from the freebie pageI printed it the image "fit to page" onto 8 1/2 X 11 kraft cardstock. Then using my piercing tool I pierced holes evenly on all the main lines. When that was finished, I stitched in the holes using a variety of colours of embroidery floss.  I added french knots for the freckles. I set that all aside and moved onto the rest of it. 

I used an 8" X 10" canvas board from my stash. I took a 9" X 11" piece of red tissue paper and wrinkled it all up into a ball, then I smoothed it out flat. Using a paintbrush, I coated the entire canvas with Delta Ceramcoat Satin Varnish and laid the tissue paper over it and gently smoothed it down with my hands. Again using the paintbrush, I adjusted any wrinkles that needed it. When it looked the way I wanted, I brushed another coat of varnish over the top. I wrapped the tissue paper around to the back and secured it with varnish. Then I set it aside to dry.

*You may be wondering why I use varnish at a time like this. It serves the same purpose as Mod Podge, but I prefer it. Mod Podge always seems to have a bit of tackiness to it, even after it's dried. The varnish is easy to work with, very affordable, cleans up beautifully with soapy water, and I have lots of it on hand. 

Okay, my canvas board is dry. I cut my stitched piece down to the size I wanted and adhered it to the board. I used the trim to frame the edge of the paper, mitering the corners. All that's left is to add the buttons, and the yoyos.


Materials Used:
Trim: KI Memories - Fire Line;
Embroidery Floss: DMC;
YoYos, Canvas Board, 
Tissue Paper, Buttons:
From My Stash.

* * * * *

Wendy has many adorable images that are perfect for this kind of application...
...or any other application you may want to try!
So pop on over to the SHOP and be inspired! :o)

Friday 15 November 2013

Lia Stampz - Challenge #53 - Use Your Paper Scraps

Hello again!

Today starts a new challenge over at Lia Stampz. Challenge #53 is "Use Your Paper Scraps." I actually don't have much for paper scraps. I'm not sure if that's because I use them all up, or if I just don't cut into enough paper! ;o)

I did find these bits and pieces left over from a previous card. I think I am now left with a 2" square. The super sweet Lia Stampz image is called  Haley. You can find it in the Whimsy Shop right HERE.

My card is pretty self-explanatory. It was a really fun image to color! I added Stickles to the snowflake punches, Liquid Pearls to the top of the sign and the hat pom-pom, and then I added both to the snow pile. I think most of you know how I feel about the snow, so "Enjoy" is the perfect sentiment for this card. Finally, I added this super delicate bow because the die was brand new and I just had to use it! 

Please gather up a few of your scraps, create something, and come on over and join us at Lia Stampz! You could win a prize or be chosen as the Spotlight Artist!

Have a fabulous weekend, my friends! Would it be awful if I wished you all a wonderful snowfall? lol We have lots in our forecast, so maybe I'll enjoy it for all of you instead! :o)


Materials Used:
Papers: Hot Off the Press - Christmas Creative Pack;
Image: Lia Stampz - Haley;
Prismacolor Pencils and OMS;
Punch: Martha Stewart - Arctic Snowflake;
Die: Impression Obsession - Bow;
Ink: Distress Ink - Vintage Photo;
Liquid Pearls - White Opal;
Stickles - Star Dust.

* * * * *


Thursday 14 November 2013

Give Thanks

Hello, my dear friends!

I'm afraid I have a fairly LONG post for you today!  I won't be offended if you just look at the photos before you leave a comment! ;o)

Unfortunately it's a dark and dreary day here but I can't wait for the sun to share this with you! lol I hope the photos look okay.


When Scrapping Everyday Miracles posted their November challenge, I knew I would participate. The challenge is to create a project using the word or phrase "thanks, thanksgiving, thankful, thankfulness, or give thanks." Here in Canada we celebrated Thanksgiving in October but many of you may know that I tend to see EVERY day as a day for giving thanks! I was very happy to create a "Give Thanks" layout.

I then happened upon a VERY inspiring sketch and used it for my page. I will get into all the details, but first I will show you my work:


Can you tell that I had a WONDERFUL time making this one?  Oh, yes! I certainly did! :o)
When I find an inspiring sketch, I do my very best to replicate it as closely as I can. How did I do? Here is the sketch from C'est Magnifique November Sketch Challenge:


I started with the paper, of course. I used an old Making Memories Autumn Splendor page. Using a Prima mask I inked the bricks where shown on the sketch. The center of the sketch looks like it's been painted, so I did that with a green paint dabber. I cut the fence out of chipboard and embossed it with a wood grain. I colored the chipboard with Weathered Wood Distress Stain, and positioned it on the page. Then I added all the spatters of assorted mists around the page. I didn't have a die that looked just like the one in the sketch, so I found something similar on one of my Slice cards and cut them out in various sizes. I scored them to add texture, and then inked them. Here you can see some of the details:


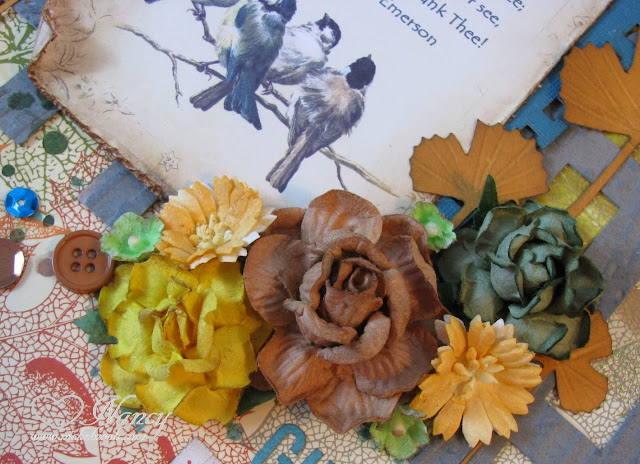
For my photo, I used this fantastic digital image from Ephemera's Vintage Garden. It's actually a freebie called Chickadee Thanksgiving, and you can find it right HERE. The coloring on the birds inspired me to add all the teal accents on the page. Everything was distressed and inked.


Here is a close-up of my flower cluster. Aren't the flowers beautiful? I didn't have to make any of them! I recently received a package from a dear sweet friend and it was FULL of beautiful I Am Roses flowers! You'll be seeing many more of them on my work. I added some ink to the edges of the flowers, and the orange-y ones were misted with Glimmer Mist. The sketch had just the one random button on it...isn't that fun?


Another detail photo:


Then I added my title. I used the first part of the Scripture verse found in 1 Thessalonians 5:18..."GIVE THANKS in all circumstances..." God is so good! Life can be difficult and get really hard sometimes. Even then, it is important that we always be thankful. It certainly changes our viewpoint and our attitude towards the trying times! :o)


Isn't this banner fun? I gathered up some dies and punches and cut these pieces out of three different colors of cardstock. Using several background stamps and some mini doily stamps I stamped and then inked all the pieces. I positioned them as shown in the sketch and stitched them together across the top keeping the end threads long. I attached to brads to the page and wrapped the end threads around them. I also added some adhesive behind the banner. 


The sketch has a hummingbird hovering above the flower thingy. I didn't have one, and decided that it would be more fun to fussy cut another set of the chickadees out of a second image. Then I sat them on the fence. Finally, I added a few random sequins in matching colors. One final look at the page:


Thanks so much for taking a look at my work! If you have any questions about anything, please ask! Also, please let me know what you think of this kind of detailed explanation for my work...or if you would prefer short and sweet! :o)

* * * * *
Linking Up To:


* * * * *
Materials Used:

Papers: Making Memories - Autumn Splendor, Bazzill Cardstock;
Digital Image: Ephemer's Vintage Garden - Chickadee Thanksgiving;
Dies: Making Memories Slice Design Card - Bon Appetit!,
Stampin' Up Framelits - Hearts A Flutter, Die-namics - Banner, 
Sizzix - Picket Fence,
Punches: EK Success Border Punch - Notebook,
Stampin' Up - XL Petite Pennants;
Embossing Folder: Tim Holtz - Wood Grain;
Alphas: Kelly Purkey - Alphabet Stickers, 
Making Memories - Tiny Alphas;
Mask: Prima - Brick;
Flowers: I Am Roses - Gift from Joy;
Inks: Distress Inks - Walnut Stain, Vintage Photos;
Stamps: Recollections - Script, Martha Steward - Doilies,
Stampology - Blog Stamps 2;
Distress Stain: Weathered Wood;
Paint Dabber: Lettuce;
Mists: Adirondack Color Wash - Meadow,
Glimmer Mists - Wheat Beer, Mallard, Chocolat Covered Cherries;
Sequins: Lawn Fawn Sequins. 

* * * * *


Sunday 10 November 2013

Hymn and Scripture Challenge #19 - Immortal, Invisible, God Only Wise

Happy Sunday, my friends!

I thought this morning would be the perfect time to post my latest Hymn and Scripture Challenge page. I'm going to schedule it but who know when it will actually post. Last time it went live 5 hours after the scheduled time! lol Is anybody else having the same issue?

Are you familiar with this wonderful hymn? It's another one of those that brings a certain "attitude" to the voices that are singing it. It's a beautiful thing to hear!

The words are beautiful too and gave me lots of options for my page. I was most inspired by verses 2 and 4. They say:

Unresting, unhasting, and silent as light,
nor wanting, nor wasting, thou rules in might;
thy justice, like mountains high soaring above;
thy clouds, which are fountains of goodness and love.

Thou reignest in glory; thou dwellest in light.
Thine angels adore thee, all veiling their sight.
All praise we would render; O help us to see
'tis onlythe splendor of light hideth thee!

Isn't that beautiful? I used two different Scripture verses this time. The song says "thy clouds, which are fountains of goodness and love", so I chose the second half of Ezekial 34:26. It says, 
"I will send down showers in season; 
there will be showers of blessing."

The second Scripture verse I chose came from verse 4 and the title. The title is also the first part of the first verse. This verse is found in Romans 16:27:

"...to the only wise God be glory forever
 through Jesus Christ! Amen"


There were so many Scripture verses that went along with this hymn. My hope is always to give you a little bit of encouragement, and I felt these verses did that. Sometimes we have to go through many difficulties in life. The good news is that God is waiting to shower us with blessings! Good is so good to us! 

Now, onto how I put my page together. I started by using a fan brush and my gold Glimmer Glam to create the "light". The title was cut from the music sheet and then matted it. I did quite a bit of stamping on this one. I started with the host of heavenly angels, then moved onto the clouds. I added swirls from the clouds to represent the fountains. Finally, I added some music stamping randomly around the page. I matted the words making one small change. The song spoke of "fountains of goodness and love" but the Scripture verse spoke of "showers of blessing". I used the words that were available and it became "showers of blessings and love". Then I just matted my Scripture verses and added some music stamping to them.

It has been a week of very exciting blessings for me! I am humbled and so very grateful for all of God's goodness! I pray that you are being blessed as well! JOYFUL Sunday to you all! :o)


Materials Used:
Papers: Colorbok - Textured Cardstock, 
Recollections - Cardstock;
Dies: Spellbinders Nestabilities - Curved Rectangles;
Stamps: Simon Says Stamp - Cloud Stamp,
Inkadinkado - Swirl Stamps, Tim Holtz - Joyful Song;
Ink: Distress Ink - Walnut Stain;
Spray: Tattered Angels Glimmer Glam - Rockin' On Sunshine;
Words: Tim Holtz Ideology - Chit Chat Seasonal;

* * * * *
Here's a better photo of the "light" of the Glimmer Glam:


* * * * *
Linking Up To:


* * * * *
Here's a lovely version of the hymn:


Tuesday 5 November 2013

A Die for a Sketch - Challenge #18

Hello...and happy winter wonderland to you all!

Yes, our snow has finally arrived and I am a happy, happy girl! :o)

Today I want to share that Challenge #18 that has just begun over at A Die for a Sketch! Our fabulous sponsor this month is:


* * * * *

Here is the fun sketch created by Dunja. For my project I turned it sideways, like this:


* * * * *

For my card I used the super sweet Jellypark image called Christmas Fairy. I coloured it up with my pencils and then added some lovely glitter with Stickles. I made some little flowers with some sheer ribbon from my stash and added some pearls. Isn't this a pretty colour combination? :o)  


This is a better photo of the sparkle:


Materials Used:
Papers: Hot Off the Press - Ultimate Christmas Creative Pack;
Image: Jellypark - Christmas Fairy,
Prismacolor Pencils and OMS;
Dies: Sizzix - Label, Ornate #2,
Spellbinders Shapeabilities - Orchard Harvest Tags and Accents;
Ink: Distress Ink - Vintage Photo;
Stickles: Broken China, Diamond;
Lace and Ribbon: My Stash;
Flowers: The Nickel Nook.

* * * * *

Head on over to A Die for a Sketch and join in the fun!

Saturday 2 November 2013

All Dressed Up Challenge - Give Thanks / Autumn Colours

Happy Weekend, everyone!

There's a brand new challenge starting today at the All Dressed Up Challenge Blog. This time it's Give Thanks / Autumn Colours.

I had lots of fun playing with this fabulous new image designed by Wendy Burns called "A Time to Give." The background paper is also a brand new release by Wendy. Isn't it lovely? You can find newly released papers and images in the All Dressed Up Shop.

This is another 8" page for my special Fall/Thanksgiving album that I have been working on. The image was coloured to match the background paper. Since I wanted more of the pretty background paper to show, I fussy cut around the image and adhered it with dimensionals. It was easy to do because the image was printed a little bit bigger. Everything was layered onto a textured cardstock base. The sentiment "A time to give" is included on the image. I punched it out and sprayed it with glimmer mists. It's very sparkly! I added some roses and bling and it was finished!

Wendy has generously provided some freebies for you to play with so you can enter our challenges! Head over to the All Dressed Up Challenge Blog and join in the fun! :o) 


Materials Used:
Papers: All Dressed Up - Autumn Papers, Bazzill - Cardstock;
Image: All Dressed Up - A Time to Give,
Prismacolor Pencils and OMS;
Punches: WRMK Mini 8 Punch - Flower, Stampin' Up - Scallop Circle;
Mini Roses: Prima and Recollections;
Mist: Tattered Angels - Glimmer Mist;
Bling: Simon Says Stamp.

* * * * *

Linking Up To:

Blog Archive