Hello, my friends!
I'm back today to share a new project for Ephemera's Vintage Garden.
This is a bitter sweet post for me,
as it will be my final post as part of the Creative Team.
I have made the difficult decision to step down.
It's been 2 1/2 years, so it wasn't an easy decision.
Debbie has been gracious enough to leave the door open for me! :o)
That being said, I will continue to share projects using these fabulous kits
because they are great creative fun! :o)
So, for my June project, I will again be sharing the fantastic "Vintage Queen Bee" kit.
You can find it right HERE.
I should have kept my last mini album project with this kit as my final project.
If you missed it, you can find it HERE.
Thank you for your wonderful response! I really appreciated it!
I do hope you will like this one just as much.
Since it is my last one, I wanted it to be different and special!
I have altered a bottle.
I will show the finished bottle first.
Then I will follow it up with LOTS of photos of my process,
just in case you're interested!
Here it is all finished:


The green doesn't really show through in the photos
but you can see how cool it looks,
and the great texture!


...and this would be the back:


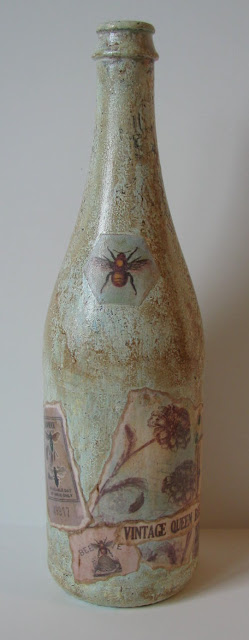

Using a variety of punches and dies, I created a variety of pretty flowers.
I adhered them onto the bottle in a pleasing way,
and then added liquid pearls for the centers.
This added a bit of sparkle, and another nice texture.


I should have kept my last mini album project with this kit as my final project.
If you missed it, you can find it HERE.
Thank you for your wonderful response! I really appreciated it!
I do hope you will like this one just as much.
Since it is my last one, I wanted it to be different and special!
I have altered a bottle.
I will show the finished bottle first.
Then I will follow it up with LOTS of photos of my process,
just in case you're interested!
Here it is all finished:

I'm sorry that I didn't think to take a photo of the plain bottle.
It was a simple green glass bottle that had sparkling cider in it.
I'm not a wine drinker, so when this cider came with a cork it it,
I thought it was worth keeping! ;o)
I started by choosing three paint colours that matched the papers; a white, a cream and an aqua.
I put little puddles of each paint on my palette, and then dabbed a sea sponge in it.
I turned the sponge several times and added more paint.
Then I simply dabbed it randomly all over the bottle.

After the paint had dried slightly, I went in again with the sponge and dabbed some more.
This process took some of the paint off, letting some of the green glass show through.

The green doesn't really show through in the photos
but you can see how cool it looks,
and the great texture!

The next thing I did was go through the kit, and the ATC pages, and print out what I thought I might use.
All I did to prepare the bits was tear them out.
I find that tearing is the best way to "cut" the papers out when you're using them for a project like this.
I'll show you why in a minute.

Normally I use multi-medium in matte for these projects.
Unfortunately, I was out and not able to get more in time.
So I watered down some white glue and used that.
It worked very well!
When I knew where I wanted paper pieces placed,
I brushed the bottle with the glue, laid the paper on, and brushed over it.
Here is where tearing the paper comes into play.
Rather than having a hard, sharp edge to the paper,
the edges are feather soft and blend into the background.
This is especially nice when you're layering pieces on top of each other.
I decided this would be the front:

...and this would be the back:

When all of that was completely dry,
I went over the bottle with a brushing of antiquing medium.
I used a paper towel to dab some of in some areas,
and brushed more on where I wanted heavier antiquing.
Here you can see where I went lighter on the base papers on the front:

I went a little heavier on the back:

Here's a closer look at the colour and texture:

When it was dry again, all that was left was the embellishing.
Using a variety of punches and dies, I created a variety of pretty flowers.
I adhered them onto the bottle in a pleasing way,
and then added liquid pearls for the centers.
This added a bit of sparkle, and another nice texture.

On the back, I also added the title of the collection.

This is just a slightly different angle.
Once the glue was dry on the flowers, I brushed some diluted antiquing medium over all of the flowers.

I adhered some jute twine around the top of the bottle, then wrapped it with some green wire.
I curled the ends of the wire, and attached two bee charms.
Finally, I popped the cork back in place.
It looks cooler than the usual screw top! lol

Here are a few photos of the entire finished bottle:


One last view of the finished front of the bottle:
* * * * *
Linking Up To:
* * * * *
Here are all the Ephemera's Vintage Garden links you'll need:
*** ON SALE NOW***
* * * * *
Thanks for stopping by!
Please let me know if you have any questions about anything.
13 comments:
It's a beautiful bottle Nancy. You have always made wonderful projects with the kits. All the photos are great to show the process ! The antiquing medium is fabulous gives a lovely effect !
Wow! This looks just fabulous Nancy! As always your attention to detail is amazing :-)
Very cool!
Love, love, LOVE this!!!! Thanks for showing your process pics. I am notoriously bad about forgetting to take before pics when I alter a project. The last one I did I just happened to have a similar box in my cupboard so I took a shot of that.
hugs,
Teresa
OMG this is gorgeous. I love the colors you chose for the bottle and the awesome variety of papers. Love the added texture the flowers give the piece. Thank you for joining our blog challenge at SweetStamps.com.
wow your bottle has turned out fantastic, love your turtorial
thanks for joining our challenge over at
http://creativeartistemixedmedia.blogspot.com.au/
Debbie DT
Love how your creation has turned out, lots of work gone into it
Hugs Rhonda DT & Owner xxx
http://creativeartistemixedmedia.blogspot.co.uk
Creative Artiste Challenge Blog
creativeartistemixe
Nancy, this is just so beautiful! I love how you pay attention to the tiny details. They really complement each other.
I love this! All of the different techniques and elements you have used work so effectively together.
So glad you joined us at Creative Artiste Mixed Media Challenge this month.
Hugs Sheryl DT member xx
Looks great!!! So creative. Thanks for joining us at Quick Quotes:)
Beautiful altered bottle. Love your design and the soft colours. Thank you for joining us at Creative Artiste this week. Hope to see you back here again soon. Judy DT
this is so beautiful! thank you for sharing with us at Quick Quotes this month!
Alicia
Oh I love your altered bottle! You did an excellent job! I am sorry to hear that you're stepping down though. I just love seeing all of your projects from Ephemera's Vintage Garden!
Post a Comment