Hello, my friends!
I'm really excited about the post I have to share with you today!
As many of you know, I really like to make mini albums.
My favorite tend to be of the vintage variety.
I had some ideas for an album I wanted to put together.
I started looking around to see what I could find,
as far as dies or cut files,
that would fit the ideas I had in my head.
I did find a variety of dies that would work,
but the cost involved was rather ridiculous.
I then turned my focus to my collection of cut files.
I found some files from My Scrap Chick that had potential.
I got busy in Cricut Design Space.
Using the cut files I had,
I set about slicing, welding, attaching, and flattening.
Up to this point I had only ever attached! lol
When I was all finished I had exactly what I wanted!
It's a cut file full of mix and match pieces and various layers.
There are even pockets!
This one file is all I need to make a multitude of creative albums!
Okay, that's enough words, right?
I'm going to show you my album photos now.
Then at the end of my post I'll have some good news to share.
Here we go:

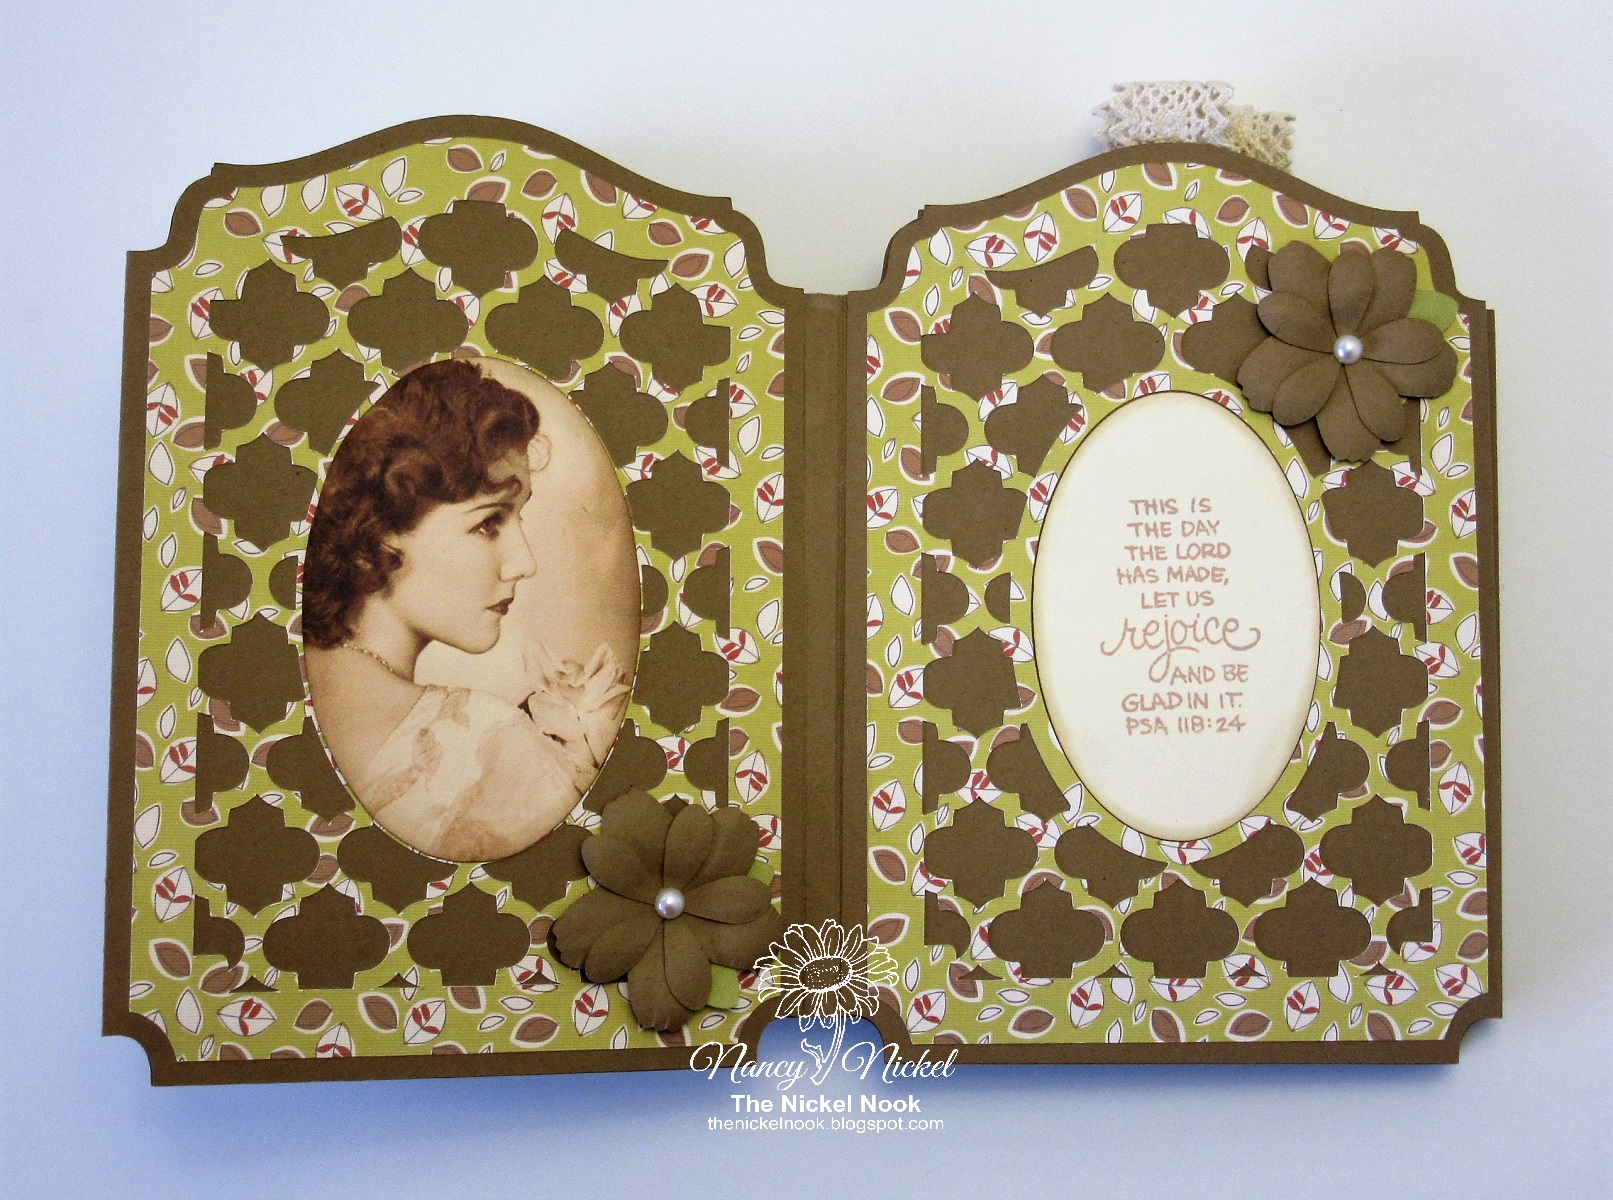
This is the front cover.
The base of the album is all kraft cardstock.
On the cover I used a full size mat with a large oval.
Under it I layered a green mat with a smaller oval - forming a frame.
Then I stamped the Scripture on an even smaller oval,
and adhered it in place.

The flowers are all cut files from My Scrap Chick, linked below.

I stamped Scripture verses in several of the ovals throughout.
I thought this one was perfect for my cover!

Here is the first page.
The album base is kraft cardstock.
You can see by the matting that there are several layers.
The one on the left is smaller than the one on the right.
You can do them individually, or you can layer them up.
Then we have this option for a layer.
Isn't that pretty?
Here the mat has an open design with an oval center.
This layer also has two options:
a solid oval center, or an open oval frame center.
On the left page it is solid, and I've added a photo over it.
On the right page, it is a frame, and I've added a stamped oval in it.

On the left we have another of the full mats.
On the right is what I think of as my "cage page".
It is actually a pocket page, with a full mat inserted into it.
On the mat is the oval image.

You can see what I mean in this photo.
The insert pulls up, and you can see right through the page.

You can see the back of that page in the photo below.

On the right side is one of the smaller mats again.
I just added the image on top and added a flower.

This page has two of the full size mats.
However, this time one has an oval cut out of it.
I simply used the cut out oval as a template to cut my photo.
Then I adhered it in place.

On the left is another one of the cut-out mats with the oval frame.
This time I added a stamped oval that was slightly smaller.
On the right is another of the smaller mats with the photo added on top.

Here is the back cover.

Each of the pages is a pocket open on the top.
There are two insert options.
The one shown above is a single layer.
I've added a tab of lace to the top for a pull.

This is the other insert option.
It folds up and tucks in the pocket.

Here you can see the spine of the album.
If you don't like the hinge folds showing,
you can simply cover it with a strip of lace, or a piece of cardstock.
I made a hinge piece, to which I added the covers and pages.
It allows 1/4" between pages, so there is room for flowers and embellishments.
The pages and covers are actually like a card.
They are folded, and the open side adheres to the hinge.
The front and back cover are adhered completely - without pockets.
The five inside pages are adhered over the hinge, and along the bottom.
This leaves the top open, and the fold to the side.
Does that all make sense to you? lol
Alternatively, you could bind it with rings,
or any of your favorite binding tools!
* * * * *
Here's the good news...
this file is available for sale at My Scrap Chick!
It's called Vintage Hinged Album!
It's now available for you to purchase!
If you need any help with putting these pieces together, just let me know.
I could make some tutorial posts.
However, I suggest you pick some paper, and just have fun cutting.
You'll end up with buncy of fabulous pieces that will all work together.
* * * * *
My Scrap Chick Products Used:
Recollections Kraft Cardstock;
S.E.I. Dill Blossom Collection;
Memento Ink - Desert Sand;
Crafts Pearls;
Vintage Lace - Gift From Susan.
* * * * *
Thanks so much for stopping by!
I'll be back soon with another fun project share!
* * * * *
Have you signed up for the My Scrap Chick newsletters yet?
Don't forget to do that!
You really don't want to miss out on any of the great freebies! :o)
* * * * *
Here are all the links you need:
8 comments:
WOW WOW WOW! Nancy, what a wonderful album and beautifully designed. Love each of the elements and how wonderful you are able to sell them on My Scrap Chick. Congratulations.
Faith x
This is beautiful, Nancy. Love the vintage look of this!
Nancy your album is fabulous ! How clever you are !! Love the embellishments too and the lovely scripture stamps. Really pleased your file is for sale too!
Nancy your album is fabulous ! How clever you are !! Love the embellishments too and the lovely scripture stamps. Really pleased your file is for sale too!
This is gorgeous.
Oh my golly gracious! Nancy this is stupendous! Your creativeness and love of vintage files is very contagious! Just one question...where do you find the vintage ephedra that is so beautiful? (maybe I missed it in your post) So dear friend a very big WELL DONE!!!
Kanjer van een kaart. Geweldig!!
Wauw, I love this card
Claudia
http://creativesketchygirls.blogspot.be/
https://girlzcreativecrafts.blogspot.com/
http://knutselmeisjes.blogspot.be
Fabulous project! * applause *
I'm curious about how to assemble the album. My brain isn't getting the picture from your explanation. I'm sorry. =( Might you post some photos during the process? TIA
Post a Comment