Showing posts with label Cut Files. Show all posts

Thursday, 7 November 2024

Customizing a Cut File with Printable Cuttable Creatables

         Hello, my friends!

It's time for a new project share for Printable Cuttable Creatables!

 One of the great benefits of using cut files
is how you can totally customize them to suit your own needs.
As I was snooping through the shop, I came across this wonderful train file.
Christmas trains are very nostalgic for me.
They bring up very special memories of past Christmases,
with my parents and three brothers.
I immediately thought it would make a great slimline card.

For my project today, I have used the Vintage Christmas SVG Bundle.
You can also find the train on it's own in the Christmas Train SVG File.

Here's my card:


Isn't that a great Christmas card?
It was so much fun to put together.

Sometimes when I see these cut files, I feel a little bit daunted because of all the pieces.
Print then Cut is always an option.
However, once you break things down, it's not really daunting at all.

Since this was a nostalgic project for me, I really wanted to use traditional Christmas colours.
This is where the customization began. 
I used Cricut Design Space for all my work.

Here is how the original file uploaded:


Here is how I customized it to my traditional colours:


Here are all the pieces after they were cut out:


Yes, there are lots of pieces but with the included instructions, and a bottle of glue,
it's easy peasy to put it all together! 

Once it was all adhered in place, it was easy to add to my glittery slimline card base.
Then I had an opportunity for further customization, with some fun embellishing!


Here on the engine, I added Stickles to the window, the bow ribbon, and the engine light.
I also added small red rhinestones to the wreath.

I also added Stickles to the star on top of the tree, and larger rhinestones to the tree.


This is a very special card to me now!
When you look at cut files, don't just look at what is there.
Look at how you can customize them to be what you need!

Use my code to get 15% off your purchase:


* * *
Printable Cuttable Creatables Products Used:

or

Other Materials Used:
Cricut Explore Air Machine;
MME Christmas Paper;
Colorbok Cardstock;
Diamond Stickles;
Unknown Rhinestones.

* * *

Thanks for stopping by today!
I'll be back soon with another fun project!

* * * * *

Here are all the links for you:

Printable Cuttable Creatables Shop

Printable Cuttable Creatables Blog

Printable Cuttable Creatables Facebook     

Sunday, 22 September 2024

Autumn Greetings Card - Printable Cuttable Creatables

       Hello, my friends! Happy Fall!

It's time for a new project share for Printable Cuttable Creatables!

I am loving the cooler temperatures and ALL that is FALL!
So I just had to create a Fall card! 

I have used:

 Autumn Greetings SVG Cut File,
 
and Autumn Harvest Digital Paper Pack.


Here's my project:


For me...plaid just goes hand in hand with Fall (Christmas too)!
So I used this lovely plaid paper from the collection for my background.


This is such a lovely/intricate cut!
In Cricut Design Space, I sized it to fit my card.
Then it was simply a matter of cutting and gluing.
I did do a little inking of the pumpkin stem, and around the plaid paper.
 

To finish everything off I added some pretty sparkly sequins!


There are SO MANY fabulous Fall files in the shop!
I'll be using more of them in the months ahead!

* * *

Use my code to get 15% off your purchase:


Printable Cuttable Creatables Products Used:

Other Materials Used:
Cricut Explore Air Machine;
Walnut Stain Ink;
Fall Colored Sequins.
 

* * *

Thanks for stopping by today!
I'll be back soon with another fun project!

* * * * *

Here are all the links for you:

Printable Cuttable Creatables Shop

Printable Cuttable Creatables Blog

Printable Cuttable Creatables Facebook     

Thursday, 12 September 2024

U R Out of This World Card - Printable Cuttable Creatables

         Hello, my friends!

It's time for a new project share for Printable Cuttable Creatables!

Have you seen all the fabulous Space Themed files that have been added to the shop?
So many fun new listings!
I have combined three of them on my project today.  

I have used:

Out of this World Title SVG,

Spaceship Rocket SVG File,

and Planets SVG File.

Here's my project:


Isn't that Fun? 
Here's how I did it:

I began by making my background.
I've inked "galaxy" backgrounds before.
However, these cuts have so much color in them that I wanted something different.
This was so simple!
I cut a piece of black cardstock 5 1/2" square.
I used a fan brush, with white acrylic paint, and simply splattered the paper.
Then I set it aside to thoroughly dry.


Here are all the pieces I cut out:


The fun title cut includes a little rocket.
Since I was using a bigger rocket, I decided to leave that out.
I had an idea...so I cut 2 of the "OUT" and "WORLD".
From the second cut, I used only a "U" and an "R".
Now my title is "U R OUT OF THIS WORLD".


Then it was just a matter of gluing all the little bits together,
and adhering them in place on the background.
I then added it to a yellow card base.

I did curve the spaceship slightly, and adhered in place with foam tape.


Such a fun card to put together!
Head on over to the shop and check out all the space files!

Find them here:

ALL SPACE FILES

* * *

Use my code to get 15% off your purchase:


Printable Cuttable Creatables Products Used:
Other Materials Used:
Cricut Explore Air Machine;
Recollections Cardstock;
White Acrylic Paint.

* * *

Thanks for stopping by today!
I'll be back soon with another fun project!

* * * * *

Here are all the links for you:

Printable Cuttable Creatables Shop

Printable Cuttable Creatables Blog

Printable Cuttable Creatables Facebook     

Friday, 8 January 2021

A Fun New Project Share!

 Hello, my friends!

I'm really excited about the post I have to share with you today!

As many of you know, I really like to make mini albums.
My favorite tend to be of the vintage variety.
I had some ideas for an album I wanted to put together.
I started looking around to see what I could find, 
as far as dies or cut files,
that would fit the ideas I had in my head.
I did find a variety of dies that would work,
but the cost involved was rather ridiculous.

I then turned my focus to my collection of cut files. 
I found some files from My Scrap Chick that had potential.

I got busy in Cricut Design Space.
Using the cut files I had,
I set about slicing, welding, attaching, and flattening.
Up to this point I had only ever attached! lol

When I was all finished I had exactly what I wanted!
It's a cut file full of mix and match pieces and various layers.
There are even pockets!
This one file is all I need to make a multitude of creative albums!
 
Okay, that's enough words, right? 
I'm going to show you my album photos now.
Then at the end of my post I'll have some good news to share.

Here we go:


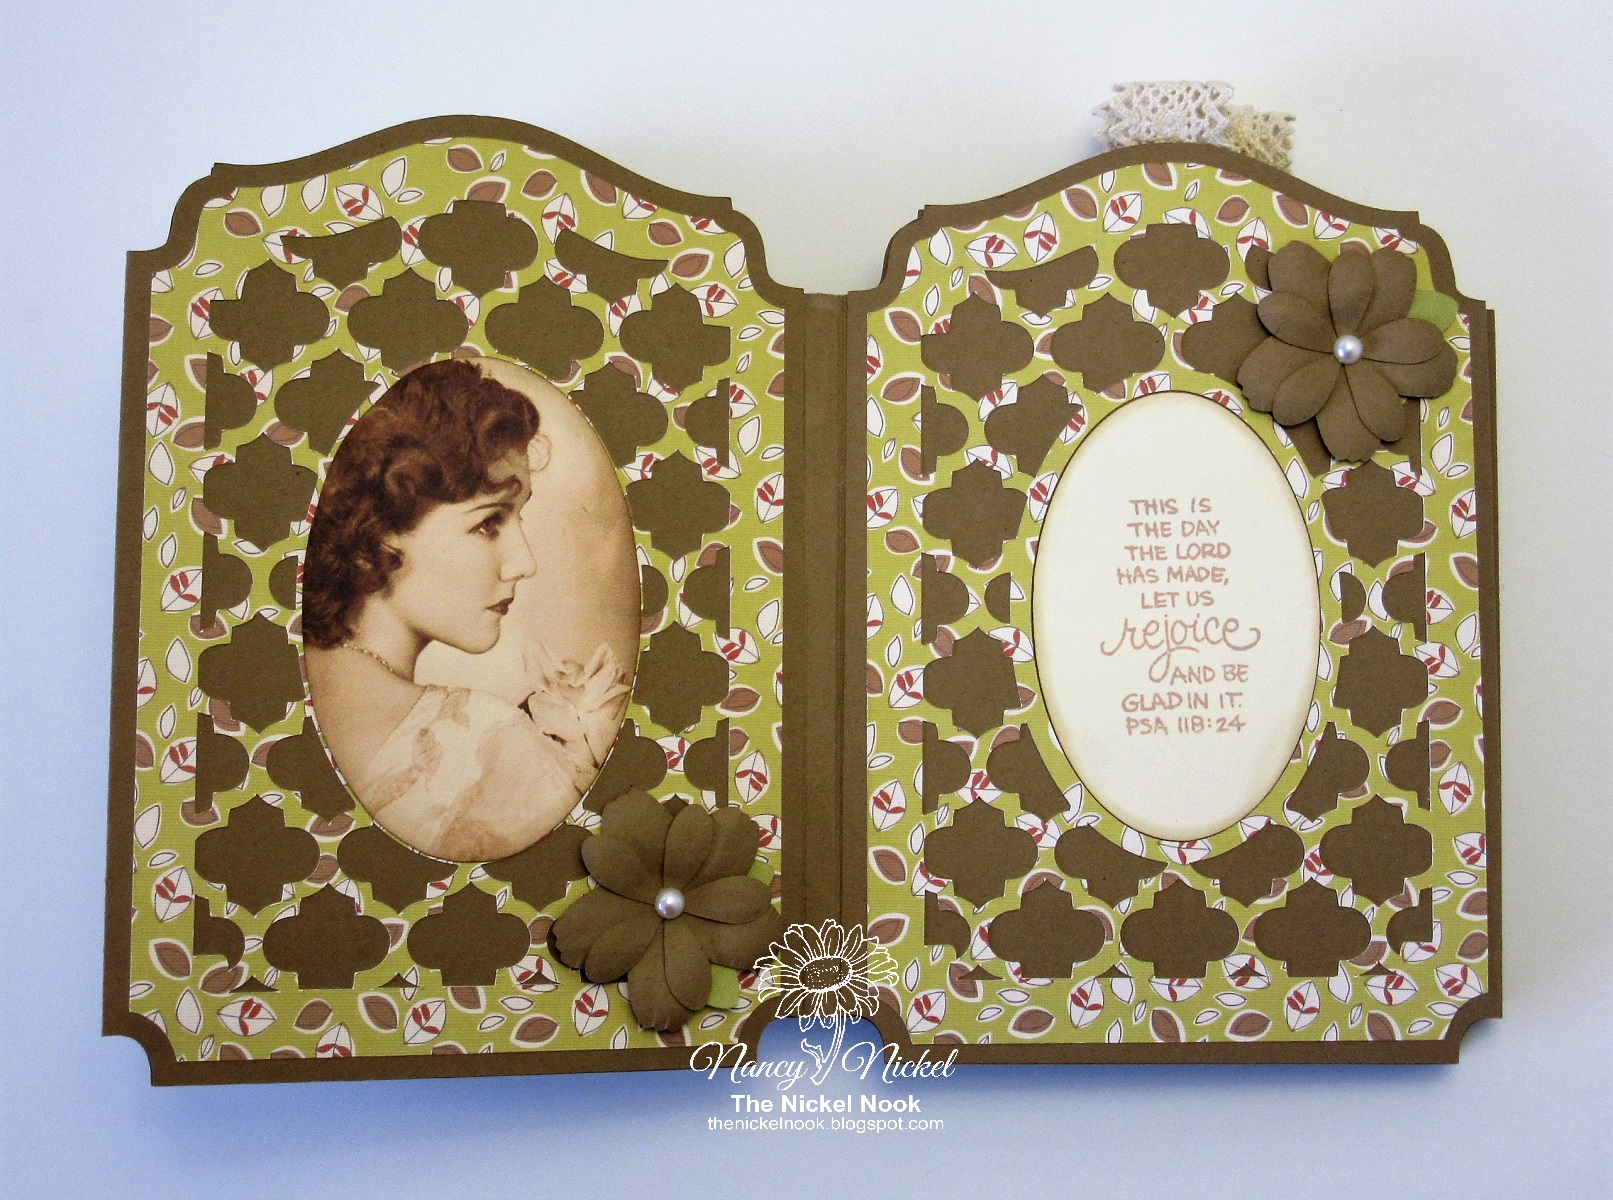
This is the front cover.
The base of the album is all kraft cardstock.
On the cover I used a full size mat with a large oval.
Under it I layered a green mat with a smaller oval - forming a frame.
Then I stamped the Scripture on an even smaller oval,
and adhered it in place.


The flowers are all cut files from My Scrap Chick, linked below.


I stamped Scripture verses in several of the ovals throughout.
I thought this one was perfect for my cover!


Here is the first page. 
The album base is kraft cardstock. 
You can see by the matting that there are several layers.
The one on the left is smaller than the one on the right.
You can do them individually, or you can layer them up.


Then we have this option for a layer.
Isn't that pretty?
Here the mat has an open design with an oval center.
This layer also has two options:
a solid oval center, or an open oval frame center.
On the left page it is solid, and I've added a photo over it.
On the right page, it is a frame, and I've added a stamped oval in it.


On the left we have another of the full mats.
On the right is what I think of as my "cage page".
It is actually a pocket page, with a full mat inserted into it.
On the mat is the oval image.


You can see what I mean in this photo.
The insert pulls up, and you can see right through the page.


You can see the back of that page in the photo below. 


On the right side is one of the smaller mats again.
I just added the image on top and added a flower.


This page has two of the full size mats.
However, this time one has an oval cut out of it.
I simply used the cut out oval as a template to cut my photo.
Then I adhered it in place.


On the left is another one of the cut-out mats with the oval frame.
This time I added a stamped oval that was slightly smaller.
On the right is another of the smaller mats with the photo added on top.


Here is the back cover.


Each of the pages is a pocket open on the top. 
There are two insert options. 
The one shown above is a single layer.
I've added a tab of lace to the top for a pull.


This is the other insert option.
It folds up and tucks in the pocket.


Here you can see the spine of the album. 
If you don't like the hinge folds showing,
you can simply cover it with a strip of lace, or a piece of cardstock.
I made a hinge piece, to which I added the covers and pages.
It allows 1/4" between pages, so there is room for flowers and embellishments.
The pages and covers are actually like a card.
They are folded, and the open side adheres to the hinge.
The front and back cover are adhered completely - without pockets.
The five inside pages are adhered over the hinge, and along the bottom.
This leaves the top open, and the fold to the side.
Does that all make sense to you? lol
Alternatively, you could bind it with rings,
or any of your favorite binding tools!

* * * * *

Here's the good news...
this file is available for sale at My Scrap Chick!

It's now available for you to purchase!

If you need any help with putting these pieces together, just let me know.
I could make some tutorial posts.
However, I suggest you pick some paper, and just have fun cutting.
You'll end up with buncy of fabulous pieces that will all work together. 
 
* * * * *

My Scrap Chick Products Used:


Other Materials Used:
Recollections Kraft Cardstock;
 S.E.I. Dill Blossom Collection;
Memento Ink - Desert Sand;
Crafts Pearls;
Vintage Lace - Gift From Susan.

* * * * * 
Thanks so much for stopping by!
I'll be back soon with another fun project share!

 * * * * *
Have you signed up for the My Scrap Chick newsletters yet?
Don't forget to do that!
You really don't want to miss out on any of the great freebies! :o)

* * * * *
Here are all the links you need:


Monday, 24 August 2020

Simply Crafty SVGs - Crayon Box

Hello, my friends!

Welcome to a new project share for Simply Crafty SVGs!

This month I'm sharing a fun little Crayon Box.
With the start of school right around the corner here, 
it's the pefect time to share this one.

The good news for all of you is that this is a FREE file!
It measures about 2 1/2" x 3 1/2",
and is just the right size to hold a gift card. 
Or you could fill it with yummy treats.
Or you could fill it with a gift card and yummy treats! lol

It would be a thoughtful gift for any teacher, or student,
that may be nervous about heading back to school.

Here's my box:


As you can see, I opted to add a little shaker element.


I found this fun pencil paper in my stash.
It's not crayons but I think it works very well.


It's a very easy project that goes together very quickly,
and it's so much fun to make!


I added a piece of acetate, 
and then used a piece of white cardstock behind.
I think the white shows off the shaker bits beautifully!


File from Simply Crafty SVGs:


Other Materials Used:
Cricut Explore Air;
Recollections Cardstock;
Project Life Desktop Edition;
Scrap of Grafix Acetate;
Unknown Sequins and Micro Beads.

* * * * *
Thanks for stopping by today!
I hope you found some inspiration!
I'll be back next month to share a brand new project! :o)

* * * * * 
Here are all the links:


Simply Craft SVGs Facebook 

Monday, 25 May 2020

Simply Crafty SVGs - Flower Center Panel Card

Hello, my friends!

Welcome to a new project share for Simply Crafty SVGs!

This month I'm combining pieces from two cut files
to make one fun card.
 I will call it my Flower Center Panel Card.

I've used:

Cupcake Center Panel Card, 
and
Pitcher of Flowers Card.

Here's my card:


Isn't that fun?


It's such a fun card base
with so many creative possibilities!
I cut multiple layers and sizes of the flowers, 
as well as the lovely greenery,
from the Pitcher of Flowers Card file.


These days there are so many reasons 
to make and share a nice Thank You card!


Head on over to the shop and check out both of these fun files!
See what you're inspired to make!

* * *
File from Simply Crafty SVGs:

Cupcake Center Panel Card, 
and
Pitcher of Flowers Card.

Other Materials Used:
Cricut Cardstock;
K & Company - Watercolor Bouquet;
CTMH Ink;
Unknown Sentiment Stamp.

* * * * *
Thanks for stopping by today!
I hope you found some inspiration!
I'll be back next month to share a brand new project! :o)

* * * * * 
Here are all the links:


Wednesday, 16 October 2019

Simply Crafty SVGs - Christmas Tag Box Set

Hello, my friends!

Welcome to a new project share for Simply Crafty SVGs!
I know it's not my usual posting date
but I've switched with a team-mate who is on holidays!

This month I'm sharing a fun little Christmas project.
I've used the:

Christmas Tag Box Set

The file contains six complete tag boxes.
Here are the four that I made:


Here's a closer look:

For this one, I cut the box out of patterned paper,
and used solid for the outside panel. 
I inserted a piece of acrylic for the window.
I added a little satin ribbon bow, and hanging loop.


For this one, I made the box out of solid cardstock,
and cut the panel from patterned paper.
Again, I've inserted a piece of acrylic,
and added the ribbon bow and loop.


This little tree box is made in the same way as the last.


I made the final box out of patterned paper.
Then instead of inserting acrylic,
I added a contrasting piece of solid cardstock.
Then I added a twine bow,
and inserted more twine through the top of the box.


Here's the back side of all the boxes.
I used the cutouts from the front to decorate the backs.


These Tag Boxes are so much fun to put together!
They'll be even more fun to fill...
...with some tasty treats or a fun little gift. 
If you don't want anyone to get a peek at it,
the fill the window with cardstock instead of acrylic.
You could even just use them as fun shaker elements!
Give them a try and make them your own!


Other Materials Used:
Cricut Explore Air Machine;
Assorted Cardstock and Christmas Scraps;
Small Pieces of Clear Acrylic;
Unknown Twine;
Offray Ribbon.

File from Simply Crafty SVGs:


* * * * *
Thanks for stopping by today!
I hope you found some inspiration!
I'll be back next month to share a brand new project! :o)

* * * * * 
Here are all the links:


Blog Archive