Sunday, 15 December 2013

Lia Stampz Challenge #55 - Make a Tag!

Happy Sunday!

Can you believe it's already the middle of December! The count-down has begun in earnest now, hasn't it? We've had two full days of steady snow...YAY!! It's so pretty out! :o)

There's a new challenge starting today over at Lia Stampz. It's an easy one, and one that will maybe help you with your Christmas preparations. All you have to do is make a tag!

I made mine using this adorable image called "Clark Present". You can find it at Whimsy Stamps right HERE. It's really the perfect image for a gift tag, isn't it? I cut the tag out on my Cricut. Then I punched out some mini tags and added them, along with a ribbon and bling! It came together super quick!

I hope you're all having fun with your preparations for the Christmas celebration. Remember not to stress about "things" and to take some time to just sit and ponder the real reason for the season...Jesus! :o)


Materials Used:
Papers: Colorbok - Textured Cardstock,
Image: Lia Stamps - Clark Present,
Prismacolor Pencils and OMS;
Basic Grey - Eskimo Kisses;
Cricut Cartridge - Wrap It Up;
Punch; McGill - Multi Tags Scallop Bunch;
Sentiment: Hampton Art - Joyous Holiday;
Ink: Memento - Tuxedo Black;
Ribbon: Celebrate It;
Unknown Bling.

* * * * *

Head on over to Lia Stampz and join in the fun! :o)

Friday, 13 December 2013

Creative Inspirations

*** If you missed my Jellypark post from earlier today, please scroll down and take a peek when you're finished with this one! ***


Hello again, my dear friends! 

Some of you might remember this mini album project from the last time I posted it...and some of you won't. I am re-posting it now because because there is a wonderful kit now available at Creative Inspirations that includes everything you need to make an album for yourself. It's the perfect place to put all those fun photos you're taking these days, and will continue to take in the days ahead.

We've had a bit of a break from Creative Inspirations posts. I'm very happy to report that I will be continuing to design for this great store.  We have some super fun things coming up in 2014!

This mini album is a sweet little layered Christmas tree. Sue has another version of it, along with a kit supply list in the shop right HERE. You should pop over there and order the kit. Then come back here and bookmark this post. You can use my photos, and the photos in the shop for inspiration for your own creation! 

So here's what I did:

This is the cover. After adhering all the papers, I went around both sides of each piece with the gold paint dabber. I also made my first swivel clasp charm to hang from the binding ring.


Here are pages 1 and 2. I decided to decorate all the back pages "upside-down" so that when you flip them over they are actually right side up! lol  
On page 1 there is a ticket stamped with the date. 
Page 2 has a little swivel ornament set. It's actually some diecut tags. 
These are just the right side to document special seasonal events.

Page 3 had two ribbon bands that hold an assortment of stamped tags. 
There's also another ticket stamped with "Merry Christmas!"


Page 4 holds a stamped label. 
It opens up and has lines with a heading that says "Dear Santa". 
A wonderful little spot to list all the gifts received for Christmas. 
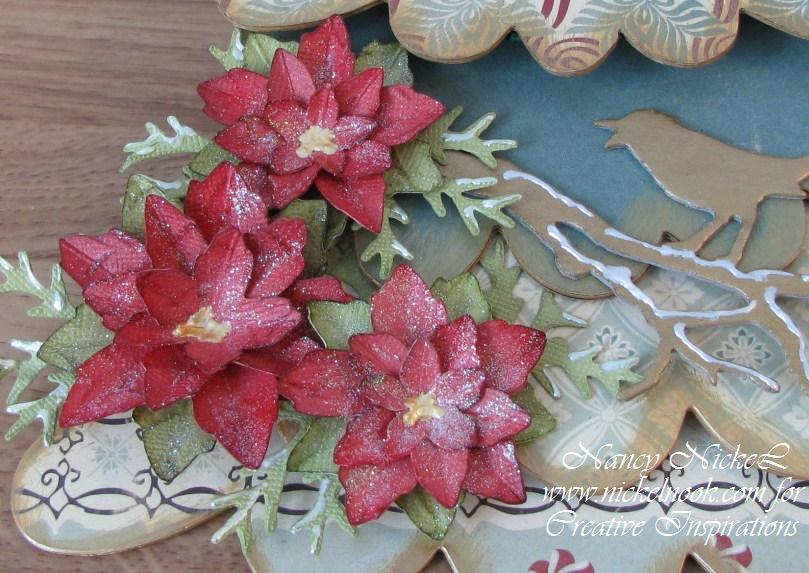
The bottom of the page also holds one poinsettia 
and a gold painted chipboard bird on a branch.


Here is a close-up of the pretty poinsettias that I made.  


Page 5 holds a large label that has pine cone branches stamped around the edge. 
A few pine branch punches with buttons creates a nice embellishment. 


Page 6 holds another mat that's been stamped with snowflakes, 
and two more of the poinsettias.


Page 7 is another Baroque mat page. 
This one has been stamped with a tree.


Page 8 has a seam binding band that holds a little booklet of  the Baroque die. 
These are large enough to add photos on the front and the back. 
There's also a little dangly charm set hanging from the binding ring. 
These charms are also made from tags and have sweet star eyelets.


Here is the back cover. 
The seam binding from the previous page is tied in a bow. 
I've glued on a sweet little Christmas wreath 
and a banner that says Merry Christmas. 
Another ticket filled out with my info is adhered to the bottom.


Here is a close-up of my swivel clasp charm. 
It holds buttons, mini ornaments, and some jingle bells. 
At the bottom is more stamped tags that look like ornaments. The only jump rings I had were a bright silver. 
So I turned them red with the help of some alcohol ink.


 So there you have it...again! :o)
If you want to see my original post and a list of all the materials used you can go HERE.

* * * * *

So head on over to Creative Inspirations 
and take a look at all the fabulous goodies in the shop.
There is even a wonderful free gift with the purchase of $60 or more!
If you have any questions just ask me or use the contact form in the store.
Then check out the Christmas Tree Mini Album Kit for yourself!

Happy Shopping! :o)


Jellypark - Challenge Reminder and Stocking Stuffer Idea!

Happy Friday, my friends!

I'm back today to share with you a fun little Jellypark project. It fits right in with the month long Christmas Challenge that is going on over at Jellypark Friends. I used the image called "Gingerbread Woman" and you can find it in the Jellypark Shop right HERE.

If you're still looking for some last minute stocking stuffers or gift ideas, this one is ideal. It's so quick and easy and FUN to make. It's a little recipe book! I printed the image on kraft cardstock, colored it up, and cut it out. I used two pieces of medium chipboard measuring 4" X  6". I covered the front and the back in this fun...and most suitable...designer paper. Then I added 24 recipe cards between the covers and bound it with my Bind-It-All. I adhered the fun sentiment on the front, then added some seam binding and rhinestones. 

This would make a lovely gift as it is, especially if some special recipes are added to the cards. It would also be a wonderful addition to a basket of baking goodies; cookie cutters, icing and decorative tips, baking pans, or even a jar of gingerbread mix! :o)


Here's a photo of the stamping I did on the inside.
This one is for one of my girls...but don't tell her! ;o)


Materials Used:
Papers: American Craft - Merrymint;
Image: Jellypark Digi - Gingerbread Woman,
Prismacolor Pencils and OMS;
Dies: Spellbinders Shapeabilities - Lotus Pendants,
Orchard Harvest Tags and Accents;
Stamps: Stampin' Up - Unknown,
October Afternoon - Home for the Holidays;
Inks: Memento - Tuxedo Black, CTMH - Cranberry;
Seam Binding and Rhinestones from My Stash.

* * * * *

Why don't you pop on over to the 
and link up your Christmas projects!
If you use a Jellypark Image your project will be counted twice! 

Christmas is so much FUN!! :o)

Tuesday, 10 December 2013

Another Pocket Card!

Happy Tuesday to all of you!

I am very honored today to be Guest Designer for Kathryne at StampArt Design by Kathryne. I am showcasing a brand new release called "Snow Mail." It's such a fun image to play with, and you can find it in the Whimsy Shop right HERE.

I created another fun pocket card with a postcard inside. I coloured the image and fussy cut both the bird and the snowman. The "air mail" sentiment is also by StampArt Design by Kathryne! It is one of many sentiments that come as a bonus when you purchase the image. I added a few snowflake punches, including one behind the bird that you really can't see. I also used Liquid Applique for the first time! How fun is that stuff?

Kathryne always creates the sweetest images! They always seem to coincide with my collections; teddy bears, raggedy dolls, and snowmen! So pop on over to the shop HERE and take a peek at all the goodness! :o)


Materials Used:
Papers: Recollections - Cardstock, Basic Grey - Eskimo Kisses;
Image: StampArt Design by Kathryne - Snow Mail;
Prismacolor Pencils and OMS;
Punches: Stampin' Up - Oval, Martha Stewart - 
Stamp: Stampin' Up - Post Card;
Ink: Distress Ink - Walnut Stain, Memento - Tuxedo Black;
Liquid Applique and Unknown Pearls. 

* * * * *

Thursday, 5 December 2013

A Die for a Sketch - Challenge #19

*** If you missed my announcement last night, 
please scroll down and check it out after this post! ***

Hello, my friends!

Today is the beginning of a new challenge over at A Die for a Sketch. It is the last challenge at A Die for a Sketch. Dunja announced a couple of months ago that she was closing down the challenge blog. This is another one of the changes that I have been referring to lately. I will be back on the 20th of the month for my last ADFAS post!

For this final month we are sponsored again by Kathryne at StampArt Design by Kathryne! I want to thank Kathryne for all her generosity to us at ADFAS. Kathryne, it has been a joy to work with you and to play with all your lovely images!


A gift of five images to one lucky winner!

* * * * *

Here is the wonderful sketch by Dunja:


* * * * *
Here is my card using the sweet image called "Beary Special Gift" which you can find in the Whimsy Store right HERE! This card was inspired by the fact that I always have some teddy bears under or next to my Christmas tree. The sketch was just perfect for this little scene. I started by choosing a paper that looked like wallpaper. Then I created the Christmas tree with the MS Branch punch and a woodgrain stamp on the trunk. I added some little ornaments from my stash. The tree skirt is cut from a doily die. I found the "Merry Christmas" in my button box. Finally, I colored the image and placed it on the tree skirt. 

As always, I had lots of fun putting this card together! I hope you like it! :o)


Materials Used:
Papers: Colorbok - Textured Cardstock, 
K & Company - Julianne, Elizabeth Brownd Designer Mat Pad;
Image: StampArt Design by Kathryne - Beary Special Gift,
Prismacolor Pencils and OMS;
Dies: Cheery Lynn - English Tea Party;
Punches: Math Stewart - Branch;
Fiskars Shape Cutter - Oval;
Stamps: Bo Bunny - Wall to Wall Textures;
Ink: Tim Holtz Distress Ink - Walnut Stain;
Bling: Kaisercraft - Rhinestones;
Button and Mini Ornaments: My Stash.

 * * * * *

Please come on over to A Die for a Sketch and join in our last challenge!


Wednesday, 4 December 2013

You're Going to Love This One!

Oh happy day, my friends!

Wait 'til you see what I have for you today!! Can you tell that I'm excited?? Well, I am VERY excited! :o)

Today is my very first post as a Design Team member of Ephemera's Vintage Garden! Why are YOU going to love this one? It's because each of you will be able to make this project using the fabulous FREEBIE that Debbie is sharing today on her blog HERE!

For those of you that aren't familiar with what Ephemera's Vintage Garden is, well...it's all about digital art! Debbie creates these beautiful digital kits that you can buy and print out at home. They are amazing kits full of lots of goodness to play with and create! The beauty of digital art is that you can buy it from anywhere in the world and not have to pay shipping fees. You also don't need a lot of fancy equipment to use the kits. I have just a regular old inkjet printer, and these images work beautifully. I have a button to the store in my sidebar, and I'm including all the links throughout this post. You're going to want to make sure you head over to the Ephemera's Vintage Garden blog and join the mailing list. Debbie generously shares a freebie every week for us to play with! I would encourage you to join the blog, as well!

This is going to be a fairly length and photo full post but I hope you'll enjoy it!

This freebie is called "A Place for Lace" and it makes these four wonderful tags to wrap your lace and trims around. I didn't take a photo of my printout but you'll see how it works when you get your own. I printed it out on a regular old Recollections 8 1/2 X 11 white cardstock. Then I printed out another one because I decided I wanted my tags to be the same front and back. I also added chipboard. Here they are...aren't they pretty?


I do have a few tips for you if you also want to make chipboard tags:
After printing out your tags cut them out in a rectangle shape. 
They print with rounded corners on the bottom and a rounded top. 
Cut them in a rectangle shape, 
then measure them and cut rectangles of chipboard in the same size. 
Adhere the rectangle tags to the rectangle chipboard. 
I like to use Scotch Quick Dry adhesive. 
Now cover the back, either with another printout or plain cardstock. 
Once the glue is dry you can trim the corners. 
I used my 1/4" corner chomper for the bottom and cut the top with scissors. 
It was very easy to do on my medium weight chipboard. 
When they were all cut out, I inked them with Walnut Stain Distress Ink.

Then I decided to try the same printout using cream colored cardstock. 
This photo shows the difference between the two:


Then I went on to try a few other things with my tags. 
To the first one I just added an eyelet on the top. 
The second one I cut out into more of a spool shape. 
I drew my line, cut it out, and then used the cutout as a template on the other side. 
For the third tag, I notched grooves into the side using my big bite. 
That makes it perfect for twine and skinny fibers.
The fourth one was just left plain for ribbon.


Here are the white tags all finished and wrapped. 
Do you see now what that empty space at the top is for? 
It's to label your tags as to what they're holding! Isn't that a great idea?


Here are the cream colored tags all finished. 
I tied a ribbon through the eyelet on the first one.
Wouldn't that make a beautiful tag in a mini or pocket card?


Now I have just a couple of ideas of what you can do with them once their finished. 
Wouldn't this make a fantastic Christmas gift? This little pail holds four tags perfectly!
The name of the printout is so pretty! 
I had to add that to the front of the pail, along with a bow.


Finally, here's what I'm doing with all my pretty tags. 
I've filed them all in this little antique wood box!


So there you have it! 
My very long...but hopefully inspiring...first post for Ephemera's Vintage Garden!
Now head on over to the blog and pick this beauty up for yourself! 
Then go visit the Ephemera's Vintage Garden and take a look at the gorgeous kits available!
I will be sharing much more with you in January!


Have fun! :o)

* * * * *


Monday, 2 December 2013

All Dressed Up Challenge - Christmas

Happy day, my friends!

Today I'm wearing my "Dressy Girl" hat, and I'm here to share the new challenge beginning over at the All Dressed Up Challenge blog! For the next two weeks it's all about Christmas! YAY!!

You must use an All Dressed Up image to join in the fun. You can find them in Wendy's store HERE, or you can snag one of the fabulous freebies HERE. So there are no excuses to not come and play along! The winner of the challenge will receive three All Dressed Up images!

For my project I used a brand new image called "A Star Is Born" which you'll be able to find in the shop. Isn't it a fantastic image? I have created an 8" page for a special book I'm starting. I hope to be showing you more of my book very soon. We'll see how that goes! ;o)

I started by printing my image out on kraft cardstock. I coloured it up and fussy cut the image out. I had an idea in my head of what I wanted the scene to be. Again, I had no Cricut or Slice designs that would work for me so I had to be creative. I picked the night sky paper, and added the sand hills in the front. Then I added the black hills and got to work on the silhouette details. The little palm trees I cut with a Slice card. The Bethlehem buildings were created using various square and circle punches and gluing them together. I couldn't find anything on-hand for the nativity, so I drew one and cut it out with my craft knife. All the little silhouette pieces were then glued behind the black hills. Several of the stars were cut out from the image, and then I added a couple more that I punched out. I added some colour and stickles under the "A star is born" star. Then I used some Frantage for the first time. I thought it would be great to finish off the "sand." Finally, I added the sentiments; one stamped and one hand-written. These both come from two of my favorite Christmas songs. On the back of my page I will add a pocket that will hold the music sheets for these two songs.

There you have it...a lovely little scene page depicting the story of the birth of Christ! It's what Christmas is truly about! :o)


Here's a close-up of the image and the Frantage:


Materials Used:
Papers: Recollections - Cardstock;
Image: All Dressed Up Stamps- A Star is Born,
Prismacolor Pencils and OMS;
MM Slice Design Card - Summer;
Punches: Fiskars - 1" Square, 1/2" Circle;
Frantage: Stampendous - Aged Bronze;
Stamp: Simon Says Stamp - Merry Everything;
Ink: Memento - Tuxedo Black;
Stickles - Diamond.

* * * * *

You're going to want to pop over to the All Dressed Up blog and see what the rest of the Design Team has created! There's also a second brand new image to see!


Blog Archive