Sunday 30 October 2016

Tutti Designs - Bamboo Screen

Hello, my friends!

It's Monday, and I'm back with a new Tutti Designs share!

Today I'm using "Bamboo Screen" from the September release.

As soon as I saw this die I pictured it with a Panda bear.
Sweet Alisha, over at Scrap N' Dipity made this sweet guy for me. 

Doesn't he look like he's enjoying all that lovely bamboo?


I cut the die twice, using this wonderful textured cardstock.
I placed one full die-cut on the card base, and added some from the second piece to fill it in.
The last bits were layed across the bottom for the Panda to climb on. 


Here's one more closer look at some of the detail.


Materials Used:
Papers: Recollections;
Image: Scrap N' Dipity - Panda Baby;
Ribbon: Celebrate It.

Tutti Designs Die - Bamboo Screen


* * * * *
I'll be back next week with a new project.
In the meantime, here are all the links you'll need:


New Release at Digistamps4Joy

Hello, my friends!

I'm excited to be sharing my first post as a member of the Digistamps4Joy Design Team!
I was very happy to accept an invitation from this lovely group,
and I look forward to sharing future projects with you. 

Today is New Release day, and I have made cards with 2 of the new images.

First up is "My Bunch of Lilies" which you can find HERE.
Isn't she lovely?

After assembling my card, I started pulling out various embellishments.
Then I decided it really didn't need anything at all. 


I did add a little bit of Stickles to the flowers, and popped the image up with foam tape.

Materials Used:
Papers: MME - Naughty or Nice, Recollections - Cardstock;
Color: Spectrum Noir Markers;
Die: Spellbinders Nestabilities - Labels 47;
Stickles: Ice Stickles - Lemon Ice.

* * * * *

The second is "Sweet 16" which you can find HERE.
She was so much fun to color!

I went a little wild with her hair color, and used one of my very favorite color combinations.


Some ribbon strips behind the image, a few enamel dots,
and it was finished.

Materials Used:
Papers: Crate Paper - Emma's Shoppe, Recollections - Cardstock;
Color: Spectrum Noir Markers;
Ribbon: Offray;
Bling: Enamel Dots.

* * * * *

Digistamps4Joy also has a monthly challenge.
I'll be back on the 1st to share a card for the new one.

Thanks so much for stopping by! :o)

* * * * *

Here are all the links:


Thursday 27 October 2016

Cards and More Shop DT - French Themed Card

Hello, my friends! 

I'm back with a new project made with products from the Cards and More Shop .

My card today features the super fun Spellbinders die called
"French Frills" and some fabulous Studio Light Papers.

Doesn't this make a lovely French themed card?
I used four of the dies from the set to accessorize my card.


The sweet image is Miss Lily Reporter from Little Blue Button Stamps.
Doesn't she look like a French tourist?
She's getting a good shot of the Eiffel Tower! ;o)


These were the products used from the Cards and More Shop :

Spellbinders Shapeabilities Die - French Frills


* * * * *
Please pop on over to Cards and More Shop to see all the great products they carry.
Also, check out the Cards and More Shop blog.


It's full of fun inspirational projects! :o)

Have a happy day! :o)

Wednesday 26 October 2016

Scrap N' Dipity Spotlight - Lil Bear Bee

Hello, my friends!

Thanks so much for stopping by today!
I have a Spotlight card to share for Scrap N' Dipity.

I have used the image called "Lil Bear Bee". 
You can find it in the shop, right HERE.

It's it a sweet scene?


Materials Used:
Papers: Pebbles - Garden Party;
Image: Scrap N' Dipity - Lil Bear Bee,
Spectrum Noir Markers;
Punch: EK Success - Parisian Border;
Ribbon: Offray;
Bling: Unknown.

* * * * *
Don't forget to join our latest challenge...it's "Autumn Colors".

Here are all the links you're going to need:


Sunday 23 October 2016

Tutti Designs - Flourish Butterfly Corner

Hello, my friends!

It's Monday, and I'm back with a new Tutti Designs share!

This time I'm using the gorgeous new Flourish Butterfly Corner die, from the September release.
You'll find it HERE in the store.

Here is the card I made:


I did some simple layering, and then cut circles out of the center.
This allows the butterfly part of the die to stand out.
I used a glue pen to adhere the die cut piece.
It's my "go to" for these intricate dies because I can put the glue exactly where I want it.


Here's a close-up of the die-cut.
It's another intricate beauty! 


Materials Used:
Papers: From My Stash, Recollections - Cardstock;
Sentiment Stamp: CTMH - Butterfly Wings;
Ink: Memento - Tuxedo Black;
Other Dies: WRMK - Nesting Circle Dies;
Ribbon: Offray Picot Ribbon. 

Tutti Designs Die Used:
Flourish Butterfly Corner Die


* * * * *
I'll be back next week with a new project.
In the meantime, here are all the links you'll need:


Saturday 22 October 2016

Fall Into Autumn

Happy Saturday, my friends!

Today I'm sharing an extra "just for fun" card.

This is made using one of the free digital images from Gecko Galz.
I printed it and then cut it out with my Cricut Explore Air. 
I colored it, and then backed it with a dark night sky colored paper, cut in a circle.


It's such a great tree!
I have a number of leaf punches but they were all too big.
So I decided this heart punch would make great little leaves.
I punched them out in several Fall colors.
I folded and curled them, and adhered them all in place.
Finally, I mounted it on a round card base.


Here's a closer look at all the little heart leaves.


Materials Used:
Papers: Recollections - Cardstock;
Image: Gecko Galz Freebie;
Color: Spectrum Noir Markers;
Cut: Cricut Explore Air;
Die: WRMK - Nesting Circles;
Punch: Martha Stewart - Hearts.

* * * * *
Linking Up To:


Fussy and Fancy Friday Challenge #175 - Shades of Fall

Fun-day Friday Challenge #161 - Anything Goes

The Crafty Addicts Challenge #26 - Anything Goes/Autumn Colors

* * * * *
Thanks so much for stopping by today!
Since this is an Fall themed post, I thought I would share a peek of our Fall with you.

My Back yard on October 5th:


The snow was so wet and heavy that it completely flattened our huge lilac hedge.


The snow is all gone now...and it looks more Fall-ish.
I'm sure it will be back very soon! :o)

Thursday 20 October 2016

Guest Design Team Project for Inspired by Stamping - Part 2


Hello, my friends!

Today is my second Guest DT spot over at Inspired by Stamping!

I would like to give Joanna a BIG thank you for having me.
It’s been lots of fun creating and sharing my projects with all of you.

Also, Joanna has generously offered a special DISCOUNT CODE to my blog readers! 
Read to the bottom for all the details! ;o)

Today I am sharing a masculine themed card.
I combined two stamp sets from Inspired by Stamping:

Here is the card I created:


Here's how I did it:

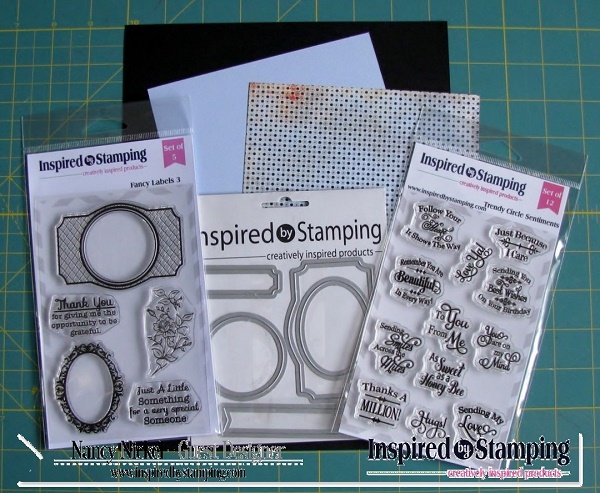
First, I gathered some of my supplies.


I began with my solid piece of blue cardstock.
I chose the sentiment “Sending You Best Wishes on Your Birthday” and stamped it in black ink,
leaving lots of space around it for the next step.


I brushed the entire cardstock with my powder tool.
I stamped the label with Versamark ink, centering it over the stamped sentiment.
Then I sprinkled it with black embossing powder and heat set it.


Next, I cut it out using the Fancy Labels 3 Die from Inspired by Stamping.


Then I cut all the pieces for the card.
From the black cardstock I made a tent-fold A2 card base,
which is a 4 ¼” X 11” piece scored at 5 ½”.
From the patterned paper, I cut a piece measuring 4” X 5 ¼”.
Since the die-cut label left a blue edge, I cut another label of black cardstock.
I inked the edges of the label and patterned paper with Walnut Stain Distress Ink.


Now I’ll show you what I did with the black label I cut.
Since the die left a blue edge around my label, it disappeared into the patterned paper.
I wanted to frame it with black to make it stand out, and give it more weight.
I cut another set of blue and black labels to demonstrate.


I began by cutting the black label in half lengthwise.
Then I trimmed off the ends from the curve to the center cut, as shown here:


Discarding the little end bits, I adhered the other pieces behind the label,
leaving about 1/8” exposed.


Here is how it looks on my finished card:


The final step was to create a simple bow to add behind the label.
I did this using the matching ribbon from the 
Autumn Ribbon Collection
from Inspired by Stamping.
I LOVE this ribbon!
Then it was just a matter of adhering it all together.


Again, here is my finished card:


I hope you like my masculine themed card!
Both of the stamp sets I used are very versatile,
and perfect for any style of card!

Thanks for stopping by!
Please let me know if you have any questions! :o)

* * * * *
Inspired by Stamping Materials Used:

Fancy Labels 3 Stamp Set

Trendy Circle Sentiments
* * * * *

Other Materials Used:
Black Cardstock
Basic Grey – Oxford 6 X 6 Paper
Blue Cardstock
Versamark Ink
Memento – Tuxedo Black Ink
Walnut Stain Distress Ink
Ranger Super Fine Detail Embossing Powder – Black
EK Success Powder Tool
Martha Stewart Score Board
Fiskars Trimmer
Acrylic Blocks

Heat Gun

* * * * *
Now for information on the special DISCOUNT CODE:
The code is thenickelnook20.
It is good for 20% off all orders of $20 or more at Inspired By Stamping
...excluding clearance items.
This discount code will expire November 20, 2016.
Thank you again, Joanna!
Happy Shopping, my friends! :o)

Wednesday 19 October 2016

Jennifer Nilsson Art DT - Autumn Basket Girl

Hello, my friends!

I'm back with a new card share for Jennifer Nilsson Art.  

Today I am using the "Autumn Basket Girl" image.
This image is available in the Etsy Shop, as well as Miss Daisy Stamps.


Materials Used:
Papers: Recollections - Autumn Paperpad;
Image: Jennifer Nilsson Art - Autumn Basket Girl;
Colour: Spectrum Noir Markers;
Bling: Unknown Rhinestones;
Ribbon: Offray - Brown Grosgrain.

* * * * *
Here are all the links you'll need:


Blog Archive