Hello, my friends!
I know things have been a little quiet around here lately,
but today I'm happy to share a new project for Printable Cuttable Creatables!
I'm going to share how I use these great cut files,
along with Cricut Design Space, to make a fun shaped card!
I've got lots of photos for you, as I took some screen shots along the way.
I have used:
Here's my card:
I think shaped cards are so much fun to make.
I began by choosing my shape...in this case it was the fun hive.
I began by choosing my shape...in this case it was the fun hive.
I imported it into Cricut Design Space,
as both a print then cut file, and a cut file.
as both a print then cut file, and a cut file.
Here I have changed the color of the cut file to the cardstock color I will use.
Since my hive is sized to 5.5" tall, I size the shape to 5.75" tall.
Since my hive is sized to 5.5" tall, I size the shape to 5.75" tall.
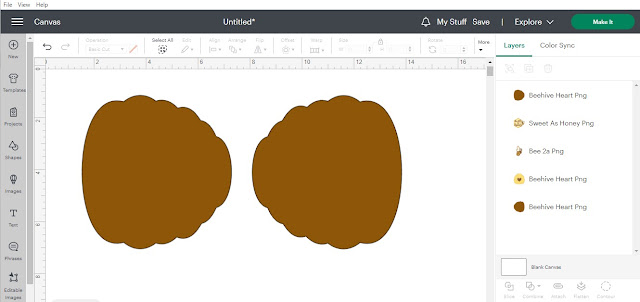
I then move the hive out of the way, and duplicate the shape.
One is the front of the card, and the other is the back of the card.
Just in case the shape is not totally symmetrical, I give it a flip.
This ensures that the edges of the card will match perfectly when folded.
One is the front of the card, and the other is the back of the card.
Just in case the shape is not totally symmetrical, I give it a flip.
This ensures that the edges of the card will match perfectly when folded.
Next, I decide where I will attach my front and back.
I decide to attach them at the top.
I rotate the shapes to do this, so I could get everything in frame.
I decide to attach them at the top.
I rotate the shapes to do this, so I could get everything in frame.
I then position the shapes so they are just touching at the top,
where I want them to be hinges.
I then highlight both shapes, and click on "Combine".
You'll find this in the bottom right corner.
I list of options pop up, and I choose "Weld".
You'll find this in the bottom right corner.
I list of options pop up, and I choose "Weld".
...and just like that the pieces are connected.
Simply score the hinge, and you have a really fun shaped card!
Simply score the hinge, and you have a really fun shaped card!
All the other elements I used were done with the "print then cut" option.
Once they were cut, I inked the edges and adhered them to the card base.
Once they were cut, I inked the edges and adhered them to the card base.
To finish things off, I added some glitter glue to the bee wings,
and a little drop to the antennae.
and a little drop to the antennae.
I then added another printed and cut element to the inside of the card!
It's so easy to make fun shaped cards using these simple steps.
Take a look through the shop and see what inspires you to make one!
Have fun!
Take a look through the shop and see what inspires you to make one!
Have fun!
* * *
Printable Cuttable Creatable Products Used:
Other Materials Used:
Cricut Explore Air Machine;
Cricut Explore Air Machine;
DCWV Textured Cardstock;
Glitter Glue - Brown and Clear;
Walnut Stain Distress Ink.
Glitter Glue - Brown and Clear;
Walnut Stain Distress Ink.
* * *
Thanks for stopping by today!
I'll be back soon with another fun project!
* * * * *
Here are all the links for you:
Printable Cuttable Creatables Shop


2 comments:
This is bee-autiful! :D So much yellow! :D Enjoyed the step by step too, it's a nifty idea to make a lovely shaped card! Annabel x
Super card, love the shaped card and lovely insert Nancy.
Faith x
Post a Comment