Tuesday 29 May 2018

Swedish House Crafts - Father's Day Gift Idea

Hello, my friends! 

I have a new project today for Swedish House Crafts!

For some of you, 
there is still time to order what you need to make this cute little project for Father's Day,
 which is on June 17th. 
The rest of you will just have to place your order and make it for a fun birthday or anniversary gift! 


 The fun little pocket page album is created using only one 12 X 12 page of the 
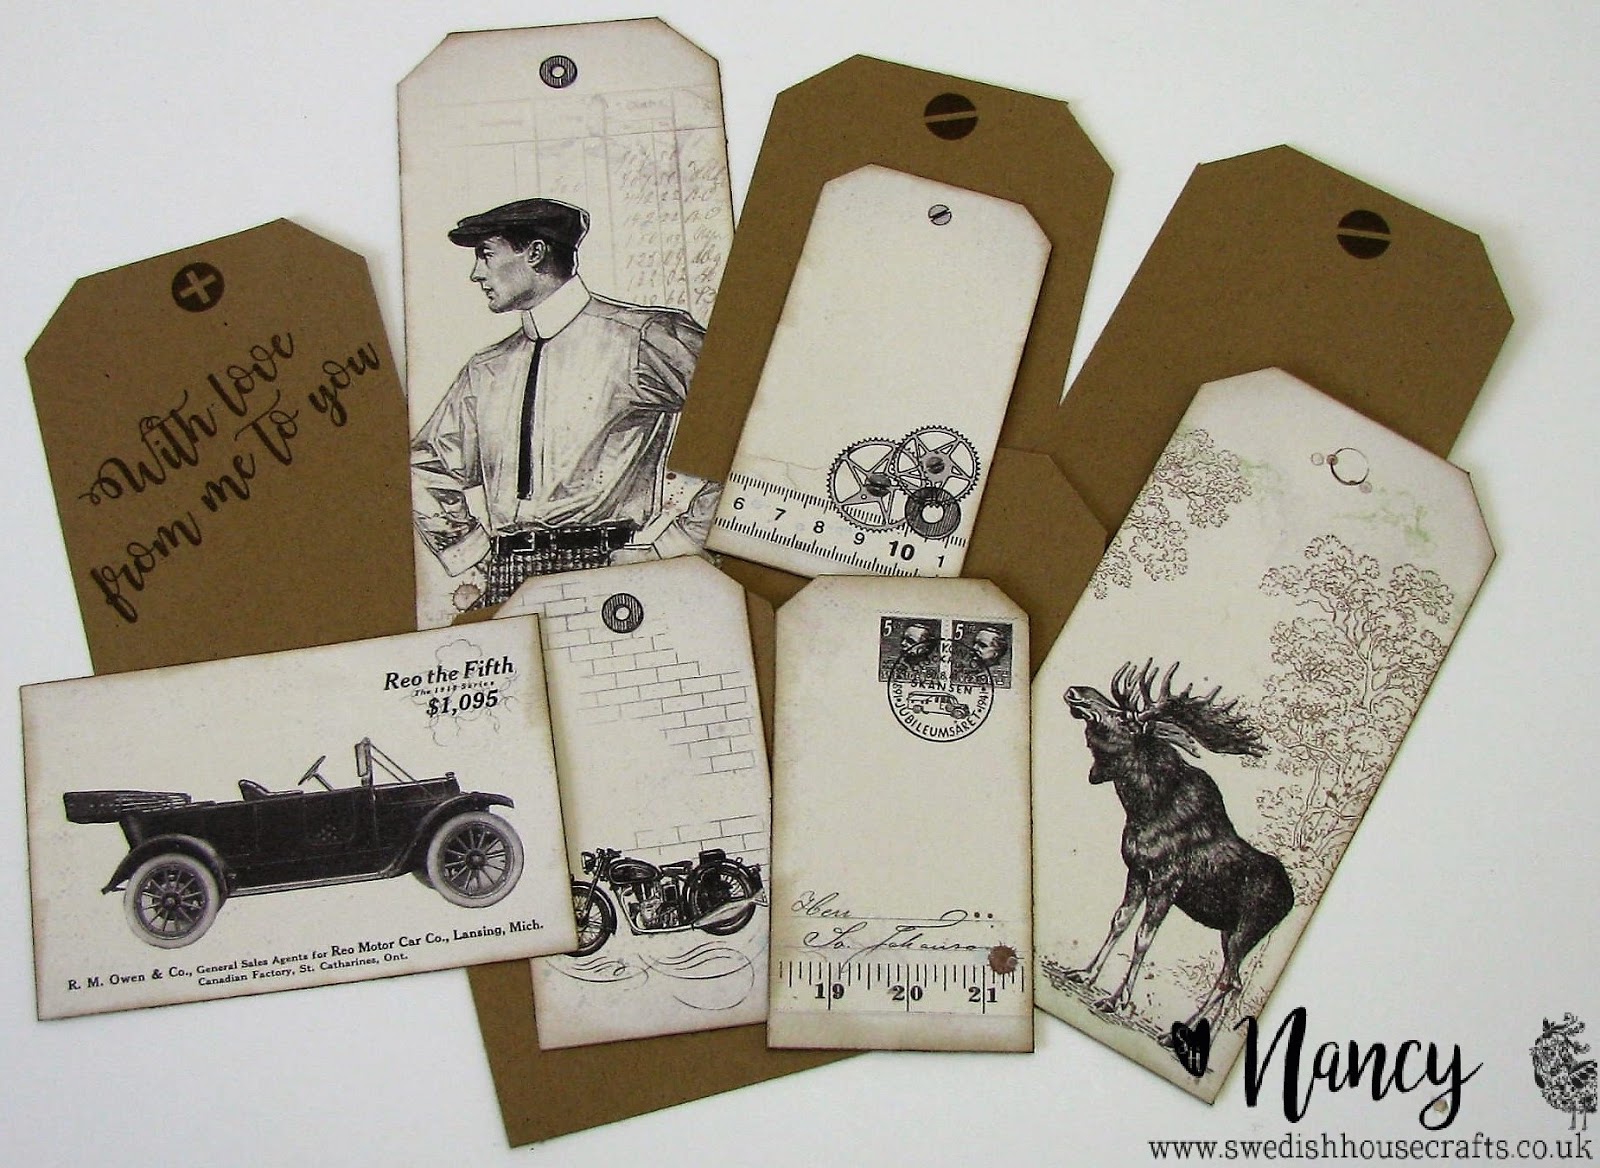
It measures 3 x 4, and has multiple pockets to house all the great masculine tags from 
I also cut some extra tags from kraft cardstock. 
These are the perfect place to make your own personal gift coupons such as: 
"This entitles you to one dessert of your choice" or "This entitles you to a picnic in the park"...things like that! 


 If you want to make it for an anniversary gift, 
a fun idea would be to write sweet love messages on each tag. 
Or you could write all the things you love and appreciate about the recipient.  


Then I went through and stamped with the screw head stamps. 
They are perfect on the wood paper. 


 The variety of the size of the tags makes it more interesting. 
It's fun to see one pop out behind the other.


 The pockets were decorated with elements that were also cut from the tags page. 


  On the back I added just the screw head stamping. 
Then I use a Tim Holtz bull nose clip to hold it shut.


Here's a look at all the wonderful tags that this tiny little mini holds. 


Thanks so much for stopping by today!  :o)

Links to all the products I used:

Clear Scraps - Get "Well" Card

Hello, my friends!

I'm back with a new project share for Clear Scraps!

Today I'm sharing a get well card that I created with this fun chipboard piece!
It's called the Wishing Well Chipboard Embellishment,
and you can find it right HERE.

This lovely, detailed piece fits beautifully on an A2 size card.


I began with an A2 size kraft card base.
I then created a grass/sky scene from cardstock for the background.


I loved the Wishing Well in the naked chipboard state,
so I decided not to color it in any way.
What I did do was cut a piece of dark grey cardstock,
and adhered that in place to the bottom of the well.
I then adhered the well to the card base.
Isn't the detail lovely?


I then stamped this sentiment...pun intended...and matted it on cardstock.
The hardest part of the whole card was trying to decide where to put it! lol
I didn't want to cover any of the detail of the well!


Here's one last look at the finished card:


Other Materials Used:
Papers: Bazzill - Cardstock;
Stamp: CTMH - 
Ink: Memento - Tuxedo Black;
Punch: Fiskars - Grass.

Products from Clear Scraps:


* * * * *
Thanks so much for stopping by today!
I'll be back with another project share very soon! :o)

* * * * *
Here are all the links you need:

Monday 28 May 2018

Simply Crafty SVGs - Hello with a Fun New Card Cut!

Hello, my friends!

It's time to share a new project for Simply Crafty SVGs !

This month I want to share one of the brand new files.
This is one of four cards from the A2 Frame Card Set 1.
You can find it in the right HERE.

I decided that since there were little hearts in the decorative paper,
I would use the card cut with the heart window.

This is another fun one to put together,
with lots of fun layering options!


Another option is to use foam tape on some of the layers.
I opted to keep them all flat.


Then I used some of the left-over cuts to decorate the inside.
I also added another panel to the inside.
Much easier than writing a message on black! ;o)


I was going to stamp something in the center of the heart.
Then I found this little "Hello" lying on my table.
It was the perfect addition. 


Other Materials Used:
Papers: Recollections - Cardstock,
Momenta - Decorative Paper;
Die: Hello. 

* * * * *
If you like to make cards, then you're going to want to grab this one!
Head on over to the shop to see the other shape options,
all in this one great file.
Also, there is now an A2 Frame Card Set 2 now available!

Thanks for stopping by today! :o)

 * * * * * 
Here are all the links:


Friday 25 May 2018

Father's Day Bog Hop with Simply Crafty SVGs

Hello, everyone!
Thank you for participating in the Father's day Blog Hop featuring Simply Crafty SVGs files. 

You should have hopped over from Leslie's blog...

To enter for your chance to win a Simply Crafty SVGs' Store Credit, 
you must leave a comment on, and follow each blog. 
The more blogs you visit and comment on, the more chances you have to win! 
Contest runs from 05/26/2018 12:00 AM EST to 05/28/2018 11:59 PM EST. 
One winner from each blog will be awarded a prize of $5 store credit,
 and 1 grand prize winner of $10 store credit will be awarded,
 based on all comments from all blogs. 
Winners will be posted by June 15, 2018.
 Please check back to see if you are a winner! 
Winners will be announced June 2, 2018 on the Simply Crafty SVGs Blog.

* * * * *
For my fun Father's Day project,
I am sharing this fabulous Coffee Cup file!
You can find it right HERE.

Remember the time when the day began with coffee and the newspaper?
Well, what's a better reminder than a cup made of newsprint?
Even better...a cup made of newsprint...filled with coffee candy!
These are actually my husband's favorite candies!
He does drink coffee but is definitely not a connoisseur,
and would much prefer a cup of the candies.
I thought this would make a wonderful Father's Day gift!


The cup is so fun to put together!
I didn't take into account the stiffness of the newsprint paper.
It's a very thick glossy paper, so it did take some extra time to manipulate the curves.


This cup holds a LOT of candy!
There's room to hide a Tim Horton's gift card in there too!


This will be a fun file to make up again at Christmas time!


This is the kind of gift my Dad would have loved!
I know that my husband will enjoy it too! :o)


Other Materials Used:
Papers: Bazzill - Cardstock, Recollections - Regent Street Signature Collection;
Ink: Walnut Stain Distress Ink.

* * * * *

Please continue the hop by visiting the next crafter on the list!

3. Julie
4. Lena
5. Leslie
You are here > 6. Nancy  <You are here

This was the last stop on the list!
Thanks so much for hopping along with us today!

* * * * *
If you just got here, then you'll want to start at the beginning!
Make sure you visit each one and leave a comment,
so that you have more chances to win! 
Also, make sure you visit the shop and try one of Simply Crafty SVGs files. 
There are lots of wonderful free SVG files to try too!

See you again soon! 

Thursday 24 May 2018

Swedish House Crafts - Quick and Easy Masculine Card Ideaa

Hello, my friends! 

I have a new project today for Swedish House Crafts!

I still hear so many of you say that you have a hard time with masculine cards. 
I hope that this A2  card  idea will help you out with that.
 Using just a few great products from Swedish House Crafts,
 you can easily make this fun card for the man in your life. 


 I actually started by choosing a paper to use for the paper piecing of my tie. 
I then stamped that and cut it out. 
I then die-cut the oval to adhere it to, 
and stamped the "Mr. Perfect" in place above the tie.


I then decided to use the same print as the background,
 since the tie print clashed with most of the others! lol 
Finally, for the card base, I chose one of the colours found in the print. 
Any of them would work but the blue was a bit more exciting than some of the other shades I tried. 


The tie stamp/die is really a fun one to play with. 
You can make a conservative striped tie, a fun polka-dot tie,
 an ugly Christmas tie...the possibilities are endless!

I hope this has helped you with at least one easy masculine card idea!

Thanks so much for stopping by today! :o)

Links to all the products I used:

My Scrap Chick - Frog Critter Book

Hello, my friends!

Welcome to a new DT post for My Scrap Chick!

Today I am sharing this adorable Frog Critter Book file.
You can find it in the shop HERE.

This was so much fun to make!
Wouldn't the kids love it?
This is the boy version but the file comes with a girl version too.


I cut everything out of this fun green, double-sided paper.
I inked all the edges with green ink.


The inside pages are put together in an accordion fold.


I wanted more pages, so I added an extra page cut.


Since I was using a paper that was striped on the back,
I cut a second back piece to cover the bold stripe.
That left just the back of the eyes showing the stripes.


To finish this fella's cute face,
I drew in the smile and inked in the pink cheeks.


Other Materials Used:
Papers: Recollections - Cardstock, gcd Studios - Oh Happy Day Collection;
Ink: Martha Stewart - Stem Green, Pink Geranium;
Pen: Pigma Pen - Black.

* * * * *

Thanks so much for stopping by!
I hope you'll head over to the shop and give it a try! 
Have you signed up for the My Scrap Chick newsletters yet?
Don't forget to do that!
You really don't want to miss out on any of the great freebies! :o)

* * * * *
Here are all the links you need:


Tuesday 22 May 2018

Clear Scraps - Girls Bib Dress Mini Album

Hello, my friends!

I'm back with a new project share for Clear Scraps!
I can't begin to tell you how much FUN I had putting this one together! 
Those of you that know me...probably can guess how much I enjoyed it!
For the rest of you...I hope it shines through! :o)
I think mini albums are still one of my FAVORITE things to create! 

I've used the fabulous Girls Bib Dress Chip Album .
It's a wonderful size at 8 1/4" X 9", and comes with 5 pages.
I found the Prima Anne Marie Paperpad in my stash,
along with a package of tickets and tags.
It's like it was made for this album!
I've posted it without photos. 
It would be perfect for any little girl photos:
baby shower, birthday party, recital, etc. 

Here's the front of the album, assembled with rings tied with bows.


To the front cover, I added ricrac and flowers.


I used large scalloped circles for photo mats,
and cut strips from the border sheet for bands to hold tags.


Here I've added some tickets.
Also, I've layered scalloped circles with tags. 
I added another ticket to hold the circles in place under the band.


These pages both have pockets to hold journaling spots and tags. 


These colors match much better in person than shown in the photo! lol


The back cover has more ricrac and flowers.


Here's the back put together with the rings and bows. 


Other Materials Used:
Papers: Prima - Ann Marie Paper Pad,
Cardstock - Pink, Turquoise;
Tags/Tickets: Prima - Ann Marie;
Die: Spellbinders Nestabilities - LG Scalloped Oval;
Flowers: Assorted Prima;
Ribbon: Celebrate It;
Other: Brads, RicRac, Binding Rings.

* * * * *
Linking Up To:


* * * * *
Thanks so much for stopping by today!
I'll be back with another project share next week! :o)

* * * * *
Here are all the links you need:

Blog Archive