Showing posts with label Handmade Paper. Show all posts

Tuesday, 25 June 2019

Arnold Grummer - Handmade Paper Butterfly Heart Card

Hello, my friends!

 I have a new project to share with you for Arnold Grummer.

You'll find all the details HERE,
at the Arnold Grummer Blog.

* * * * *
My blizzard day stash is almost gone...so I'll have to make some new paper soon!
However, when I was looking through what I have left,
I came across this pretty purple piece just waiting to be finished!


Here's what I made:


Here's What I Used:

Materials Used:
Blender;
Stampendous - Butterfly Trio Die Set;
Inks: Archival Ink - Jet Black;
Distress Markers: Black Soot, Wilted Violet, Dusty Concord;
Water Brush;
Spectrum Noir Sparkle Pen
Black Micron Pen.

Here's How I did it:

1. I used this fun template to create this card, during my paper-making blitz.


 2. Then I pulled out this lovely Butterfly Trio Stamp and Die Set from Stampendous to decorate my card.


 3. I found a scrap circle of a contrasting handmade paper in white. I stamped the butterfly in Archival - Jet Black Ink.  


4. Once the ink was dry, I used the Distress Markers and a water brush to add color to the butterfly. 
I dried it with my heat tool.

5. I then went over the entire butterfly with the Spectrum Noir Sparkle Pen. Set aside to dry. 


6. When dry, I adhered the butterfly body to the card, folding the wings upward, and positioning it at a slight angle. 

7. Using the micron pen, I added stitch marks around the outside edge of the card. I also added the two antenna. 


That's all there is to it. Here are some more pictures of this pretty card. 
The sparkle is so bright that it interferes with the photos.


The inside of the card is read for stamping or writing any sentiment. 


The butterfly is so pretty, and has such lovely detail.


This was a really fun card to create! I hope you'll consider making one of your own! 


* * * * *
Thanks so much for stopping by today!
I'm really looking forward to sharing more handmade paper projects with you 
in the months ahead!
It's so much FUN!

Oh, you'll want to check out the resource page over at the website. 
You can watch Arnold Grummer himself demonstrate how to make paper! 

* * * * *
Here are all the links:


Tuesday, 11 June 2019

Arnold Grummer - Stamping on Handmade Paper Card

Hello, my friends!

 I have a new project to share with you for Arnold Grummer.

Today I'm using more handmade paper from my blizzard day stash!
My stash is almost gone...so I'll have to make some new paper soon!
Yay! It really is fun to do! :o)

* * * * *
Today I'm sharing a lovely stamped card.
You'll find all the details HERE,
at the Arnold Grummer Blog.

A BIG thank you to Stampendous for the gorgeous stamp set!
It is called: Leafy Imprint.

Here's my card:

Materials Used:
Blender;
Inks: Stampin' Up - Old Olive, Lucky Limeade;
Green cardstock card base;
Ribbon: Celebrate It.

How I did it:


Today I'm using the paper that I made from packaging paper.
I haven't really done any stamping on handmade paper,
so I was anxious to use this beautiful leaf stamp to try it out.


I chose a couple of stamps I wanted to use.
Once I had them loaded with ink, I misted them with a spritz of water before stamping them.
I love the way the stamping turned out!
I used both greens on each imprint.


I mounted the finished piece on a green cardstock card base.
Then all it needed was a pretty green bow!


Here's one last look at the finished card:


* * * * *
Thanks so much for stopping by today!
I'm really looking forward to sharing more handmade paper projects with you 
in the months ahead!
It's so much FUN!

Oh, you'll want to check out the resource page over at the website. 
You can watch Arnold Grummer himself demonstrate how to make paper! 

* * * * *
Here are all the links:


Tuesday, 21 May 2019

Arnold Grummer - Handmade Paper Happy Birthday Card

Hello, my friends!

Happy Wednesday to you! 
I'm back with a fun new handmade paper project for Arnold Grummer!
I'm also up on the Arnold Grummer Blog today!

I'm using what might be the last of the pretty mauve paper from my blizzard day stash!
You can read the post about making this paper HERE.

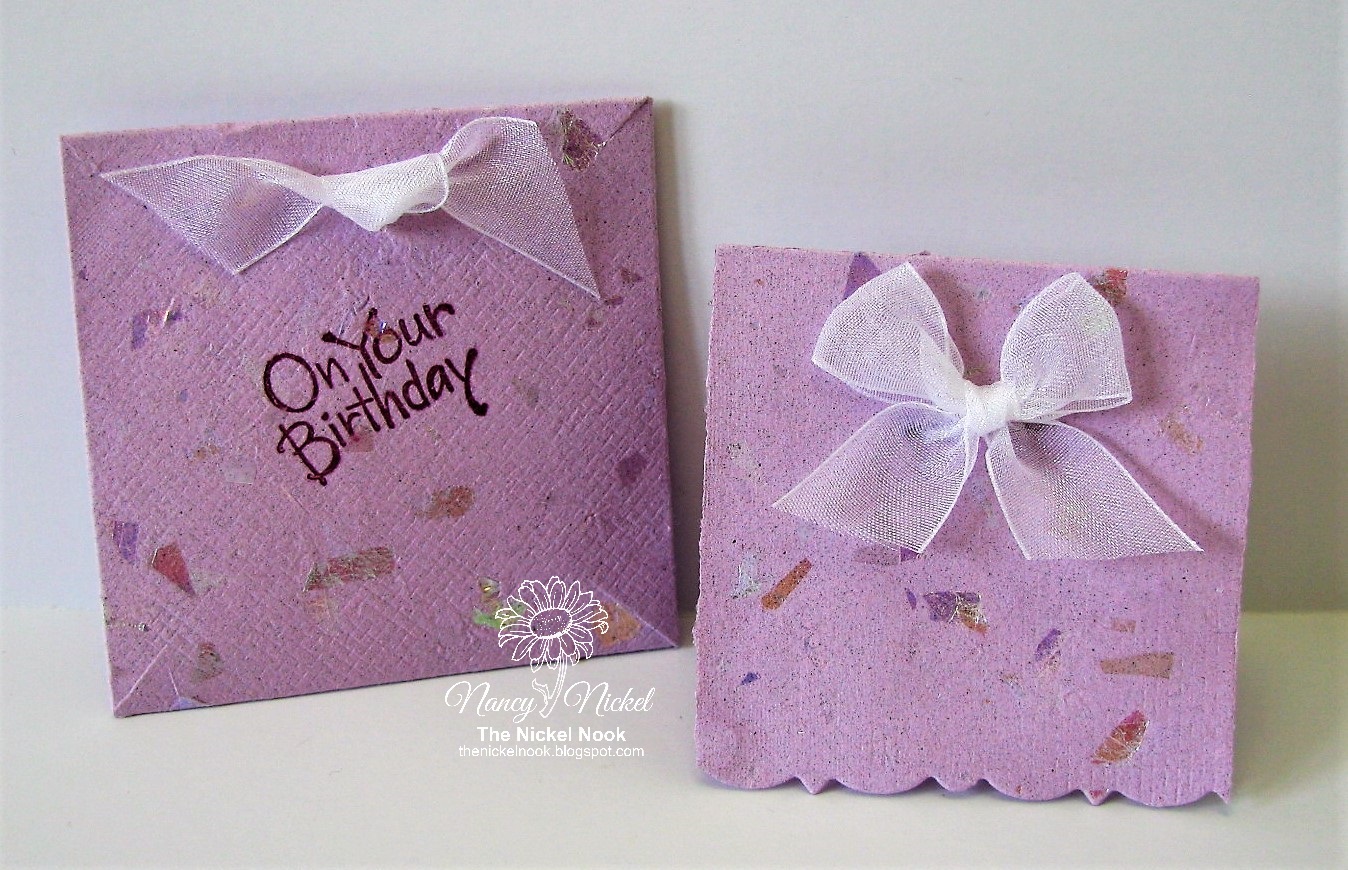
This is the Happy Birthday gift card and envelope I have for you today:


Supplies Used:


(Generously provided by Stampendous)

Ink: Stampin Up - Rich Razzleberry

Ribbon: Celebrate It.


I used the template, and followed the instructions, to make this sweet handmade paper set.


To the front of the envelope, I added a little ribbon tie. 
I also stamped the "On Your Birthday". The envelope is only about 3" square.


The little card measures 2 1/2" square. Isn't it adorable?
I die-cut the bottom edge of the front of the card, using one of the Spring Border Dies.
 Then I did some more stamping to the inside of the card.

It's the perfect little set to include with a gift.
Wouldn't it be lovely tucked under the bow of a wedding gift?
The handmade paper makes it so special,
and the sparkles make it so magical! 

* * * * *
Thanks so much for stopping by today!
I'll be back soon with another handmade paper project!

* * * * *
Oh, you'll want to check out the resource page over at the website. 
You can watch Arnold Grummer himself demonstrate how to make paper! 

* * * * *
Here are all the links:


Tuesday, 26 March 2019

Arnold Grummer - Handmade Paper Butterfly Tag

Hello, my friends!

 I have a new project to share with you for Arnold Grummer.

You'll find a full tutorial and product list at the 
Arnold Grummer Blog HERE.

Last time I shared some paper I made using sewing patterns.
Today, I'm sharing more handmade sewing pattern paper 
but with a twist.
To this paper I added some of the gorgeous Gold Dust
from the Arnold Grummer Store.
I also used a template to create the shape of the paper.
It's the Invitation & Thank You Card Medium Template.
However, if you don't fold it, doesn't it make a great tag?

Here's my project:


For the full tutorial on how I put this tag together,
head over to the Arnold Grummer blog HERE.

* * * * *
Thanks so much for stopping by today!
I'm really looking forward to sharing more handmade paper projects with you 
in the months ahead!
It's so much FUN!

Oh, you'll want to check out the resource page over at the website. 
You can watch Arnold Grummer himself demonstrate how to make paper! 

* * * * *
Here are all the links:


Tuesday, 12 March 2019

Arnold Grummer - Handmade Paper Card

Hello, my friends!

 I have a new project to share with you for Arnold Grummer.
You'll find a full tutorial over at the the blog HERE.

Here is the card I made:

  I'm using more handmade paper from my blizzard day stash!
Can you guess what I used to make my paper this time?


The theme of my card kind of gave it away, didn't it? 
This paper is made from sewing patterns!
This tissue made such a great paper.

It took the stamping so well. 
You can see the nice crisp image:


The flower punched from pattern tissue, was found in my stash.
It's the perfect match!
So I had to add it to the card, along with some punched leaves.


Materials Used:

Blender;
Sewing Pattern Tissue;
Black Cardstock;
Sewing Themed Stamps from Stampin' Up and Close to My Heart;
Memento - Tuxedo Black Ink;
Piercing Tool and Mat;
Sewing Needle;
DMC - Black Embroidery Floss;
Small Piece of Black Ribbon.

Again, you'll find my tutorial HERE.

* * * * *
Thanks so much for stopping by today!
I'm really looking forward to sharing more handmade paper projects with you 
in the months ahead!
It's so much FUN!

Oh, you'll want to check out the resource page over at the website. 
You can watch Arnold Grummer himself demonstrate how to make paper! 

* * * * *
Here are all the links:


Tuesday, 26 February 2019

Arnold Grummer - Handmade Paper Celebration Card

Hello, my friends!

 I have a new project to share with you for Arnold Grummer.

Today I'm using more handmade paper from my blizzard day stash!


Materials Used:

Blender;
Packing Paper;
Red Crinkle Basket Filler;
Red Cardstock;
Ribbon: Offray - Red Satin;
Alphabet Dies: Little B - Block Out.

How I did it:

During a recent marathon day of paper-making, 
I made some plain pages using the packing paper that came in a parcel. 
I then experimented with adding some crinkled strips of basket filler. 
With one page I cut the filler up, 
and with one page I kept the filler in the original long pieces. 
Here are what all three pages look like:


Here's a photo of the red crinkled strips, 
so that you know just what I'm talking about:


To see exactly how I put my card together,
please go HERE,
to the Arnold Grummer blog.


Isn't it fun how some crinkly bits can turn plain packing paper
 into a piece of party infested handmade paper? 
I think it's wonderful fun!

* * * * *
Thanks so much for stopping by today!
I'm really looking forward to sharing more handmade paper projects with you 
in the months ahead!
It's so much FUN!

Oh, you'll want to check out the resource page over at the website. 
You can watch Arnold Grummer himself demonstrate how to make paper! 

* * * * *
Here are all the links:


Tuesday, 12 February 2019

Arnold Grummer - Introduction to Handmade Paper

Hello, my friends!

I'm excited to be sharing my first post 
as a member of the Arnold Grummer Design Team.

We recently had a wonderful blizzardy day...
...it was the perfect day to spend making paper!
I've got a great little stash for my first few projects.

I love to create projects using handmade paper.
To actually make the paper myself is even better!
There's just something about the texture of it that is so lovely.
That's why books are always my favorite handmade paper project to create.
They just feel so good in my hands! ;o)

So I knew that my first project for Arnold Grummer would be a book!

If you're not interested in some extra ramblings,
you can find my full book tutorial here:


Here's a peek:


Materials Used:

Dies: Tim Holtz - Alphaneumeric, 
Spellbinders - Romantic Rectangles Two;
Small piece of Silver Velum;
Glue Stick;
Double-sided Tape;
1 yard Sheer Ribbon.

How I did it:
I followed all the directions in the PAPERMILL Papermaking Kit to make my paper. 
I began by recycling our town school newsletter. 
We get one in the mail every month, and they're always a lovely color. 
So I'm hoarding them all to make paper.


The January newsletter made this beautiful colored paper.
I made several sheets of plain colored paper,
then I added the Iridescent Flakes to one page for the cover.
Here's a close-up of that:


Isn't that pretty?
Here's another look at my finished book.
You'll find a complete tutorial on just how I put this book together over on the Arnold Grummer Blog.
There will be lots more photos and information there for you!


* * * * *
Thanks so much for stopping by today!
I'm really looking forward to sharing more handmade paper projects with you 
in the months ahead!
It's so much FUN!

Oh, you'll want to check out the resource page over at the website. 
You can watch Arnold Grummer himself demonstrate how to make paper! 

* * * * *
Here are all the links:


Blog Archive