Wednesday, 10 February 2021

Scrappy Tails Crafts - Valentine Vase

Happy Wednesday, my friends!

I'm so excited to be sharing my first DT project for Scrappy Tails Crafts

I'm a little bit late to the party, as there were some shipping delays.
I'm jumping right in with a fun Valentine project,
using fabulous dies from the January release.

Today I am featuring:

Flower Vase Pop Up Card Die,

and Heart Assortment Metal Dies.

This is such a fun combination of dies,
and there are so many creative possibilities!

I love versatile dies that can be used in many different ways,
and these are both that! 

Here is my project from the front:


Isn't that fun? 
I just love this Flower Vase Pop Up Card Die!
It's the same principle as a box card,
where it's a 3D piece that will fold flat.
Sabrina has made a great video showing how super simple it is to put together.
You'll find that video HERE.
This die also comes with a great variety of optional pieces.

I grabbed a variety of patterned papers and cardstock colours
and got busy cutting out all the pretty hearts.
There are so many fun designs in this die set.
You can mix and match and layer them all up.
I backed each piece, so that it looks great from all sides.
Do you see the "LOVE" and the "XOXO"?
Well those are both optional panels for Vase base.
Since I was using paper that already had a matching XOXO,
I decided to pop the words in among all the hearts!


Below is a photo of the back side of my project:


Here is one side:


Here is the other side:


It would make such a cute little table centerpiece, wouldn't it?

Below is a photo taken from the top.
It doesn't really appear that full at this angle.


Here it is all folded up and ready to pop into an envelope.
It looks much fuller in this photo! ;o)

Both of these die sets are so fun to play with!
I just used strips of matching cardstock to attach all the cards.

You could also use pretty wires, or strips of acetate.
I used the strips as another embellishing opportunity,
and chose to add some of the tiny hearts to some.

There are so many fun things you could add to all the hearts:
rhinestones, pearls, glitter, ribbons, etc.

Also, there are so many fun ways to fill the fun Vase!
You'll see some great ideas over at Scrappy Tails Crafts!

* * * * *

Scrappy Tails Products Used:

Flower Vase Pop Up Card Die,

and Heart Assortment Metal Dies.

Other Products Used:
Basic Grey Kissing Booth Papers:
Assorted Cardstocks from DCWV, and American Crafts;
Pink and Red Inks from Martha Stewart.

* * * * *

Thanks so much for stopping in!
I'll have another Scrappy Tails project share soon!

* * * * *

Here are all the links:

Scrappy Tails Crafts Shop

Scrappy Tails Crafts Blog

Scrappy Tails Facebook 

Tuesday, 9 February 2021

Junk Journal - In My Life

 Hello, everyone!

I have a really quick post share this evening!

I've created a flip through video of my latest journal.

I've used the In My Life Journal Kit from Janey B Journals.


Thanks for watching! 

See you again soon! :o)

Monday, 8 February 2021

Kate Hadfield Designs - Springity Spring Mini Album

Hello, my friends!

I am very happy to be a Guest DT for February with

Kate Hadfield Designs,

I'll be sharing two posts full of these fabulous products!
 Since Spring is right around the corner I am featuring:

Springity Spring Doodle Collection,

and Blues 'N Greens Alphabet.

I've made a fun mini album:


This Collection is FULL of the loveliest Spring themed doodles.
They are all hand drawn by Kate.
I had the best time putting it all together.


Here is a little Spring butterfly charm,
that I added to the binding wire.


I planned my pages out in my mind,
and then got busy in Cricut Design Space.
I sized everything to fit on a six inch page, 
and then used the print/cut feature for all the images I wanted.


I went ahead and filled my white pages with all the pretty doodles.
Then I realized that an album should have room for photo and journaling, right?
I inserted tags behind all of the images during the final assembly.


There is such a great assortment of images.


April showers...


...bring May flowers!


Of course, there must be some birds.


I ended it all with a pretty rainbow.

These doodles are so much fun to play with!
The selection of Collections in the shop are fantastic!
So many creative possibilities,
and great products for the kids to have fun too!

Some of the Collections are available in Bundles.
They include both coloured and images for you to colour yourself
So much fun!

* * * * *
Thanks so much for stopping by today!
I'll be back later in the month with another Kate Hadfield project!

* * * * *

Here are all the links:

Kate Hadfield Designs Shop

Kate Hadfield Blog

Kate Hadfield Facebook

Friday, 5 February 2021

My New "REMEMBER" Journal Project

Hello, my friends! 

As I mentioned in a previous post, 
I've had some free time lately to work on some fun new creative projects.
Today I'm sharing one of them.

This will be a "work in progress" over 2021.
In previous years I have worked on calendar pages each month.
This year I will be sharing monthly journal pages. 

I recently discovered Caroline's Craft Tree.
I'll add all her links below so that you can go check her out. 
In 2020, she gifted her youtube viewers with some beautiful monthly printables. 
These fun files included birth month flowers and birthstones,
along with coordinating pockets, and tags, and more.
That is what inspired this journal project.

Here is the unfinished cover.
I've simply added a beautiful lace paper from Caroline's Etsy Shop.


I have used a file folder for the base,
and stitched two signatures into the spine, using a simple pamphlet stitch.


The two signatures are made up of tea dyed papers
in between more of the pretty lace papers.
The lace papers come in a wonderful variety of colours,
so I tried to plan it out to coordinate with the monthly colours.

There are more lace papers lining the inside of the covers.
The file folder was folded up to form a pocket,
and I've added a pretty trim
.
Then we begin with January:


 I've added a tab for each month, with six months in each signature.
There will be four pages for each month, 
and then the second half of the signature for all the extra bits.

I will be using the tags and journaling cards
to document all the important dates I need to remember,
along with any special events that may happen.


This is the last January page.
It holds a pretty pocket with another large tag for journaling.


I have to say that I've had a really great time putting this all together.
The fun will continue as I fill the pages each month.

* * * * *

I'll be back soon to share my February pages!
I hope you come back to see them,
and maybe you'll consider putting together a journal of your own!

* * * * *

Just a little more information regarding Caroline's Craft tree.
Caroline shares great projects and tutorials on her youtube channel.
She is very generous and inspiring!
She sells both digital and finished products in her Etsy shop.
Oh, and she's a fellow Canadian! :o)
I really hope you go check her out.

* * * * *

Here are all the links for you:


Monday, 25 January 2021

Altair Art - Valentine Home Decor Project

 Hello, my friends!


I'm back today with a new project share
 as Brand Ambassador for Altair Art Scrapbooking Papers.

Today I am featuring a recent release called:


It's such a lovely collection of papers and elements, 
with an assortment of both whimsy and elegance.
For my project today, I have chosen the elegant route.

In all the sorting and organizing I've been doing,
I recently came across a stash of pretty decorative plates.
Two of the plates were heart shaped.
With Valentine's Day right around the corner,
I thought I would decorate them,
using these beautiful papers. 

Here is the first one:


The green ribbon was already attached to the plate for hanging.
I made an impression of the heart in the center of the plate,
traced it onto the decorative paper, and cut it out.
I distressed the edges of the heart before adhering it to the center of the plate.


I fussy cut all the flowers and elements from the collection.
I began by placing the fussy cut floral wreath to the center of the background heart.
Then I added some extra leaves around the wreath
I used a combination of Best Glue Ever and foam tape.

The two butterflies had their wings folded up for some extra dimension.
I also distressed two of the mini tags, and added them to the bottom of the ribbon.


Here is the second plate.
It also had a green ribbon hanger.


I followed the same process with the background paper here.
This time I added a multitude of fussy cut flowers and leaves,
along with a piece of cheesecloth.


There's so much pretty dimension and texture in this grouping.


Here are the two plates side by side.
The one on the left measures 7 1/2" across it's widest point.
The one on the right is a little bit bigger at 9 1/4" across.
Aren't they pretty?
I think they'd make a wonderful Valentine's Day gift! ;o)


Altair Art Products Used:


Other Materials Used:
Decorative Plates;
Tim Holtz Distressing Tool;
Scrap of cheesecloth;
Unknown Foam Tape.

* * * * *
Thanks so much for stopping in today! 
I'll be back next month with another project using these pretty papers!

Oh, one more thing...
Altair Art also has a wonderful monthly Challenge,
with a chance to win some fabulous prizes!
Check it out at the blog.

* * * * *

Here are all the links for you:


Sunday, 17 January 2021

Sherlock Holmes Case File Junk Journal

 Hello, my friends!

As I've ended some DT work, 
and have a bit of a break before my new DT work begins,
I've been working on some fun new creative projcts.

My favorites have been some junk journals, and altered books.
You'll be seeing more of those projects as I progress. 

Today I have a finished junk journal to share.
I've used some of the Sherlock Collection from Meg's Garden.

I'm not going to share all the photos because I've put together a slideshow. 
I will show the front and back cover, and say just a few things about it.

Here's the front cover:


Isn't that fun?
I decided that a file folder made the perfect cover for a Sherlock Holmes themed journal.
It's a very masculine journal with LOTS of room to write...so a real journal! ;o)
It would make a great gift for the guy in your life.
After I did the stamping on the cover,
 I decided that a case file wouldn't be stamped so cleanly.
So I went back and added the lines.
I added a small key with a bulb pin, and wrapped the journal with some jute twine.

I folded the file folder so that it formed a couple of fun pockets,
including this big one on the back cover.

I had so much fun putting this one together. 
I reinforced th spine, and stitched in the two signatures.
Other than the kit pages, I added coffee dyed paper, 
and some specialty parchment/tracing type paper.

I've made some ephemera clusters that have been paperclipped in place.
There are also tuck spots and pockets that hold LOTS of extra bits.

As I was putting it together I kept thinking along the lines of an actual case.
As I added the tabs, I was thinking they should be labeled:
crime, evidence, suspects, etc. 
I also tried to find some "mystery" sounding music to go with the video. ;o)

Here's the slideshow:


I tried to make it nice and short for you.
Not all the pages are shown but the ones I missed are just duplicates

* * * * *

Thanks so much for stopping by!
I'll be back soon with some more fun projects! :o)

Friday, 8 January 2021

A Fun New Project Share!

 Hello, my friends!

I'm really excited about the post I have to share with you today!

As many of you know, I really like to make mini albums.
My favorite tend to be of the vintage variety.
I had some ideas for an album I wanted to put together.
I started looking around to see what I could find, 
as far as dies or cut files,
that would fit the ideas I had in my head.
I did find a variety of dies that would work,
but the cost involved was rather ridiculous.

I then turned my focus to my collection of cut files. 
I found some files from My Scrap Chick that had potential.

I got busy in Cricut Design Space.
Using the cut files I had,
I set about slicing, welding, attaching, and flattening.
Up to this point I had only ever attached! lol

When I was all finished I had exactly what I wanted!
It's a cut file full of mix and match pieces and various layers.
There are even pockets!
This one file is all I need to make a multitude of creative albums!
 
Okay, that's enough words, right? 
I'm going to show you my album photos now.
Then at the end of my post I'll have some good news to share.

Here we go:


This is the front cover.
The base of the album is all kraft cardstock.
On the cover I used a full size mat with a large oval.
Under it I layered a green mat with a smaller oval - forming a frame.
Then I stamped the Scripture on an even smaller oval,
and adhered it in place.


The flowers are all cut files from My Scrap Chick, linked below.


I stamped Scripture verses in several of the ovals throughout.
I thought this one was perfect for my cover!


Here is the first page. 
The album base is kraft cardstock. 
You can see by the matting that there are several layers.
The one on the left is smaller than the one on the right.
You can do them individually, or you can layer them up.


Then we have this option for a layer.
Isn't that pretty?
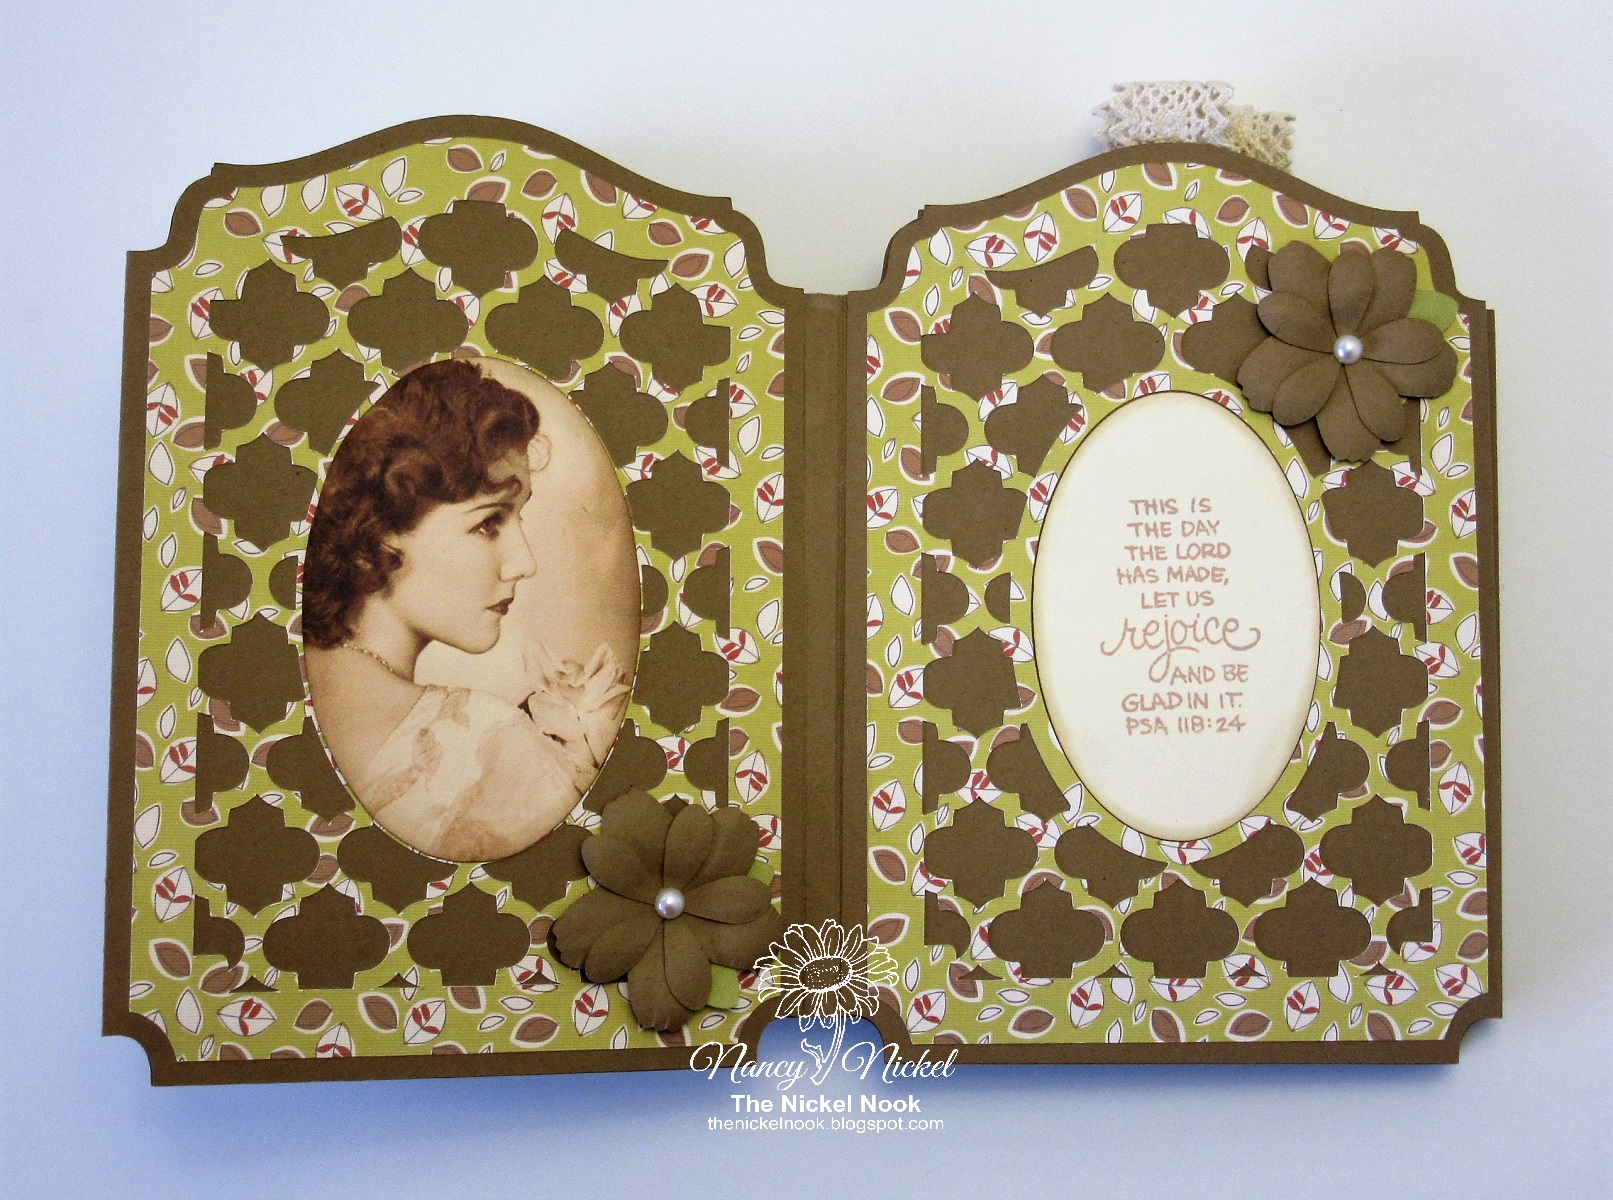
Here the mat has an open design with an oval center.
This layer also has two options:
a solid oval center, or an open oval frame center.
On the left page it is solid, and I've added a photo over it.
On the right page, it is a frame, and I've added a stamped oval in it.


On the left we have another of the full mats.
On the right is what I think of as my "cage page".
It is actually a pocket page, with a full mat inserted into it.
On the mat is the oval image.


You can see what I mean in this photo.
The insert pulls up, and you can see right through the page.


You can see the back of that page in the photo below. 


On the right side is one of the smaller mats again.
I just added the image on top and added a flower.


This page has two of the full size mats.
However, this time one has an oval cut out of it.
I simply used the cut out oval as a template to cut my photo.
Then I adhered it in place.


On the left is another one of the cut-out mats with the oval frame.
This time I added a stamped oval that was slightly smaller.
On the right is another of the smaller mats with the photo added on top.


Here is the back cover.


Each of the pages is a pocket open on the top. 
There are two insert options. 
The one shown above is a single layer.
I've added a tab of lace to the top for a pull.


This is the other insert option.
It folds up and tucks in the pocket.


Here you can see the spine of the album. 
If you don't like the hinge folds showing,
you can simply cover it with a strip of lace, or a piece of cardstock.
I made a hinge piece, to which I added the covers and pages.
It allows 1/4" between pages, so there is room for flowers and embellishments.
The pages and covers are actually like a card.
They are folded, and the open side adheres to the hinge.
The front and back cover are adhered completely - without pockets.
The five inside pages are adhered over the hinge, and along the bottom.
This leaves the top open, and the fold to the side.
Does that all make sense to you? lol
Alternatively, you could bind it with rings,
or any of your favorite binding tools!

* * * * *

Here's the good news...
this file is available for sale at My Scrap Chick!

It's now available for you to purchase!

If you need any help with putting these pieces together, just let me know.
I could make some tutorial posts.
However, I suggest you pick some paper, and just have fun cutting.
You'll end up with buncy of fabulous pieces that will all work together. 
 
* * * * *

My Scrap Chick Products Used:


Other Materials Used:
Recollections Kraft Cardstock;
 S.E.I. Dill Blossom Collection;
Memento Ink - Desert Sand;
Crafts Pearls;
Vintage Lace - Gift From Susan.

* * * * * 
Thanks so much for stopping by!
I'll be back soon with another fun project share!

 * * * * *
Have you signed up for the My Scrap Chick newsletters yet?
Don't forget to do that!
You really don't want to miss out on any of the great freebies! :o)

* * * * *
Here are all the links you need:


Blog Archive