Friday 31 August 2018

Clear Scraps - Fun Shovel Shaker Card

Hello, my friends!

I'm back with a new project share for Clear Scraps!

Today I am sharing this super fun Mini Shaker Shovel,
which you can find HERE.

Since summer is almost over, I thought I better use this one quick!
Then I realized it would be super cute for a Winter card too! lol 

Here's my card:


I found the cute background paper in my stash of printable papers.
I thought it was perfect for this card!
I layered it up on some coordinating cardstock.


The shaker shovel includes several layers.
I covered the back layer with the yellow cardstock.
I covered the front layer with the red cardstock.


Before adhering the layers all together, 
I added the shaker elements. 
I also remembered to remove the protective film from the acrylic! ;o)
Finally, I stamped, punched, and layered the "Hello Sunshine" sentiment.


Other Materials Used:
Papers: Recollections - Cardstock,
  Digital Paper - Echo Park Summer Bliss;
Punches: Stampin' Up - Oval and Scalloped Oval;
Stamp: Your Next Stamp
Ink: Memento - Tuxedo Black;
Shaker Elements: Assorted Sequins, Beads, and Glitter.

Clear Scraps Products:


* * * * *
Thanks so much for stopping by today!
I'll be back with another project share next week! :o)

* * * * *
Here are all the links you need:

Wednesday 29 August 2018

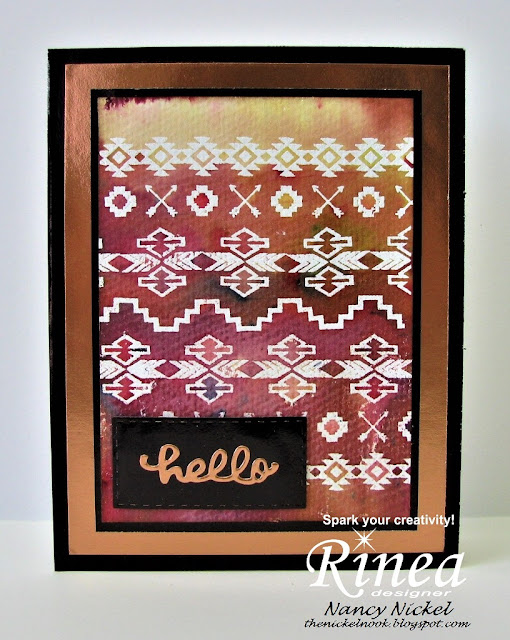
Rinea - Hello Card with Joy Clair Stamps

Hello, my friends!

I'm back with a new Rinea project share, using Rinea Foiled Paper!
This is my second partnership post with Joy Clair Stamps!

Here is the card I made:


Today I am using the gorgeous Earth Tones Foiled Paper Variety Pack,
along with the wonderful Aztec Background Clear Stamps from Joy Clair.


I began with a piece of watercolor paper.
Using Versa-mark ink, I stamped a series of the stamps down the paper.
Then I heat embossed it with white embossing powder. 
Once cooled I sprinkled the piece with Color Bursts,
and spritzed it with lots of water, until I had the colors I wanted.
Once it was dry, I matted it with the Ebony/Gold Glossy Foiled Paper
and then one more layer of Ebony/Gold Glossy Foiled Paper.
Then I mounted it onto a cream colored card base.


Finally, I die-cut a rectangle and added a die-cut "hello",
and adhered it in place on the card front.


Here's one final look at the finished card:


* * * * *
Thanks so much for stopping by today!

* * * * *
Here are all the links for you:


Simply Crafty SVGs - Part 3 of Card and Card Holder Series

Hello, my friends!

Welcome to a new project share for Simply Crafty SVGs!

This is Part 3 of my fun Series.
If you missed it...you'll find Part 1 HERE,
and Part 2 HERE.
Each post includes a card/cards, along with a card holder,
both available in the shop.
I think sets like these make fabulous gifts,
so this may help you get ready for the gift giving season well in advance.
They are also really great to keep and use for organizational purposes.
I hope to share a variety of styles, so as to appeal to all of your tastes! :o)

* * * * *
Part 3 Files:

Card: Castle Gate Card

Holder: Vintage Mailbox

We'll start with the card:


Isn't that cool? I love this file!
I cut down one of the hinge options, and used it as a latch.
Later you'll see a photo without it because I couldn't decide if I liked it. 


I inked all the edges of the paper before assembling it.


I used Rinea Foiled Paper for the hinges and the cage part.
They cut perfectly on my Cricut!


Other Materials Used:
Machine: Cricut Explore Air;
Papers: Recollections - Cardstock, Mr Smith's Workshop;
Ink: Distress Ink - Walnut Stain;
Specialty Paper: Rinea Foiled Paper - Glossy Silver, Glossy Black.

* * * * *
Now we move on to the card box.

Since my card was a so medieval looking, I tried to make my box match.
I pulled out my old DCWV Once Upon A Time Stack.
You'll believe this is a medieval tapestry, right? 
It's got gorgeous glitter on it.
Then I cut off the trim and added it to the front flap.


All the edges of everything were inked.


The card measured 5 1/2", so it needed a bigger box.
Here it is inside the box.
This box will hold LOTS of cards!
I added a half circle of velcro for a closure.


This file comes with several decorative options,
and lots of other embellishments. 
You can see them all in the shop.
I kept mine very simple to match the theme of my card.


Other Materials Used:
Machine: Cricut Explore Air;
Papers: Recollections - Cardstock; DCWV - Once Upon A Time;
Ink: Distress Ink - Walnut Stain.

* * * * *

Isn't that a lovely way to store cards,
or a beautiful way to gift a set of cards?

So head on over to the shop and pick up these files:

Card: Castle Gate Card

Holder: Vintage Mailbox 

Thanks for stopping by today!
I hope you found some inspiration!
I'll be back next month to share Part 3! :o)

* * * * * 
Here are all the links:


Tuesday 28 August 2018

My Scrap Chick - Decorated Trifold Card

Hello, my friends!

Welcome to a new DT post for My Scrap Chick!

Today I am sharing THREE files from the shop,
and they're all on this one pretty card!

I started with the wonderful Trifold Card base.
This is such a fun card cut!
You don't have to do any measuring or thinking! ;o)
The file includes the base, and the three panels for each side.

Next, I used several words from the Good Words Set 1 file.
"Hello" is on the front, and "Sweet Wishes" on the back.

Finally, I used the Flower Pretties file to finish things off.
I created simple double layered flowers in small, medium, and large.

Here's the front view of my card:


Here's the one side:


Here's the other side:


So much fun to put together!


Other Materials Used:
Papers: DCWV - Citrus Stack;
Ink: Distress Ink - Walnut Stain, Martha Stewart - Orange;
Bling: Crafts - White Pearls.

Find the Files here:

Trifold Card

Good Words Set 1

Flower Pretties

* * * * *

Thanks so much for stopping by!
I hope you'll head over to the shop and give it a try! 
Have you signed up for the My Scrap Chick newsletters yet?
Don't forget to do that!
You really don't want to miss out on any of the great freebies! :o)

* * * * *
Here are all the links you need:


Monday 27 August 2018

Whisker Graphics - Ways to Use Bitty Bags in Your Journals

Hello, my friends!

I'm back to share a fun project created with products from the Whisker Graphics Shop!
I'm also over on the Whisker Graphics Blog today.
You're going to want to go over there and subscribe in the sidebar, if you haven't already done so. 
That way you won't miss all the fun shares from the rest of the DT,
and all the fun ways you can use these great products! 

* * * * *
In today's post I am sharing a number of ways to use Bitty Bags in your journals.
Whisker Graphics has an incredible selection of these fabulous bags!
I will link to the size only but you need to check out the amazing color selection!
I chose bags that kept with my journal color.

I'm filling a journal that I previously decorated for Clear Scraps.
You can find the link HERE.
This is the front of the album:


On the inside front cover, I adhered a Bigger Bitty Bag - Gold Metallic.
I trimmed just a little bit off the top, and punched a half-circle.
This is the perfect spot to keep extra large tags that I add as pages.
On the right I added a matching Little Bitty Bag - Gold.
This is the perfect spot for a Large Gift Tag.


Here's another option for the same Little Bitty Bags.
Turn them sideways on the page, and insert the Large Tags.


Here I've used a Middy Biddy Bag - Gold.  
With two small folds, it now holds a very large cardstock tag,
and one of the Large Colored Tags.


I think this bag is my very favorite from all of the bags! :o)
This is just a beautiful Middy Bitty Bag adhered to a page.
Then I cut a very large kraft tag to fill it. 
It fits in beautifully with the color scheme of my album!


Moving on to one of my blue pages,
Then I cut a large matching cardstock tag to fill it. 
This provides a wonderful opportunity to add some ephemera, or some stamping.


Here's another idea using the Middy Bitty Bags - Gold.
I took two of the gold metallic bags, and adhered them together along three sides, 
leaving the one long side open.
The holes were punched in the side that was adhered together. 
This creates a great pocket page!
It holds two big tags in the top bag pockets, 
and a couple of tags along the side pocket.


This is the other side of it:


For my final idea, I have trimmed and layered two bags on top of each other. 
I began by trimming a Middy Bitty Bag down to a square, 
and adhering it to the page.
Then I took a coordinating Little Bitty Bag
trimmed it down, and adhered it on top of the other bag. 
I cut a large cardstock tag for the one pocket, 
and added a Large Colored Tag to the other. 


That's just a few of the ways I'm using these great little gift bags!
They're so much fun!
Head on over to Whisker Graphics and check out all the 
wonderful colors and patterns that are available!

Next time...I'll show you how I'll add twine to these pages!
* * * * *
Thanks for stopping by!
I'll be back again soon with another project share!

Here are all the links you'll need:

Friday 24 August 2018

Publication Share!

Hello, my friends!

I know most of you have already seen this over on facebook!
Thank you again for your overwhelming response! 
I did want to document the event here on my blog too.
So if this is repeat news to you...feel free to ignore it! ;o)

I'm really thrilled to have four of my cards published in the
Fall 2018 Issue of Creative Scrapbooker Magazine!


These are the cards that are in the magazine:


This one for Swedish House Crafts, found HERE.


This one for Swedish House Crafts, found HERE.


This one for All Dressed Up, found HERE.


Finally, this one for The Project Bin, found HERE.

* * * * *
It's my favorite magazine...
...filled with lots of information and inspiration!
I highly recommend it! :o)

* * * * *
Have a WONDERful weekend!
See you again very soon!


Wednesday 22 August 2018

Clear Scraps - Thank You Wood Card

Hello, my friends!

I'm back with a new project share for Clear Scraps!

Today I'm featuring the "Thank You Wood Card",
which you can find HERE.

These wood cards are so much fun to play with!
There are so many styles to choose from too.
You might remember that I shared a plain wood card with you previously.
You can find that post HERE.

The card I'm sharing today has "Thank you" beautifully cut out of the front piece,
and a plain back piece. 

Here's the card I created:


I began by covering the front and back pieces with Picket Fence Distress Stain.
I didn't bother with the insides because I knew they would be covered with paper.
Once the distress stain was dry, and using a fan brush, I added two very light coats of Tattered Angels Glimmer Glam in Hammered Copper. 


Here's a look at the back of the card.
The shimmer and glitter is so pretty!


Behind the "Thank you" I added a piece of the Rinea Glossy Foiled Paper in Copper.
It shines through beautifully and makes the words pop out!


To attach the front to the back, 
I simply cut cardstock to fit, scored it across the top,
and adhered it in place on the inside of the wood pieces.
Now there's a spot to stamp a sentiment and write a message!


Finally, I added a sparkly copper bow to the front of the card!


Other Materials Used:
Paper: Recollections - Cardstock;
Color: Tim Holtz Distress Stain - Picket Fence;
Tattered Angels Glimmer Glam - Hammered Copper;
Ribbon: Crafts;

From Clear Scraps:


* * * * *
Thanks so much for stopping by today!
I'll be back with another project share next week! :o)

* * * * *
Here are all the links you need:

Blog Archive