Saturday, 27 February 2021

Scrappy Tails Crafts - Baby Card Crazy Hop!

Welcome, everyone!

You should have arrived here from Kimberly's Blog.

It's time for Scrappy Tails Crafts Baby Card Crazy Hop
and I hope you'll join in on the fun!

A little added benefit - if you comment on every blog post & video along the hop,
 you will be entered into the chance to win a $25 gift certificate.
The more you comment...the more opportunities to win!
 Also, please consider subscribing to everyone on the hop.
You never know when that might add to your chances of the WIN! 

Today I am featuring:

Heart Assortment Metal Dies

and the A7 Pop Up Box Gift Card Craft Die.

I still had these pretty little heart dies all over my work table from my last project.
I had pulled out the gift card die for another project.
The two die sets side by side inspired this fun card.


I pulled out a baby themed paper pad and got to playing!
Isn't it fun?
I know that in the photos the hearts kind of disappear into each other
but they don't in real life.


The gift card die forms this adorable little stitched pocket.
It's just perfect to put on the front of a card,
and fill with a lot of love.

To finish everything off,
I outlined each of the hearts with Stickles.

A baby card needs some sparkle, right?

Scrappy Tails Products Used:

Heart Assortment Metal Dies

 A7 Pop Up Box Gift Card Craft Die.

Other Materials Used:
Recollections Cardstock;
AC My Baby Paper Pad;
Martha Stewart Blue Ink;
Frosted Lace and Baby Blue Stickles.

* * * 
Thanks so much for stopping by!

*** Next up... head over to Sabrina's great Video HERE!! * * *

Good luck to all of you!

* * *

Friday, 26 February 2021

Kate Hadfield Designs - Fun Traveler's Notebook Shares

  Hello, my friends!

This was going to be my second Guest Design Team post for

Kate Hadfield Designs. 

I'm very happy to share that I have been invited to the DT fulltime!
I'm so excited to be working with this great company,
and I look forward to sharing more with you.

I find these doodles very inspiring, and I think you will too.
These hand-drawn doodles are perfect for any digital or hybrid projects.
I've used the print/cut feature on my Cricut Explore Air.

This time I am sharing several fun Traveler's Notebook spread.
I know I've mentioned before that I'm really loving this format for creativity.
I've decided that these pages don't all have to have a purpose;
they can just be FUN!

This first page was create in honour of Kate's 14th Anniversary celebration.


Fourteen years!!! Isn't that fantastic?
That is definitely a reason to celebrate "every day"!
I used:


Here's a fun page that's ready for any occasion.
I can slip a photo into the frame and do some journaling.
I used:


Aren't these doodled flowers fabulous?
They were so fun to play with!
I layered them all up and framed an appropriate quote.
I used:
 
* * * * *
Kate Hadfield Designs Products Used:

Other Materials Used;
Cricut Explore Air Machine;
Traveler's Notebook.

* * * * *

I have to tell you that I am having the BEST time working with Kate's doodles!
They just make me HAPPY!

* * * * *

Here are all the links:

Kate Hadfield Designs Shop

Kate Hadfield Blog

Kate Hadfield Facebook

Monday, 22 February 2021

Altair Art - Baby Boy Mini Album

 Hello, my friends!

I'm back today with a new project share
 as Brand Ambassador for Altair Art Scrapbooking Papers.

Today I am featuring the sweetest paper collection called:


I have put this album together using my 
The album that I am sharing today is a good example
of the versatility of this album design.

Here's the front cover:


The matting on the front cover is open on the top.
This allows a photo to be slipped in behind it.
This photo on the cover, as well as the one other photo I included in the album,
are both photos of my big brother when he was a baby.
 
The back cover, and spine, are decorated to coordinate with the front.


On the left page is a belly band.
I had a little envelope ready to slip in behind it,
but took the photo without it.
It's a great place to tuck a lock of hair from the first haircut,
or any other special little items.


All the embellishment bits are open on the top
to allow for a photo, or journaling card, to be tucked behind.


More fun spots to add photos.


I call the cutout page on the right my cage page.
One of the tag inserts slip into it.
It's a great place to write info:
name, date of birth, weight, etc.
It's also a fun spot to add photos or stamping.


I love the little birdies!


These two matted pages are again open to add photos,
or whatever you want.


I think this is my favorite of the papers!
It combines all the cute little elements,
and the fabulous colours!


Each page is created with a top loading pocket,
just like the cage page.
Three pockets house the large double tag shown below,
and three pockets house the single tag.


Altair Art Products Used:


Other Materials Used:
Recollections Cardstock;
Offray Ribbon.

* * * * *
Thanks so much for stopping in today! 
I'll be back soon with more projects using these pretty papers!

Oh, one more thing...
Altair Art also has a wonderful monthly Challenge,
with a chance to win some fabulous prizes!
Check it out at the blog.

* * * * *

Here are all the links for you:


Vintage Hinged Album - Tutorial

Hello, my friends!

Today I want to share a tutorial with you,
on how to put together my Vintage Hinged Album.

This is my first cut file design,
and it's available to purchase at My Scrap Chick

I know that many of you have already purchased this file,
and I really appreciate the encouragement I've received.

I might have to try doing this again! ;o)

This really is a very simple album to put together.
It's even easier to customize it to suite your needs.

These are the two albums that I have made, so far:


You've probably seen the album on the left. 
The album on the right is my most recent make,
and it will be posted right after this tutorial goes live.

* * * * *

There are some simple steps to putting this album base together.
Once the base is finished,
you can go on to make a quick and easy album,
or you can choose to make it more complicated.
The creative possibilities are truly endless!

Here we go!

Theses are the base pieces: the pages, and two hinge options.
I use the larger hinge piece, and I cut 6 of the pages.
Two are for the front and back cover.

Fold the hinges on the score lines, as shown in the photo.
From here on, I will be working with the large hinge.
The smaller hinge gives you the option of choosing just how many pages you want.
The pages are folded in half.


This is a closer look at the right side of the hinge.
The 1/2" lines form mountains - the 1/4" lines stay flat.
On this side, I apply double-sided tape to the two end pieces on this side.


This is the back side of the scored hinge.
On this side, I apply double-sided tape as shown in the photo.
Leaving the outside strips alone,
I peel off the backing of each of the other strips, and adhere the 1/2" sides together.


This is how the hinge piece looks once it's all put together.
The two outside flaps are for the front and back cover,
and still have double-sided tape on both sides.
and the other five are for the inside pages.


Now it's time to attach the front and back covers.
I peel the backing off the tape on the back of one side of the hinge.
Lining the cover up against the score line,
I adhere it in place as shown in the photo.
I repeat this for the back cover.


Here's a closer look.
One side of each cover is attached to the hinge.


 I remove the backing from the other side of the taped strip,
I spread liquid glue all over the one side of the cover.
I know the glue doesn't show very well. ;o)
I then fold the cover over the hinge and burnish it all very well.


Here the back cover is in place.
I repeat for the front cover.


Now you have the front and back cover in place.
For the rest of the pages, I like to use my Best Glue Ever.
It's fabulous for all these paper projects!
It allows some time to ensure that I have my page exactly where I want it on the hinge.
If you're comfortable using double-sided tape for this
it will work very well too.


Now I will show you what I do with the pages.
I apply the glue to one side of the hinge and adhere the page to it.
Then I put glue along the other side of the hinge,
and a line of glue across the bottom of the page only.
Then I fold the page closed and burnish.
This forms a top loading pocket.
If you don't want a pocket to fill,
then just apply each page in the same manner as the covers.
 

I repeat this process for the first two pages, as well as the last two pages.
This leaves the center hinge free for what I call my cage page.


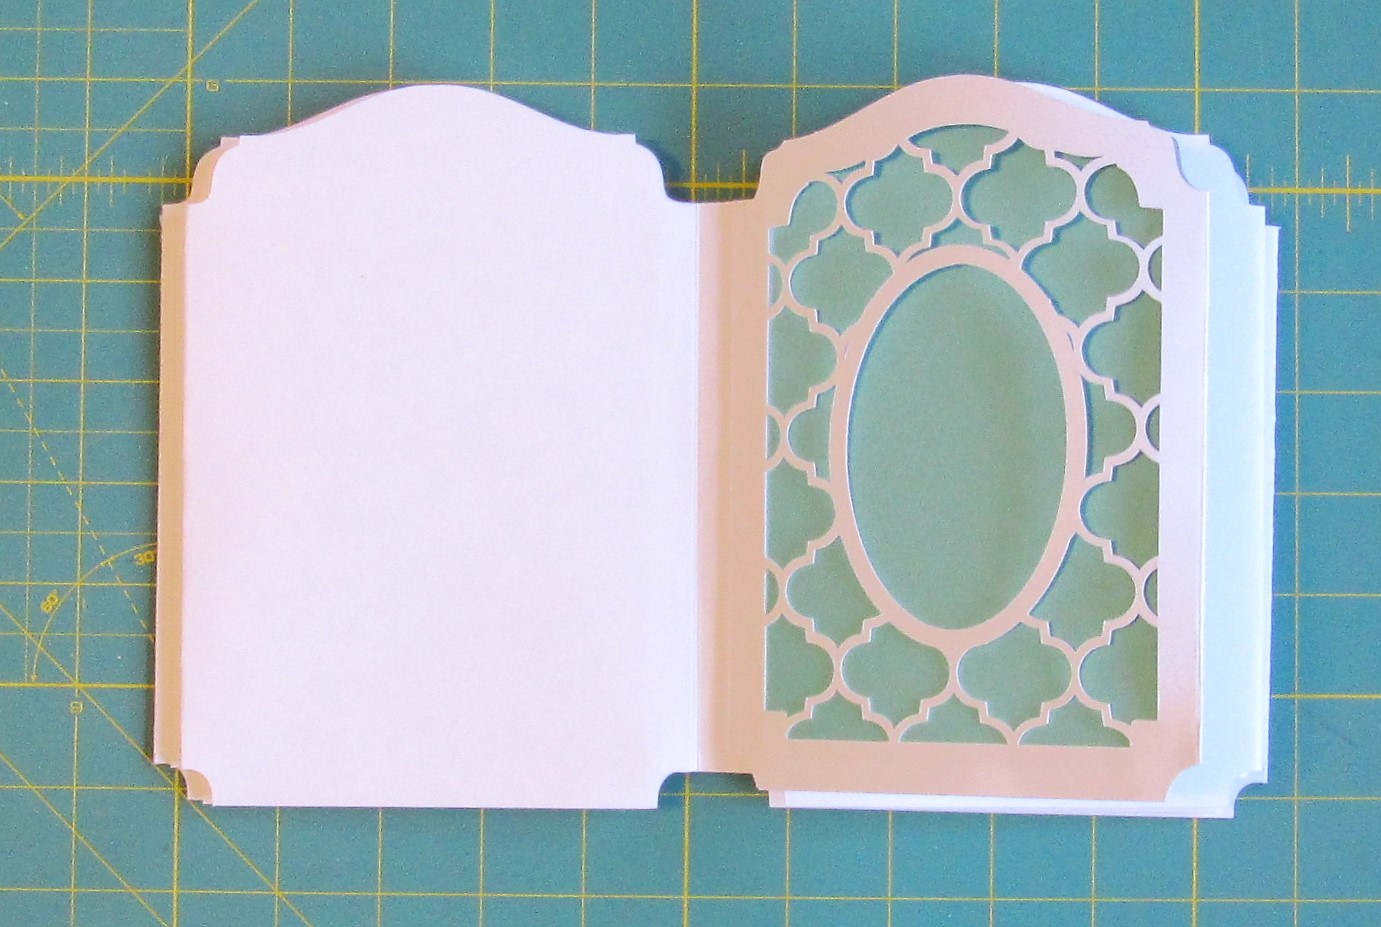
In this photo you can see a second page option (cage page), along with an extra oval cut.
The bottom row shows the two tag options.
One is a single tag, and the other folds in half before inserting into the pocket.
This allows extra space for journaling or photos.


I begin by folding the page in half along the score line.


I then apply the cage page in the same manner as the previous pages.
This page is created slightly smaller than the other pages.
It's a delicate page, and I wanted it tucked in a bit for protection.
I adhere it to the hinge carefully, ensuring that the hinge does not show through the "cage" part.


Here it is with a single tag tucked into it.
It's a fun spot to add a photo or some stamping.

Now the album base is finished!
It's ready for you to decorate and fill however you choose.


These are all layers that fit over the base pages.


These are some smaller cuts that fit on top of the last set.
They can be used on their own on top of the base pages,
or they can be layered on top of any of the bigger layers.

* * * * *
I hope this helps those of you that needed more information
on the construction of this album.

You can see my original Vintage themed album HERE.
You can see my Baby themed album HERE.

I hope you have lots of fun with this Vintage Hinged Album file.
Leave a link below in the comments if you've made something.
I'd love to see it! :o)

Friday, 19 February 2021

February Remember Journal Pages & Some Other Journal Fun

Happy Friday, my friends!

Today I'm sharing my February pages in my Remember Journal.

I also have some other fun journal projects to share.
It's been a productive week around here!

Here's a look at some fabric journal covers that I've made:


I have seriously downsized my fabric collection,
yet I still have as much fabric as I do paper! ;o)

These fabric covers are all lined with a coordinating paper.
Several of them are themed...inside and out.
Here's a peak at the insides:


This will be my Easter Journal,
and it's the first one that I'm going to fill!


Now...onto my Remember Journal pages:

As I mentioned in my initial journal post,
this journal is a combination of tea dyed paper,
and lace paper from Caroline's Etsy Shop.

 The images are all from the monthly printables from Caroline.
The fairy in the mason jar is just too cute.

Above, I tucked it behind two pretty tickets.
Below, I tucked another one into the lovely pocket.

On the right, I used half of a floral strip as a belly band for the postcard.


On the final February page,
I used the other half of the floral strip.
The flap of the envelope tucks over it.


I'm now ready to get started on my March pages.
I'll be back to share them next month.

 I'll add a Remember Journal Label in my sidebar,
in case you're interested in following my progress in this journal.

* * * * *

Just a little more information regarding Caroline's Craft tree.
Caroline shares great projects and tutorials on her youtube channel.
She is very generous and inspiring!
She sells both digital and finished products in her Etsy shop.
Oh, and she's a fellow Canadian! :o)
I really hope you go check her out.

* * * * *

Here are all the links for you:


Sunday, 14 February 2021

Maker's Movement - You're My Jam

Hello, my friends!
Happy Valentine's Day to you all!

I'm back today with another new project for Maker's Movement
I had to sneak this one in before Valentine's Day was over.
I'm actually going to give this card to my sweet husband
because strawberry jam is my favorite! :o)
I used my wonderful Crossover II Machine for all my die-cutting on this project.

I've also used:


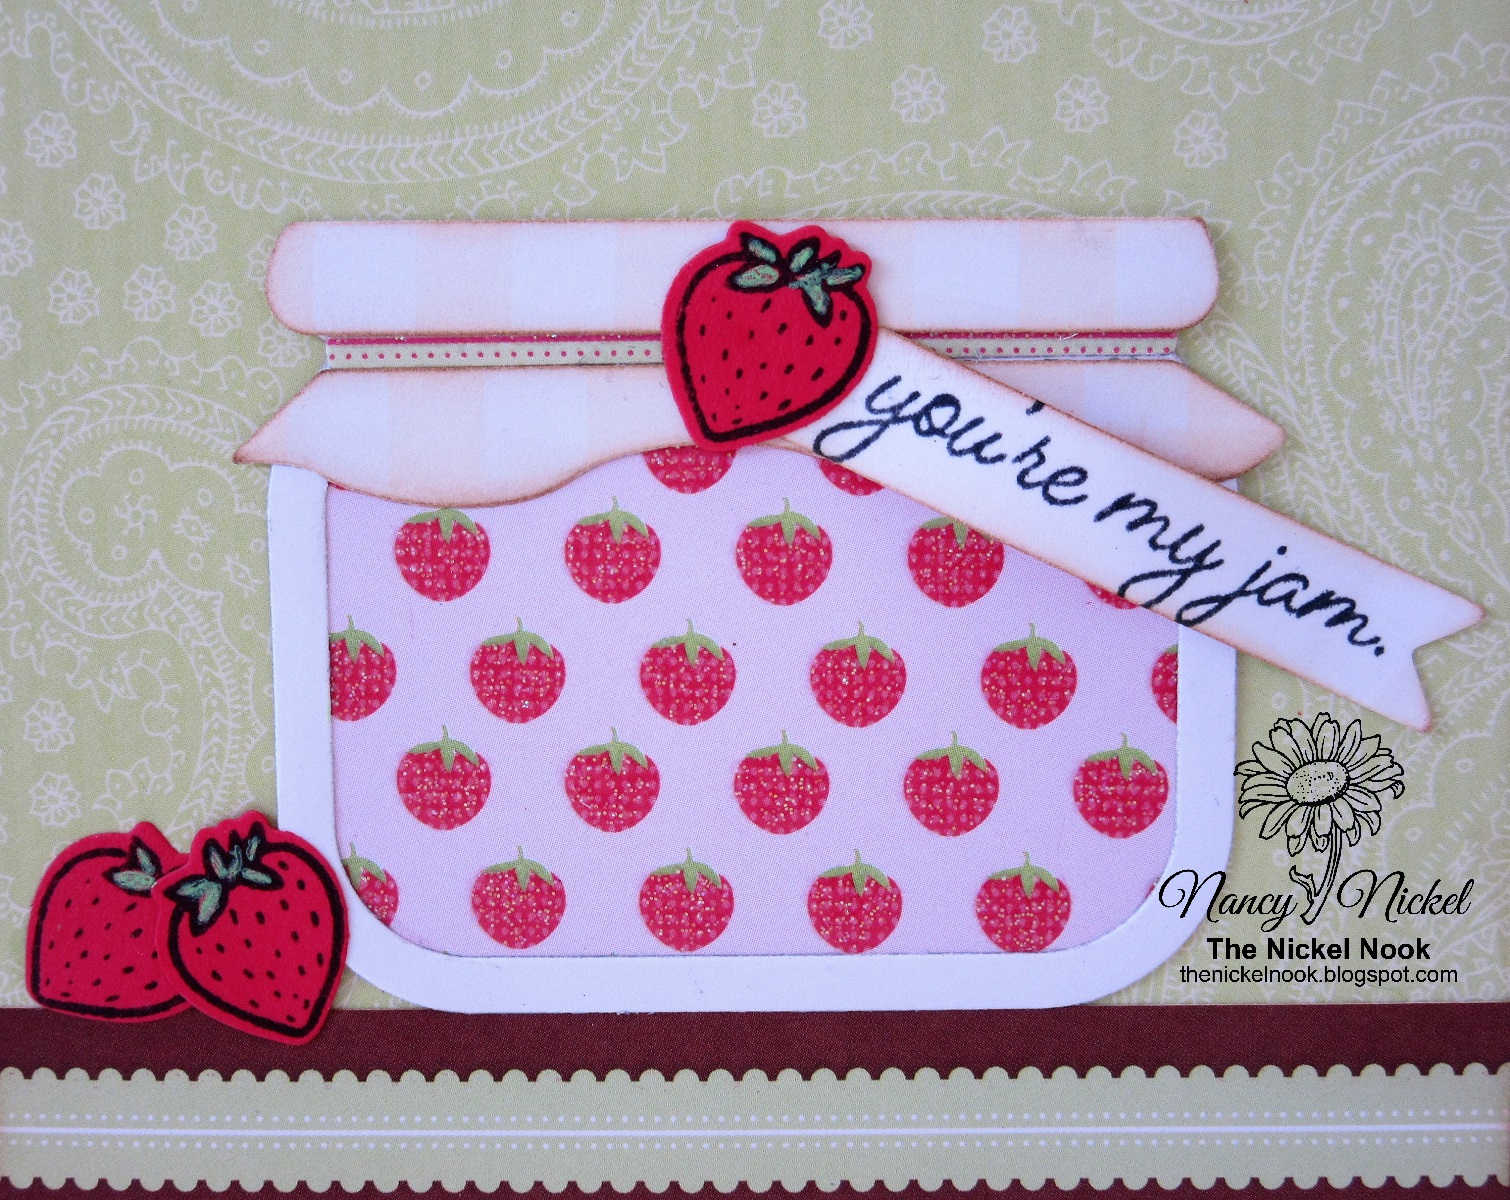
Here's my card:


This is another stamp & die set that makes a great shaker card.
Since I just shared one of those,
I decided to show you a strawberry jam jar.
Isn't it cute?


The strawberries are so glittery and yummy!
So I set the little jar on a fun trimmed shelf.
Then I added a the stamped sentiment, along with a few stamped/cut strawberries.
Don't they look delicious? 


Maker's Movement Products Used:

Crossover II Fabric & Paper Cutting System,


Other Materials Used:
DCWV The Sweet Stack;
Recollections Cardstock;
Green Gel Pen;
Memento Tuxedo Black Ink.

* * *
Thanks so much for stopping by!
I'll be back soon with another fun project!

* * *

Here are all the links for you:

Maker's Movement Facebook  

Friday, 12 February 2021

Maker's Movement - You're the Sweetest Shaker Card

 Hello, my friends!


I'm back today to share a fun project for Maker's Movement
It's a super "sweet" shaker card!

I used my wonderful Crossover II Machine for all my die-cutting on this project.

I've also used:


This set comes with several great stamp options!

Here's my card:


This set is so much fun!
It's so easy to make a fabulous shaker card.


I love the beautiful font of the "Sweetest" die,
and it includes the shadow die.


Here is a closer look at my candy jar.
I backed it with some lovely glittery candy paper.
Then I filled it with some of the pretty Sprinkles,
choosing some hearts in read and pink,
along with the little pink balls that look like candies.
Then I used the small circle die to cut another fun candy,
which I attached to the top of the jar.


Maker's Movement has everything you need to create
really fun and unique shaker cards!

* * * * *

Maker's Movement Products Used:

Crossover II Fabric & Paper Cutting System,


Other Materials Used:
DCWV The Sweet Stack Papers;
Recollections Cardstock;
Memento Tuxedo Black Ink.

* * *
Thanks so much for stopping by!
I'll be back soon with another fun project!

* * *

Here are all the links for you:

Maker's Movement Facebook 

Blog Archive