Showing posts with label Joy Clair. Show all posts

Monday, 16 September 2019

Rinea Tutorial - Thanksgiving Place Card

Hello, my friends!

Today I have a fun tutorial for Rinea.

I'm going to show you how to make this fun project
using these fabulous foiled papers,
in partnership with Joy Clair Stamps!

With Thanksgiving fast approaching, 
in less than a month here in Canada,
I thought I would share a fun place card idea.
These cards would be lovely decorating the table.
There is a spot left right above the "Thankful" to add a name.
This could easily be done with a marker.


Here's how I did it:


Materials Used:
Joy Clair Stamp - Thankful and Blessed;
Imagine Crafts - StazOn Ink - Piano Black;
Stamp Positioning Took;
Tiny Scissors.


1. I began by doing all my stamping on a variety of foiled papers. I did some extra stamping while I was at it - for future projects.  


2. Using my tiny scissors, I fussy cut the sunflower images out. One flower from Gold/Gold Starstruck Foiled Paper, one flower from Copper/Copper Starstruck Foiled Paper, one stem from Emerald/Emerald Starstruck Foiled Paper, and one flower center from Mocha/Mocha Starstruck Foiled Paper


3. Then I cut a piece of the Mocha/Mocha Starstruck Foiled Paper measuring 4 x 5, and a piece of the Copper/Gold Glossy Foiled Paper measuring 3 3/4 x 4 3/4. 
4. I scored down the center of each piece.
5. Using the StazOn ink, and a stamp positioning tool, I stamped the sentiments on each side of the Copper/Gold Glossy Foiled Paper.
6. I adhered these two layers together, lining up the score line.


7. I adhered the sunflower in place on the one side of the place card. First the copper flower, then I added the gold flower with a little piece of foam tape. I added the stem, tucking it under the copper flower, with a little piece of foam tape behind the leaf. Finally, I added the flower center.


8. I fluffed up the flower petals to give it some extra dimension.


Here's the stamping on the other side:


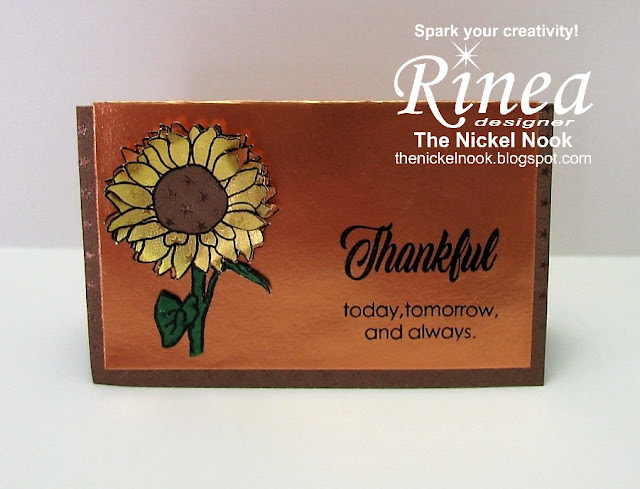
 It's the perfect Scripture verse for a Thanksgiving Place Card!
Then you can send the card home with your guest,
as a reminder to always be Thankful! 


Thanks so much for stopping by today!
I'll be back again soon with a new Rinea project! 

* * * * *

Here are all the links for you:


Monday, 2 September 2019

Rinea Tutorial - We Rise ATC

Hello, my friends!

Today I have a fun tutorial for Rinea.
This month we're in partnership with Joy Clair Stamps.

I'm going to show you how to make this fun ATC
using these fabulous foiled papers and stamps!


Here's how I did it:


Materials Used:
Joy Clair - Fly With Me Stamp Set;
Imagine StazOn Pigment Ink - Piano Black;
Stamp Positioning Tool;
Sizzix ATC Die.


1. I began by choosing my stamp designs, and stamping them on my chosen colors of foiled paper, using the StazOn ink. 
*I did my stamping with a stamp positioning tool. This helps prevent any sliding or mistakes. 


2. Once the ink was all set, I took my tiny scissors and fussy cut all the little pieces out. 
3. I then cut out my ATC base, and my ATC background.
4. I stamped the sentiment on the ATC background.


5. I adhered the ATC background onto the ATC base.
6. I adhered the fussy cut banner in place on the hot air balloon, as well as the basket.
7. Before adhering the hot air balloon in place on the ATC background, I curved the balloon with my fingers. I placed some foam tape under the center of the balloon, and then adhered the basket and the edges flat against the background. 


8. Finally, I adhered the clouds in place on the background. I positioned them with the clouds extending off the base, and trimmed excess. 


Here you can see some of the dimension...


...and all the pretty shimmer of the beautiful foiled papers!


* * * * *
Thanks so much for stopping by today!
I'll be back with some more Rinea Inspiration soon!

* * * * *

Here are all the links for you:


Saturday, 6 October 2018

Joy Clair - Around the World CardMaking Day Blog Hop

Hello, my friends!

Warm welcome to all my visitors today!
I'm happy that you're here! :o)


I'm thrilled to be joining a very talented group of ladies,
to bring you some fun inspiration, 
using wonderful Joy Clair Stamps!

I've used the lovely Hugs and Smiles Clear Stamps
to create my card.

Here it is:


I had lots of fun playing with gold embossing powder,
and doing some simple layering!
I even embossed around all the edges of my cardstock,
so that I had a gorgeous matching frame around the image,
as well as the sentiments.


Here's a closer look at the layers.
I used foam tape to adhere them in place.


 Here's one final look at the finished card:


Here's a look at the pretty stamp set:


* * * * *

Here are all the details of the Hop:

>>>HOP ALONG FOR THE CHANCE TO WIN PRIZES<<<

We're giving away three Stamp sets from Joy Clair Store! Just leave a comment on every destination along the Hop to be in with a chance to win!

Comments close at 23:59 EST on 7th October 2018.

Don't forget that we have a lot more going on the rest of the day! We hope to see you back here for the new events - there will be lots of opportunities to be inspired and to get crafty with us!
Happy hopping! 

BLOG HOP LINE UP:

Ready for more inspiration? Here is the list of my friends that are part of this big celebration "Around the World Card Making Day Blog Hop with Joy Clair"
YOU ARE HERE! > Nancy Nickel < YOU ARE HERE!

* * * * *
Have fun! :o)

Around the World Card-Making Day with JOY CLAIR - My Space Challenge

Happy Hello, to all friends and visitors!

Welcome to the MY SPACE CHALLENGE of
Joy Clair's
Around the World Card-Making Day!


* * * * *
This will be a little bit of a re-post for some of you.
For many of you it will be brand new! 
I am in the process of purging and clearing my space,
so it was not possible to take updated photos. 
These are from the last space hop I did. 
The basics are all still the same.
My goal is to clear out what I'm no longer using,
make room for new things I want to focus on,
and have everything organized and pretty! :o)

* * * * *
I am blessed to have a bright room that measures 13' X 16'.
It's been my craft room for 18 years and has seen a lot of changes;
both in crafts and in set-up.
I really can't share the whole room in the condition it's in but I'll share some parts.
My husband is very talented, and builds me anything I want. 


He actually came up for the plan for these shelves.


The end unit is my die-cutting station. 
My Big Shot goes on top, and my dies are all close-by.


I always work standing up. 
I colour sitting down...but otherwise I'm always standing.
This is where I work.
I had my husband build a raised area for me, so I don't get a back ache.
I also work on a glass surface. 
It's just my favorite surface to work on for many reasons.
Everything I need is close at hand, either on top or under the work surface.


If I turn around from my work surface, this is what you see.
My trimmer, score board, another glass surface, and lots more, is all easily accessible.
The unit under it is from an old Eaton's Department Store.
The drawers are huge and very strong. 
You'd be shocked at how much they hold!
That's why I didn't share any photos of them open! lol


This is one of my favorite organizational spots.
It's in the black filing cabinet right under my work surface. 
The first two drawers are shallow and hold inks and other mediums.
This bottom drawer holds all my 8 1/2" X 11" cardstock. 
It's all sorted by colour, then in front of each colour is a file folder to hold the scraps in those colours. 
When I need a smaller piece I search through the scrap folder first.


 Here's a peek at one of my pegboards. 
This is my favorite ribbon organization! 
Do you know what these trays are?
They're chick feeders from a local hardware store.
Yes, actual chick feeders and they hold ribbon spools perfectly!
I love this system, and since this photo was taken I have added more!


There you have a look at where I work.

If you're interested in seeing more, it will have to wait until my room is finished! :o)

* * * * *
Now on to some business from Joy Clair about the days events...


We want everyone to be able to play so there is *no* requirement to use Joy Clair Stamps although we would be thrilled if you did. Please make a new card though!
We will have all challenges open until next Sunday, October 14th, 2018 at 11:55 p.m. EST to let you create a little more, because celebrations should never be limited to a single day, right?
If you are unable to participate in the challenges, simply comment on the posts. We will be giving one prize to a randomly drawn commenter compiled from all WCMD 2018 posts.
Add your link to the appropriate Inlinkz Link-up tool for that post. You may enter as many times as you wish while the challenges are open. There will a prize posted on each challenge and one card will be randomly chosen as a winner of that prize from those that Link-up.
Have tons of fun!
>>>SCHEDULE & CHALLENGE LINKS<<<
7:00 a.m. EST WCMD-18 My Space
9:00 a.m. EST WCMD-18 Rainbow Colors
12:00 a.m. EST WCMD-18 Make & Mail
1:00 p.m. EST WCMD-18 Around the World Blog Hop with Joy Clair Friends
3:00 p.m. EST WCMD-18 Smooshing
6:00 p.m. EST WCMD-18 Letters & Die Cuts
EDITOR'S NOTE: Winners of all the challenges will be announced as usual on a Joy Clair Blog post on Wednesday, October 31, 2018.
We really want to reward those who enter multiple challenges. The crafters who enter a different card for at least FOUR (4) of the challenges (hopefully all of them!) AND add JCGP to the name of their link (for example "Lisa Lane JCGP") will be entered into a special pool to receive the Grand Prize. Entering to the WCMD -18 My Space Challenge below will qualify as 1 of those 4 challenges.

What is the Grand Prize you ask? We are giving away 6 Stamps Sets from Joy Clair Store (just in time for our upcoming next Release)!

Blog Archive