Tuesday, 20 November 2018

Clear Scraps - Final Fall Mini Album

Hello, my friends!

I'm back with a new project share for Clear Scraps!

Today I'm sharing another fun mini album!
For this one I used the Chipboard 6 x 6 Regular Album,
along with a 12 x 12 Acrylic Sheet.

For my album, I used 4 of the chipboard pages.
I cut 2 - 6 x 6 pages from the acrylic sheet, 
as well as 2 - 6 x 5 pages.

Let's have a closer look:


The front cover is acrylic.
It holds the "Fall" title sticker, the enamel dots, 
a rainbow file tab, and the bottom border.
I've also tied multiple ribbon bows onto the binding rings.


Here you can see the back of the acrylic,
and the first page.
This page is made of two decorative pages adhered together.
One is die-cut, with a fun sticker tucked in.


Here's a great spread to add photos.
The left side is the double-layered paper,
the right side is paper covered chipboard.


Here on the left side, I've inserted a tag under a band.
The right side is the shorter acrylic page.
This side is covered with paper, and a journaling tag.


The left side is the acrylic page.
The right is chipboard, with a tag tucked under the pumpkin band.


The left side is another tag tucked under a band.
The right side is the paper covering the shorter acrylic page.


The left side is the acrylic side of the page.
The woodgrain tag tucks in behind the "give thanks" square.
The right page is chipboard with a tag pocket.


On this side there is a large pocket with a tag booklet tucked in.
Then I've inserted an undercut journal spot.


I added some stickers to the back of it. 
The right side is paper that's been added to the acrylic back cover.
The orange is a sticker border that's been added. 


This is the acrylic back cover. 
I've added paper strips on each side to cover the adhesive.
I've also added a matted journal spot.

* * * * *

Other Materials Used:
Papers: Bella Blvd - Hello Autumn Collection Kit;
Ink: Distress Ink - Walnut Stain;
Die: Spellbinders - Scalloped Oval;
Binding Rings: Unknown;
Ribbon: Offray.

Clear Scraps Products Used:


* * * * *
I hope you enjoyed seeing my mini album!
I really love to make them, and I love to add acrylic to them!
Acrylic makes you think about where you're putting what,
and it's a great time to use double-sided papers!
I'll be back soon with another project share!

* * * * *
Here are all the links you need:

Monday, 19 November 2018

Whisker Graphics - Christmas Ideas with Bags, Tags, and Twine.

Hello, my friends!

I'm back to share a fun project created with products from the Whisker Graphics Shop!
I'm also over on the Whisker Graphics Blog today.
You're going to want to go over there and subscribe in the sidebar, if you haven't already done so. 
That way you won't miss all the fun shares from the rest of the DT,
and all the fun ways you can use these great products! 

* * * * *
 Today I want to share some fun ways to incorporate these products into your Christmas projects.

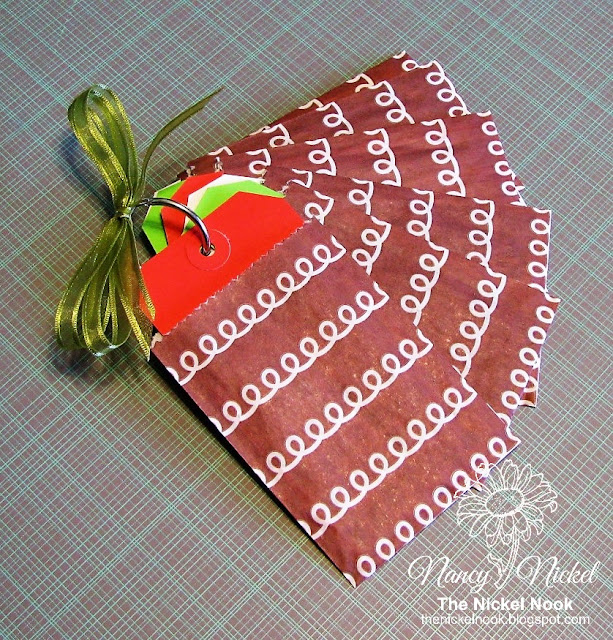
When I saw these sweet Little Bitty Bags they just shouted Christmas to me!
Don't they make you think of a gingerbread house.
They totally reminded me of one of my favorite Christmas paper pads.
That is what inspired the following creativity! :o)

I began by gathering some supplies together:


Then I pulled out the Christmas paper pad I mentioned. 
It's the AC Merrymint Collection, and I'm down to just scraps.
I cut pieces that measured 2 1/4" x 3 3/4",
and adhered them to both sides of each tag.


Here's what the tags look like.
Aren't they festive? 


Here's what they look like inserted into the Little Bitty Bags.
So cute!


At this point you could simply insert a ring through the tags,
tie a ribbon around the ring, and call it a mini tag book.
You could add photos to the tags, as well as the bags.
It would make a lovely gift.
Another gift idea would be to add a hand-written gift certificate to each tag.
"This is good for one shoveling of the sidewalk and driveway."
The possibilities are endless! 


Now I'll share a few more ideas.
You could add some twine to the top of the tag.
Then wrap some more twine around the bag with a bow.
Simply adhere this onto a package, and add the recipients name on the tag.


Here I've punched a label, and added it to the outside of the bag.
I've written To: and From: on the tag.
A personalized message can be added on the tag inside,
and this can also be added to a wrapped package.
This would also be a lovely way to present a gift card.


Speaking of gift cards...why not put one on the tag
...inside the Little Bitty Bag...on the outside of a Christmas card?
Then you've got it all done in one! 


Now, going back to my original idea.
You can add several strands of matching twine to the binding ring. 
Then add one of the fun Sweet Sticky Labels to the front.
I added "Happy Holidays" in mine.
You could even put a sticker on each Little Bitty Bag if you wanted.

I hope I've given you some fun ideas!
There's so many great ways to use tags, and bags and twine!

* * * * *
Thanks for stopping by!
I'll be back again soon with another project share!

Here are all the links you'll need:

Thursday, 15 November 2018

All Dressed Up - Challenge #87

Hello, my friends!

I don't know if you've noticed 
but it's been a while since I've shared a new post for All Dressed Up.
I ran into some nasty "technical difficulties" with my printer. 
It looks like I FINALLY have things sorted! :o)

So here we go with a new challenge at All Dressed Up!
The challenges are always Anything Goes but you MUST use an image from All Dressed Up.
There are freebies available at the challenge blog HERE! :o)

This month I used one of the 3 Little Christmas Girls image,
which you can find HERE.


These sweet images are always so much fun to color and create with!


Just some simple die-cutting and layering, and some bling.
Then for a final touch, I added some Glossy Accents to the nose of the reindeer hat.


Other Materials Used:
Papers: Recollections - Cardstock, Crate Paper - Peppermint Collection;
Coloring: Spectrum Noir Markers;
Dies: Sizzix - Label, Ornate #2, Tutti Designs - Musical Stave;
Bling: Queen & Co - Red Rhinestones;
Glossy Accents.

* * * * *
Head on over to the Challenge Blog and join the fun! :o)

* * * * *
Here are all the links you'll need:


Rinea Tutorial - Christmas Tag with Imagine

Hello, my friends!

Today I have a fun tutorial for Rinea.

I'm going to show you how to make this fun Christmas Tag
using these fabulous foiled papers!


I'm using the Jolly Foiled Variety Paper Pack for this project.
Also, in partnership with Imagine, I'll be using StazOn Ink.


Other materials used:

  • Imagine StazOn Ink - Jet Black;
  • Stamp: Just Rite - Festive Poinsettia, Gina K Designs - Merry Christmas, Stampin' Up - Luke 2;
  • Dies: Spellbinders - Layered Poinsettias, Just Rite - Custom dies;
  • Cardstock: American Crafts - Green;
  • Punches: WRMK - Hole Reinforcer, Fiskars - Holly Border;
  • Ribbon: Trim It Up - Gold Metallic;
  • Beads: Round Rose Gold Metallic.

1. Using Jet Black StazOn Ink, stamp multiple Poinsttia leaves and flowers onto Emerald/Gold Glossy Foiled Paper.


2. Then use the Jet Black StazOn ink to stamp multiple Poinsettia flowers onto the Ruby/Gold Glossy Foiled PaperAlso, stamp several of the floral style berries.


3. Next, stamp both of the sentiments, and several of the holly berry outlines (I ended up not using these), with the Jet Black StazOn ink. Do this onto the Gold side of the Silver/Gold Glossy Foiled Paper.


4. Using the coordinating dies, cut out all the stamped designs.
5. Cut the tag base from the green cardstock. It measures 4 1/4" x 8 1/2". Angle cut the top corners.


6. Cut strips of the Gold Glossy paper to fit around the outside of the tag. Punch with the Holly border punch. Adhere in place.
7. Die-cut the sentiments using the Just Rite Custom Dies. Layer as shown in photo, and adhere in place on the tag.


8. Punch a hole in the center top of the tag. Using the WRMK Reinforcer punch, punch a reinforcer from the Gold Glossy paper. Adhere in place around the hole.
9. Thread gold metallic ribbon through the hole.


10. Shape the Poinsettia flowers and leaves, and adhere the layers together. 
11. Adhere one round Rose beads to the center of each Poinsettia.
12. Adhere Poinsettias in place on the tag, as shown in the photo. 
13. Finally, adhere several of the floral style berries randomly around the tag. 


* * * * *
Thanks so much for stopping by today!
I'll be back with another Rinea tutorial next month!

* * * * *

Here are all the links for you:


Tuesday, 13 November 2018

Clear Scraps - Holly Stencil Background Card

Hello, my friends!

I'm back with a new project share for Clear Scraps!

Today I'm sharing a Christmas card I made featuring the 6" Holly Stencil.

We all need cards that are flat, and can easily be popped in the mail.
This design is really good for that. 
I've made it 5 1/2" square but it could easily be done in A2 size.
Here's my card:


Using a foam applicator, and Distress oxide inks, 
I stenciled the design, onto kraft cardstock, as follows:
Holly Leaves in Peeled Paint,
Holly Berries in Fired Brick, and 
Swirls in Wilted Violet.
I thought the addition of the purple really added some fun excitement! ;o)


When I was finished I trimmed it to 5 1/4" and misted it with water. 
I love what the water does to the Distress Oxide inks on kraft!


I mounted the finished piece onto a 5 1/2" purple card base.
I stamped the sentiment on kraft, using the Memento Tuxedo Black ink.
I matted it with purple cardstock, and adhered it in place with foam tape.
Finally, I added a pretty purple double-looped bow!


Here's one last look at the finished card:


Other Materials Used:
Papers: Recollections - Kraft, Cardstock;
Inks: Distress Oxide Inks - Fired Brick, Vintage Photo, 
Imagine - Memento Tuxedo Black;
Stamp: Gina K Designs - Merry Christmas;
Ribbon: Celebrate It.

From Clear Scraps:


* * * * *
Thanks so much for stopping by today!
I'll be back with another project share next week! :o)

* * * * *
Here are all the links you need:

Friday, 9 November 2018

My Scrap Chick - Fall Frenzy

Hello, my friends!

Welcome to a new DT post for My Scrap Chick!

I called my post a Fall Frenzy.
It's not really a frenzy...it's just a combination of three great files...
and I thought frenzy sounded really good behind Fall! lol

The three fun Fall files from My Scrap Chick are:

Bracket Book

Fall Leaf Party Pennant

Harvest Treat Tag 2 inch Printable

There were a couple of good tongue twisters there, huh? lol

Okay...let's move on to the mini album I put together.

The base pages were all cut from kraft cardstock.
Then I down-sized the page just a bit,
and added a layer of cardstock to each side in Fall colors.


To decorate my cover, I cut the Party Pennants small enough to fit.
I cut them in a variety of Fall colors, layered them, and adhered them in place.
I added small brown pearls over the pre-cut holes. 


 I printed the page of Treat Tags, cut one out, and added it to my cover. 
Then I adhered a couple of extra leaves to the top of it.


 Here's a peek at one of the inside pages. 
I'll share more as I work on them.


 Finally, I punched holes, added the rings, and added a ribbon.


Other Materials:
Paper: Recollections, AC - Cardstock;
Ink: Distress Ink - Walnut Stain;
Bling: Basic Grey;
Binding Rings: Unknown;
Ribbon: Last Scrap of My Favorite Fall Ribbon.

* * * * *
Thanks so much for stopping by!
I hope you'll head over to the shop and give it a try! 
Have you signed up for the My Scrap Chick newsletters yet?
Don't forget to do that!
You really don't want to miss out on any of the great freebies! :o)

* * * * *
Here are all the links you need:


Blog Archive