Saturday, 12 December 2020

Vilda Stamps - Just Waiting...

   Hello, my friends!

It's my time to share a new project for Vilda Stamps!

Today I have used two stamps from:


You can find it in the shop HERE. 

This sweet little girl is all ready for her Christmas party;
in her pretty red dress and shoes.
She even has her party hat on! ;o)

Here is my card:


I stamped and coloured the girl and then bench,
and then fussy cut them out.
I decided to place her in a scene with this fun frame die.
I thought it looked like a place she needed to be,
as she waits for her party to begin.


Here's a closer look:


Vilda Stamps Used:


Other Materials Used:
Recollections Cardstock;
Memento Tuxedo Black Ink;
Spectrum Noir Markers;
Yvonne Creations - Autumn Frame Square.


* * * * *
Thanks so much for taking a look!
I'll be back soon with another project!

* * * * *
If you're not familiar with Vilda Stamps, they are located in Sweden!
I've been a big fan of the stamps since I was introduced to them 
while working on a DT in Germany!
The stamps can be purchased from Engstroms Artstudio AB.
They ship all over the world.

* * * * *

Here are all the links for you:


Thursday, 10 December 2020

Maker's Movement - Frosty Fun Shaker Card

 Hello, my friends!


I'm back today to share a really fun project for Maker's Movement

I used my wonderful Crossover II Machine for all my die-cutting on this project.

I've also used:


I've used all these products to make a "cool" shaker card! ;o)
Here's my card:


The cardstock I used has a beautiful pearly finish on it - just like snow.
I couldn't get it to show in the photos 
because I was making sure there was no glare on the acetate.


After creating the fun Winter scene,
I stamped and die-cut one cute snowman from the Christmas is Best With You stamp set.
I paper pieced his scarf and hat from cardstock to match the background.
Finally, I added some Enamel Accents to add the fluffy fur to his hat.


To fill my shaker, I used the snowflakes from the Jingle Bell Shaker Srinkles.
I added just a pinch of fake snow to the mix.
For my final photo I gave it a good shake,
so you can see the full effect! :o)

This was LOTS of fun to put together! 


* * * * *

Maker's Movement Products Used:

Crossover II Fabric & Paper Cutting System,


Other Materials Used:
Bazzill Bling Cardstock;
Memento Tuxedo Black Ink;
White Enamel Accents;
Pinch of Fake Snow.

* * *
Thanks so much for stopping by!
I'll be back soon with another fun project!

* * *

Here are all the links for you:

Maker's Movement Facebook 

Thursday, 3 December 2020

Meg's Garden - Burgundy with Cream Christmas Tag

 Hello, my friends!

Today I have a new project share for Meg's Garden!

Again, I've used the newly released Christmas Collection:

 Burgundy with Cream

It's a beautiful Collection full of goodness!
The creative possibilities are endless!

I have made a tag:


I began with a red cardstock tag base.
I punched along the bottom edge with a decorative border punch.
To pull out the bits of gold included in the collection,
I also punched along the bottom edge of the foiled paper.


I chose one of the beautiful Burgundy with Cream Papers,
and added that in place on top of the Foiled Paper layer.
Then I fussy cut several of the elements from the Burgundy with Cream Cut and Create Pages.
I had fun positioning them in place.
I added some pretty gold ribbon to the top of the tag.


I also added a small gold bow to the berry stem.
Finally, I added some extra sparkle with Stickles.

Find the full Collection here:

 Burgundy with Cream

Other Materials Used:
DCWV Red Textured Cardstock;
Rinea Foiled Paper - Gold/Gold Glossy;
Fiskars Holly Border Punch;
EK Success Scalloped Scallop Border Punch;
Diamond Stickles;
Celebrate It Gold Ribbon.

* * * * *
Thanks so much for stopping by today!
Head over to etsy to take a good look at this beautiful collection!
You can buy the complete collection, or just pick up what you want!
I'll be back soon with more fun!

* *.* * *

Here are all the links for you:

Meg's Garden Papercraft Shop

Meg's Garden Blog

Meg's Garden Facebook Page

Monday, 30 November 2020

Maker's Movement - Merry & Bright

 Hello, my friends!


I'm back today to share a fun project for Maker's Movement

I used my wonderful Crossover II Machine for all my die-cutting on this project.

Today I'm featuring:


I also used:


Here's my card:


This is such a fabulous and fun set to play with!
There are 18 stamps included, and 10 dies in the die set.
I used only a few of them on my card!

I began with a light kraft card base.
I cut the rounded tag out of a Christmas print.
I then stamped/die-cut the tree, star, and gifts from coordinating paper.
Then I just put all the pieces together.
I added the sentiment to the front...


...and then used some other pieces to decorate the inside.


Finally, I added Stickles to give everything some sparkle and shine!


Maker's Movement Products Used:

Other Materials Used:
Hot Off the Press Ultimate Christmas Pack;
Recollections Cardstock;
Memento Tuxedo Black Ink;
Gold, Frosted Lace.

* * *
Thanks so much for stopping by!
I'll be back soon with another fun project!

* * *

Here are all the links for you:

Maker's Movement Facebook 

Saturday, 28 November 2020

Meg's Garden - Christmas Gift Tags in Burgundy with Cream

  Hello, my friends!

Today I have a new project share for Meg's Garden!

This is my first project share using the new Christmas Collection:

 Burgundy with Cream

  I have made an assortment of Christmas gift tags:


Aren't they pretty?
This is such a beautiful collection of papers and elements!
The tag base in the top center of the photo, is one of the printable elements.
I simply cut it out, and layered a Santa image on top of it. 

This collection has lovely touches of gold throughout.
To bring out the gold, I have added a layer of Rinea Gold/Gold Glossy Foiled Paper.
To finish the tags off, I punched a hole and added a piece of gold cording.
They've all been left blank on the back,
offering a place to add names and messages.

Below is my favorite image! 
The finished tag measures 4"x 4".
That will give you a good idea of the size of all in the photo. 

Any of these tags would certainly dress up a Christmas gift!


Meg's Garden Products Used:

 Burgundy with Cream

Other Materials Used:
Bazzill Cardstock;
Rinea Gold/Gold Glossy Foiled Paper;
Gold Cord;
Distressing Tool;
Walnut Stain Distress Ink.

* * * * *
Thanks so much for stopping in today!
I'll have another project to share very soon!

* * * * *

Here are all the links for you:

Meg's Garden Papercraft Shop

Meg's Garden Blog

Meg's Garden Facebook Page

Monday, 23 November 2020

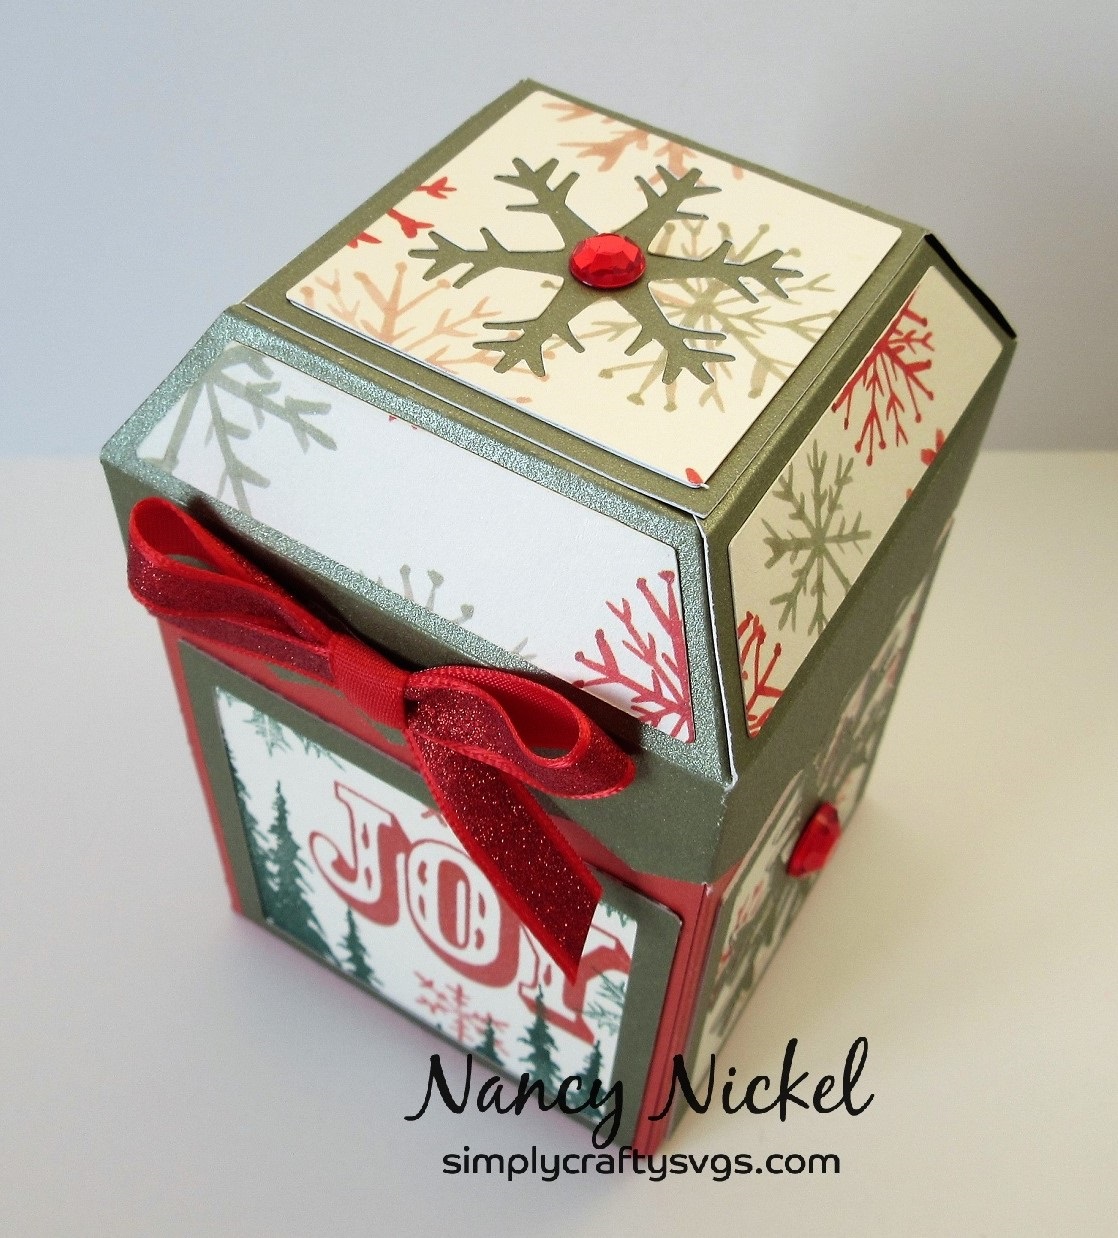
Simply Crafty SVGs - JOY Gift Box

 Hello, my friends!


Welcome to a new project share for Simply Crafty SVGs!

This month I'm sharing another great gift box!

I've used the:

Joy Gift Box SVG File

It was the title of this box that attracted me.
How could I not want to make a JOY gift box?
Sandy has two wonderful samples posted in the shop;
one is Christmas themed and one is Winter themed.

I thought I would give you another creative option.

Here's my version:


As you can see, I've combined Christmas with Winter,
and added a stamped panel rather than the JOY cut panel.


I used pretty shimmer cardstock, added some big red rhinestones,
and finished it off with a big glittery bow.


The lid of this box is such a great shape!
The box base is a wonderful size to fill with some goodies!


When you look at all these great cut files,
think about how you can incorporate your other craft supplies,
like stamps, stencils and such.
It's all so much fun!


File from Simply Crafty SVGs:


Other Materials Used:
DCWV Handpainted Christmas Stack;
Recollection Holiday Shimmer Paper Pad;
Tim Holtz Holiday Joy Stamp Set;
CTMH Ink: Cranberry, Ponderosa Pine;
Celebrate It Glitter Ribbon.

* * * * *
Thanks for stopping by today!
I hope you found some inspiration!
I'll be back next month to share a brand new project! :o)

* * * * * 
Here are all the links:


Friday, 20 November 2020

Vilda Stamps - Little Flower Sprite Card

  Hello, my friends!

It's my time to share a new project for Vilda Stamps!

Today I have made a card featuring V219 Stamp Set.
You can find it in the shop HERE.

This stamp set is really loaded with images that are so much fun!

Here is my card:


I stamped, coloured, and fussy cut this cute little girl.
I die-cut a pretty floral background for her,
and popped her up on foam tape.
After adding everything to the white card base,
I added little green rhinestones and a pink ribbon bow!


To finish it off, I added some sparkle marker to the image.
Here's a closer look:


Vilda Stamps Used:


Other Materials Used:
Recollections Cardstock;
Precious Marieke Die - Clematis Oval;
Celebrate It Ribbon;
Crafts Mini Rhinestones;
Spectrum Noir Sparkle Marker.

* * * * *
Thanks so much for taking a look!
I'll be back soon with another project!

* * * * *
If you're not familiar with Vilda Stamps, they are located in Sweden!
I've been a big fan of the stamps since I was introduced to them 
while working on a DT in Germany!
The stamps can be purchased from Engstroms Artstudio AB.
They ship all over the world.

* * * * *

Here are all the links for you:


Blog Archive