Showing posts with label Vilda Stamps. Show all posts

Monday, 21 December 2020

Vilda Stamps - Christmas Mice

   Hello, my friends!

It's my time to share a new project for Vilda Stamps!
This will be my final Design Team project for Vilda Stamps.
I've been making some changes to my schedule,
and I have some new projects in the works.

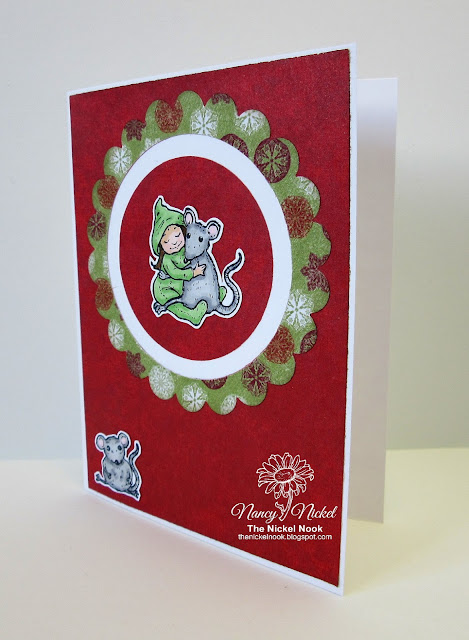
Today I have made another card featuring two more stamps
from the V219 Stamp Set.
You can find it in the shop HERE.

Here is my card:


Althought the card appears to have dimension,
it's all flat and easy to mail.


Aren't they cute?
They've been stamped, coloured, and fussy cut.
Then I did some simple die-cutting to frame them.


I had one extra little mouse that was added to the bottom corner.


Vilda Stamps Used:


Other Materials Used:
Hot Off the Press - Ultimate Christmas Creative Pack;
Memento Tuxedo Black Ink;
Spectrum Noir Markers;
Spellbinders Nestabilities - Circles, Scalloped Circles.

* * * * *
Thanks so much for taking a look!
I'll be back soon with another project!

* * * * *
If you're not familiar with Vilda Stamps, they are located in Sweden!
I've been a big fan of the stamps since I was introduced to them 
while working on a DT in Germany!
The stamps can be purchased from Engstroms Artstudio AB.
They ship all over the world.

* * * * *

Here are all the links for you:


Saturday, 12 December 2020

Vilda Stamps - Just Waiting...

   Hello, my friends!

It's my time to share a new project for Vilda Stamps!

Today I have used two stamps from:


You can find it in the shop HERE. 

This sweet little girl is all ready for her Christmas party;
in her pretty red dress and shoes.
She even has her party hat on! ;o)

Here is my card:


I stamped and coloured the girl and then bench,
and then fussy cut them out.
I decided to place her in a scene with this fun frame die.
I thought it looked like a place she needed to be,
as she waits for her party to begin.


Here's a closer look:


Vilda Stamps Used:


Other Materials Used:
Recollections Cardstock;
Memento Tuxedo Black Ink;
Spectrum Noir Markers;
Yvonne Creations - Autumn Frame Square.


* * * * *
Thanks so much for taking a look!
I'll be back soon with another project!

* * * * *
If you're not familiar with Vilda Stamps, they are located in Sweden!
I've been a big fan of the stamps since I was introduced to them 
while working on a DT in Germany!
The stamps can be purchased from Engstroms Artstudio AB.
They ship all over the world.

* * * * *

Here are all the links for you:


Friday, 20 November 2020

Vilda Stamps - Little Flower Sprite Card

  Hello, my friends!

It's my time to share a new project for Vilda Stamps!

Today I have made a card featuring V219 Stamp Set.
You can find it in the shop HERE.

This stamp set is really loaded with images that are so much fun!

Here is my card:


I stamped, coloured, and fussy cut this cute little girl.
I die-cut a pretty floral background for her,
and popped her up on foam tape.
After adding everything to the white card base,
I added little green rhinestones and a pink ribbon bow!


To finish it off, I added some sparkle marker to the image.
Here's a closer look:


Vilda Stamps Used:


Other Materials Used:
Recollections Cardstock;
Precious Marieke Die - Clematis Oval;
Celebrate It Ribbon;
Crafts Mini Rhinestones;
Spectrum Noir Sparkle Marker.

* * * * *
Thanks so much for taking a look!
I'll be back soon with another project!

* * * * *
If you're not familiar with Vilda Stamps, they are located in Sweden!
I've been a big fan of the stamps since I was introduced to them 
while working on a DT in Germany!
The stamps can be purchased from Engstroms Artstudio AB.
They ship all over the world.

* * * * *

Here are all the links for you:


Wednesday, 11 November 2020

Vilda Stamps - Frosty Fun!

   Hello, my friends!

It's my time to share a new project for Vilda Stamps!

Today I have made a card featuring the V618 Stamp.
You can find it in the shop HERE.

I've used this adorable stamp on a previous card,
and she actually has a tiny little butterfly on her nose.
We had a wonderful snow blizzard this past weekend,
and it inspired me to make a fun Winter themed card.
I simply covered the butterfly with a sparkly snowflake!

Here is my card:


I stamped, coloured, and fussy cut the image.
Then I created a fun frosty scene using the same colours.
I embossed the snowflake background, cut out a snow drift,
and added some pretty snowflakes.
Then I adhered the image using foam tape.
The photo below shows the dimension.


Finally, I went in and added the pretty rhinestone stickers.
One to the center of several of the embossed snowflakes,
and one on her nose!


Vilda Stamps Used:


Other Materials Used:
American Crafts Cardstock;
Cuttlebug Snowflake Embossing Folder;
Memento Tuxedo Black Ink;
Alcohol Markers;
Your Next Die Holiday Snow Globe;
Crafts Rhinestone Stickers.

* * * * *
Thanks so much for taking a look!
I'll be back soon with another project!

* * * * *
If you're not familiar with Vilda Stamps, they are located in Sweden!
I've been a big fan of the stamps since I was introduced to them 
while working on a DT in Germany!
The stamps can be purchased from Engstroms Artstudio AB.
They ship all over the world.

* * * * *

Here are all the links for you:


Wednesday, 21 October 2020

Vilda Stamps - What Do You Do...

...When You Live in a Shoe?   

Is that a familiar saying to you?
I've asked a few people and they've never heard of it.
Yet if I ever hear the line "what do you do?"...
in my mind it is immediately followed by "when you live in a shoe?"
I had a little talk about it with my brother recently. 
He's very familiar with it too,
so it's something from our childhood. 

All that being said...

It's time for a new project share for Vilda Stamps,
and I'm thrilled to be sharing this fun Shoe House stamp.

Today I have made a card featuring V219 Stamp Set.
This is an A5 Stamp Set that includes 12 stamps.
I have used two of them on my card.
You'll find the set HERE.
  
Here is my card:


I stamped and coloured two of the images from the stamp set.
I cut a card base from kraft cardstock,
and created a square frame in the front. 
I inserted the image behind it, and did some pen-stitching around it.


I fussy cut the little fellow and added him to the corner of the frame.
Isn't he cute? He obviously lives in the house! ;o)
Here's a closer look:


Vilda Stamps Used:


Other Materials Used:
Recollections Cardstock;
Alcohol Markers;
Black Pigma Pen.

* * * * *
Thanks so much for taking a look!
I'll be back soon with another project!

* * * * *
If you're not familiar with Vilda Stamps, they are located in Sweden!
I've been a big fan of the stamps since I was introduced to them 
while working on a DT in Germany!
The stamps can be purchased from Engstroms Artstudio AB.
They ship all over the world.

* * * * *

Here are all the links for you:


Monday, 12 October 2020

Vilda Stamps - Boy With Dog Card

   Hello, my friends!

It's my time to share a new project for Vilda Stamps!

Today I have made a card featuring V833 Stamp Set.
This set includes three great stamps:
Boy with Dog, Girl with Bag, and Flowers.
You can find it in the shop HERE.

Here is my card:

I stamped the image and coloured it with alcohol markers.
Then I fussy cut it out.
I adhered the image to the dark brown cardstock.
I die-cut the Fall frame from green cardstock,
and adhered it in place.


It's a nice flat card to mail but looks like it's full of dimension.
Isn't he cute?
He's so much fun to colour!


Vilda Stamps Used:


Other Materials Used:
DCWV Textured Cardstock;
Yvonne Creations Die - Autumn Frame Square;
Memento Tuxedo Black Ink;
Alcohol Markers.

* * * * *
Thanks so much for taking a look!
I'll be back soon with another project!

* * * * *
If you're not familiar with Vilda Stamps, they are located in Sweden!
I've been a big fan of the stamps since I was introduced to them 
while working on a DT in Germany!
The stamps can be purchased from Engstroms Artstudio AB.
They ship all over the world.

* * * * *

Here are all the links for you:


Monday, 21 September 2020

Vilda Stamps - Stamped Circle Cards

  Hello, my friends!

It's time to share a new project for Vilda Stamps!
Today I have two cards to show you.

I am featuring V850 and V693 Stamp Sets.

I had a fun play time with these stamps,
along with some Distress Oxide Inks.
Both cards are made exactly the same way,
and with the same colours,
yet they look entirely different!

Here are both of the cards:


I used the great distressed circle stamp from the V850 Stamp Set.
I stamped each ink colour randomly on the card base.
I dried each colour before moving on to the next.

The card below was stamped on black cardstock.
Isn't it soft and pretty?
It shows the distressed stamp off so nicely.
The sentiment is from the V693 Stamp Set.
I stamped it at an angle before adding it to the card front with foam tape.


The second card was done the same way,
only it was stamped on white cardstock.
What a difference!
It makes such a fun and festive card.
This sentiment is also from the V693 Stamp Set.


Vilda Stamps Used:


Other Materials Used:
Recollections Cardstock;
Distress Oxide Inks:
Broken China;
Fired Brick;
Peeled Paint;
Cracked Pistachio;
Fossilized Amber.

* * * * *
Thanks so much for taking a look!
I'll be back soon with another project!

* * * * *
If you're not familiar with Vilda Stamps, they are located in Sweden!
I've been a big fan of the stamps since I was introduced to them 
while working on a DT in Germany!
The stamps can be purchased from Engstroms Artstudio AB.
They ship all over the world.

* * * * *

Here are all the links for you:


Saturday, 12 September 2020

Vilda Stamps - Sweet Dreams

 Hello, my friends!

It's my time to share a new project for Vilda Stamps!

Today I have made a card featuring another stamp from the V837 Stamp Set.
You can find it in the shop HERE.

Here is my card:


I stamped the image onto watercolor paper,
and colored it with watercolor pencils and a water brush.
Then I fussy cut the image out before adhering it to the card base,
using foam tape.


I stamped out the sentiment and added that with foam tape too.
Finally, I added a pretty bow to the top of the card. 
This is a new die, and I was anxious to use it.
It's so pretty with the lovely embossing,
which you can see a little better in the photo below.


Vilda Stamps Used:


Other Materials Used:
Recollections Cardstock;
Watercolor Paper;
Prima Watercolor Pencils;
Water Brush;
WRMK Nesting Circles Dies;
Joy! Crafts Die;
Memento Tuxedo Black Ink;
Stampin' Up Modern Label Punch

* * * * *
Thanks so much for taking a look!
I'll be back soon with another project!

* * * * *
If you're not familiar with Vilda Stamps, they are located in Sweden!
I've been a big fan of the stamps since I was introduced to them 
while working on a DT in Germany!
The stamps can be purchased from Engstroms Artstudio AB.
They ship all over the world.

* * * * *

Here are all the links for you:


Friday, 21 August 2020

Vilda Stamps - Thanks Card

 Hello, my friends!


It's time for a new project share for Vilda Stamps!

 Today I'm using the V656 - Flower Elves A5 Kit.
This is a big set of 13 stamps in varying sizes.
It's so much fun to play with!

Now, I realize that these are actually flower fairies,
but as I was colouring it, I decided it kind of looked like an eggplant girl.
Can you see it?

It's the time of year when people are enjoying the harvest of their garden.
On our local community page, 
many are generously offering to sharing their bounty.
That was the inspiration for my card today.
 Whether it's flowers or eggplants, it makes a fun "Thanks" card!

Here it is:


I stamped the image on watercolour paper, using Archival ink.
I then coloured it using Inktense watercolour pencils and a waterbrush.

I layered up the card base and background, and added a labe.
Then I went about creating a fun dimensional bed of leaves for my girl.


I curled cut/embossed and then curled the leaves
before adhering them in place.
Then I used foam tape to add the image.
I die-cut the sentiment and added it to the background.

Finally, I added some sparkly glitter glue to the leaves,
and a rhinestone to each corner.


Vilda Stamps Used:


Other Materials Used:
Unknown Watercolour Paper;
Jet Black Archival Ink;
Recollections Cardstock;
Sizzix Thinlits - Card, Basics;
Momenta Cut & Emboss Leaves;
Inktense Watercolour Pencils;
Water Brush;
Crafts Rhinestones;
Unknown Glitter Glue.

* * * * *
Thanks so much for taking a look!
I'll be back soon with another fun project!

* * * * *
If you're not familiar with Vilda Stamps, they are located in Sweden!
I've been a big fan of the stamps since I was introduced to them 
while working on a DT in Germany!
The stamps can be purchased from Engstroms Artstudio AB.
They ship all over the world.

* * * * *

Here are all the links for you:


Wednesday, 12 August 2020

Vilda Stamps - Dream Big

Hello, my friends!


I'm back with my second project for Vilda Stamps!

This time I have another card, using a really sweet image!
Cozy seems to be really high on my priority list these days,
and to me this card is just COZY! :o)

Here it is:


Isn't that image adorable?
I stamped it and coloured it with my markers.
Then I die-cut it and did some simple layering.


I then used the "Dream Big" sentiment from a second stamp set.
I punched that out, and layered it on another punched piece.
Finally, I added some matching sequins.

Here's a closer look at the image:


Vilda Stamps Used:


Other Materials Used:
Bazzill Cardstock;
Memento Ink - Jet Black, London Fog;
Sizzix Framelits - Labels, Ornate #3;
Unknown Sequins.

* * * * *
Thanks so much for taking a look!
I'll be back soon with more fun Vilda projects!

* * * * *
If you're not familiar with Vilda Stamps, they are located in Sweden!
I've been a big fan of the stamps since I was introduced to them 
while working on a DT in Germany!
The stamps can be purchased from Engstroms Artstudio AB.
They ship all over the world.

* * * * *

Here are all the links for you:


Tuesday, 11 August 2020

Vilda Stamps - Flower Bouquet

 Hello, my friends!


It's my time to share some projects for Vilda Stamps!

Today I have a bouquet of flowers to share with you!

Here it is:


I've used this stamp set before but with different colors.
I stamped it onto watercolor paper, 
and then colored it with my Inktense pencils and a water brush.
I added a green punched doily behind the image
before layering it onto the blue card base. 


To finish it off,
I added a pretty green double looped bow,
along with some shimmer from my sparkle marker.


Vilda Stamps Used:


Other Materials Used:
Bazzill Cardstock;
WRMK Corner Chomper - Deco;
WRMK Mini 8 Punch - Doily;
Ranger Archival Ink - Jet Black;
Inktense Pencils;
Water Brush;
Satin Ribbon.

* * * * *
Thanks so much for taking a look!
I'll be back soon with my second project!

* * * * *
If you're not familiar with Vilda Stamps, they are located in Sweden!
I've been a big fan of the stamps since I was introduced to them 
while working on a DT in Germany!
The stamps can be purchased from Engstroms Artstudio AB.
They ship all over the world.

* * * * *

Here are all the links for you:


Tuesday, 21 July 2020

Vilda Stamps - Butterfly Tag

Hello, my friends!

I'm back with my second project for Vilda Stamps!

This time I have made a pretty butterfly tag, using:

V693 Stamp Set - English Texts 2010

and

V710 Stamp Set - Butterfly Corner with Butterflies.

Here it is:


I began with cutting a tag from watercolour paper.
I stamped and heat embossed the sentiment,
along woth various butterflies from the stamp set.
I then spritzed with water and sprinkled with Color Burst powder.


Once it was dry, I added it to a larger cardstock tag,
and then used foam tape to add it to another cardstock tag.


Finally, I added some pearls to the corners, and a ribbon to the top!


Vilda Stamps Used:


Other Materials Used:
Watercolour Paper;
Recollections Cardstock;
Stampendous Emboss Ink;
White Detail Embossing Powder;
Ken Oliver Color Burst - Indigo;
Tim Holtz Die - Stacked Tags;
Celebrate It Ribbon;
Crafts Pearls.

* * * * *
Thanks so much for taking a look!
I'll be back soon with more fun Vilda projects!

* * * * *
If you're not familiar with Vilda Stamps, they are located in Sweden!
I've been a big fan of the stamps since I was introduced to them 
while working on a DT in Germany!
The stamps can be purchased from Engstroms Artstudio AB.
They ship all over the world.

* * * * *

Here are all the links for you:


Monday, 20 July 2020

Vilda Stamps - Bookmark

Hello, my friends!

It's my time to share some projects for Vilda Stamps!

On the 12th and 21st of each month, I will be sharing two projects/blog posts,
that I hope will inspire you to get some Vilda Stamps of your own.
They have such a fabulous variety of stamps to create with!
Due to the time difference between Canada and Sweden,
I will share my first project in the evening,
and my second project the next morning.

Today I have made a fun bookmark,
using a sentiment from:

V693 Stamp Set - English Texts 2010

Here it is:


I found this fun book paper in my stash, which is ideal for a bookmark!
I layered a strip of it onto a white cardstock base.
I stamped my sentiment with embossing ink,
and embossed it with a fun glittered embossing powder. 
All the glitter makes it a little bit harder to read.
It says: "Reading is to the mind what excercise is to the body."


Finally, I used my tag punch at the top of the bookmark, and added my ribbon.


Vilda Stamps Used:


Other Materials Used:
White Cardstock;
Project Life Papers - Desktop Edition;
Stampendous Emboss Ink;
Turquoise Glittered Embossing Powder;
WRMK Euro Hook Chomper;
Celebrate It! Ribbon

* * * * *
Thanks so much for taking a look!
I'll be back soon with my second project!

* * * * *
If you're not familiar with Vilda Stamps, they are located in Sweden!
I've been a big fan of the stamps since I was introduced to them 
while working on a DT in Germany!
The stamps can be purchased from Engstroms Artstudio AB.
They ship all over the world.

* * * * *

Here are all the links for you:


Blog Archive