Wednesday 30 January 2019

Rinea Tutorial - 10 Reasons Valentine Mini Album

Hello, my friends!

Today I have a fun tutorial for Rinea.

I'm going to show you how to make this fun Valentine Mini Album
using these fabulous foiled papers!


I'm using the "Love Foiled Paper Variety Pack" collection for this project.


Other materials used:
  •  Spellbinders Nestabilities - Classic Hearts
  • Spellbinders - Renaissance Tags 2 
  • Tim Holtz Alterations - Alphanumeric Die (not shown)
  • Assorted Cardstock in Valentine Colors
  • Big Shot (Or other die-cutting machine)
  • Binding Ring
  • Piece of Shimmery Ribbon
  • Adhesive    


1. I began by cutting the largest heart from black cardstock.
2. Then I cut several of the third largest heart from each of the Valentine colored cardstock pieces. 


3. I cut the second largest heart from each of the Foiled Papers in the Love Variety Pack
4. Then I did the same with the variety of dies in the Renaissance Tags 2 Die pack. 
Don't they look pretty all scattered together like that?


5. I cut my title out of the Fuschia Starstruck Foil, using the Tim Holtz Alphanumeric dies. I also cut out the numbers 1 through 10.
6. I adhered the title in place on the first heart. 
7. I punched out some mini hearts that I also added to the front cover.
8. I went on to decorate all the pages before punching the hole for the binding ring. 
9. I placed all the pages onto the binding ring, and added a pretty ribbon bow.
Now I'll show you photos of all the pages.
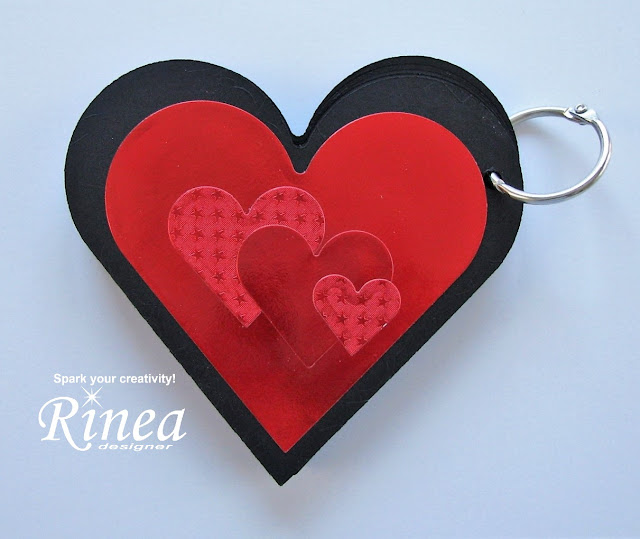
Here's the front cover:


On each page, I used the dies to create a pocket. Into the pocket I've slipped one of the cardstock hearts. Each heart is numbered 1-10, and has a place to write one of the 10 reasons on the back. That way nobody looking at these photos can read what they say! ;o)


Here's the back of the album, where I just layered several of the Ruby and Ruby Starstuck hearts on top of each other.


One final look at the front cover:


I hope you enjoy my little Valentine Mini Album
and are inspired to make one of your own!
Rinea Foiled Paper helps make such a beautiful album!

* * * * *
Thanks so much for stopping by today!
I'll be back with another new project very soon!

* * * * *

Here are all the links for you:


Tuesday 29 January 2019

Clear Scraps - Vintage Garden Sign

Hello, my friends!

I'm back with a new project share for Clear Scraps!

I'm sharing some more of the wonderful new products in the store!
Today I'm featuring the Plaque Medium DIY Pallet Shape.
I'm also using the Vintage Garden Stencil.

Here's what I created:


This wood plaque measures 6.5" x 16.5",
and has three pieces along the front.
This time I opted to decorate the wood piece with paper.
I began by inking all the wood edges.


I then cut paper to fit the first end piece,
positioning the flowers on the bottom left corner. 
I cut the paper slightly smaller than the wood,
leaving a nice border.
I inked the paper and adhered it in place.


I repeated the process for the small piece on the other end,
positioning the flowers on the top right corner.
I cut the paper for the center piece from a second piece of paper, 
leaving out the flowers.


I then positioned the stencil over the papered piece,
and stenciled the design using the same ink. 


Other Materials Used:
Papers: GCD Studios - Donna Salazar Family Jeans Collection;
Ink: Distress Ink - Walnut Stain.
* * * * *
Thanks so much for stopping by today!
I'll be back soon with another project share! :o)

* * * * *
Here are all the links you need:

Monday 28 January 2019

Simply Crafty SVGs - Box Card Series - Part 2

Hello, my friends!

Welcome to a new project share for Simply Crafty SVGs!

Welcome to Part 2 of my Box Card Series.
You'll find Part 1 HERE

Considering the date, I just had to create a Valentine Box Card!

My Box Card is actually a combination of three cut files:

A2 Box Card Collection 2
(Box Card Base)

Side by Side Box Card
(Layered Heart Cluster)

Happy Valentine's Bag
(Sentiment, Lips, and Hearts)

Here it is:


It's a small box card that fold down to A2 size.
I did extend my pieces a little bit beyond that size
but since I make my own envelopes that isn't really a problem.


Here's a view from the back side. 
I'll adhere a pink cardstock label to the back to write my message on. 


From the top you can see the supports that hold everything.


You could add lots of glitter and sparkle to all the elements.
I opted not to do that because there was lots of glitter in the paper I used.


Here's one last look at the finished Box Card:


Other Materials Used:
Papers: Recollections - Love and Devotion Paper Pad

Head on over to the shop and pick up these files:

A2 Box Card Collection 2
(Box Card Base)

Side by Side Box Card
(Layered Heart Cluster)

Happy Valentine's Bag
(Sentiment, Lips, and Hearts)


* * * * *

Thanks for stopping by today!
I hope you found some inspiration!
I'll be back next month with a brand new box card project! :o)

* * * * * 
Here are all the links:


Saturday 26 January 2019

Mirtillamente Craft Shop - Freezing Season Layout

Hello, my friends!

Today I have a Winter layout to share with you for Mirtillamente Craft Shop.
(The shop is closed for inventory just now)

 I wanted to play with this photo of a beautiful Blue Jay. 
He is a regular visitor to my back yard. 
He is VERY noisy, and always lets me know when he is there! 

I call this my Freezing Season Layout:


Here is how I created it:

I began by gathering a navy cardstock for my background base. 
I then used two Dylusions stencils (Let It Snow and Small Bubbles) 
and Prima art extra vagance Snowflake Paste.


I stenciled my snowy design, and then set it aside to dry.
 When it was dry, it resembled snow beautifully!


Next, I cut a mat for my photo from white cardstock, 
and I cut several strips from the Les Papiers de Padore - Weeeek-end! paper. 
I also punched several circles from white cardstock using my 1/2", 1", and 1 1/4" circle punches. 
These will be my snowballs.


This photo shows how I assembled all these pieces. 
I first distressed all the edges with a distressing tool. 
I began with matting the photo. 
Then I added a strip of paper to the top, and a smaller strip to the bottom. 
I then adhered it to the background using foam tape. 
I then added a longer strip of the paper along the bottom of the page. 
I then added a variety of the "snowballs" randomly around the page.


Finally, I added some fun stickers from the 
Echo Park - I Love Winter 12 x 12 Sticker Sheet. 


Here's a closer look at the photo, 
and the embellishments surrounding it:


Here's the bottom of the page:


The top right corner: 


Here you can see some of the dimension the foam tape adds:


The paste also adds wonderful texture:


Here's one final look at the finished page:


Thanks so much for stopping by today! 
May you enJOY happy Winter days!


* * * * *
Here are all the links for you:


!

Thursday 24 January 2019

My Scrap Chick - Snowman's Winter Wonderland Card

Hello, my friends!

Welcome to a new DT post for My Scrap Chick!

Today I am sharing the super cute Snowman's Winter Wonderland file.
You can find it HERE.

Don't you just love happy little snowmen?
I always say that they live in my back yard! :o)


I really like how the little circles are cut out of the background.
There are automatic snowflakes when it's placed on a white card base.


I frosted everything up with Stickles and some extra bling.
Our Saskatchewan snow always has some special sparkle to it! ;o)


This file comes with two cut options:
portrait and landscape.
I think it's a must have for all of us!


Other Materials Used:
Papers: Recollections - Cardstock, Scraps;
Stickles: Diamond;
Bling: Crafts - Sparkles.

* * * * *
Thanks so much for stopping by!
I hope you'll head over to the shop and give it a try! 
Have you signed up for the My Scrap Chick newsletters yet?
Don't forget to do that!
You really don't want to miss out on any of the great freebies! :o)

* * * * *
Here are all the links you need:


Tuesday 22 January 2019

Clear Scraps - Scallop Wood Phone Stand

Hello, my friends!

I'm back with a new project share for Clear Scraps!

Today I am sharing another new product project with you!
This time I am featuring the Scallop Wood Phone Stand.

This is such a handy little stand, with endless creative possibilities! 
It can easily be decorated to match the decor of any room.
It's a great place to put your phone,
with a handy little notch for the cord when re-charging.


This phone stand comes in two pieces of wood that simply slide together.
I did all the decorating before putting it together.


I began by painting both wood pieces 
using the Creative Expressions Gilding Polish.
This was part of the October Q Kit at Clear Scraps.


Then I measured all the sides, and cut the paper to fit,
leaving a gold border showing all around. 
I rounded some of the corners.


I adhered all the papers in place...front and back.
Finally, I added a gold trim double bow to the top center.


Other Materials Used:
Papers: Craft Smith - Gold Foil Paperpad;
Paint: Creative Expressions - Gold Treasure Gilding Polish;
Gold Trim.

Clear Scraps Products Used:


* * * * *
Thanks so much for stopping by today!
I'll be back with another project share next week! :o)

* * * * *
Here are all the links you need:

Wednesday 16 January 2019

The Robin's Nest - Will You Be My Valentine?

Hello, my friends!
I'm back today with a new project sneak for The Robin's Nest.
You'll have to head over to the Chattering Robin's blog to see all the details.

Here's my card:


Other Materials Used:
Paper: AC - Textured Cardstock;
Punch: Martha Stewart - Heartbeat Punch;
Ink: Stampin' Up - Melon Mambo;
Stamp: Simon Says Stamp - Paper Hug Stamp.

The Robin's Nest Products Used:


Sun Shower Tear Drops


Sunkissed Tear Drops


Dew Dew Glue

* * * * *

Thanks so much for stopping by today!
I'll be back with another sneak in a couple of weeks!

* * * * *


Here are all the links for you:


Blog Archive