Wednesday 31 July 2019

Swedish House Crafts - Guest Post - Coffee Time Album

Hello, my friends! 

   I'm back with my second and final Guest DT post for Swedish House Crafts
This time I have created a fun little mini album, 
featuring the fabulous Laserowe Love - Coffee Time Collection

The base of the album is made from some coordinating cardstock. 
  All the papers and tags are from the Coffee Time Collection.

 The album measures 6" X 5 1/2" with 1 1/4" spine.


Here's the cover spread:


For those of us that love coffee, 
this album is the perfect place to house coffee recipes or coffee photos,
or both!


I distressed all the paper edges with a distress tool. 
All the tags and cards have been inked with Walnut Stain Distress Ink. 


I've added some cardstock tags to use as photo mats,
or recipe cards.


I left the center pages plain because they're so fun!


Here I've added belly bands to hold the tags in place.


On these pages I added coffee colored doilies.
They serve as tuck spots for more cards.


Finally, the back cover:


Other Materials Used:
Papers: DCWV - Textured Cardstock;
Ink: Walnut Stain Distress Ink;
Tools: Tim Holtz Distress Tool;
Doilies: Recollections.

* * * * *
Thanks so much for stopping in today!
I'll be back again soon with another fun project!

* * * * *
In the meantime,
head over to the Swedish House Crafts,
and take a look at all the fun goodies in the shop!

Monday 29 July 2019

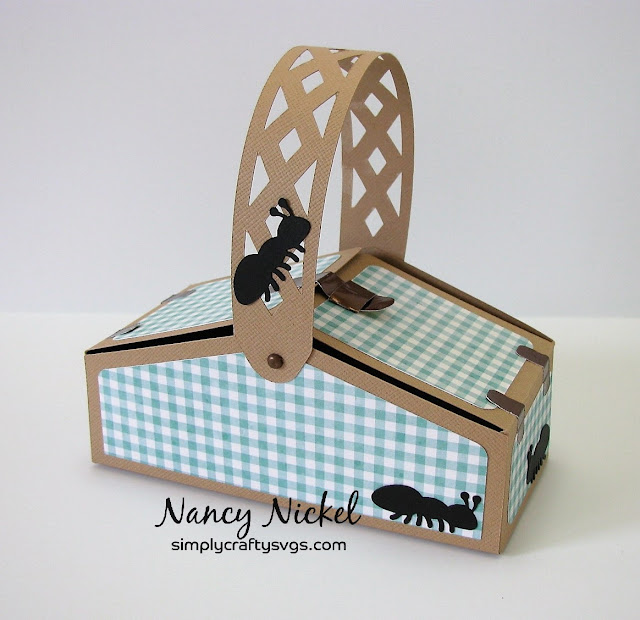
Simply Crafty SVGs - How About a Summer Picnic?

Hello, my friends!

Welcome to a new project share for Simply Crafty SVGs!
This is such a fun project!

This month I'm going on a Summer picnic!
When I decided to share this file with all of you,
I thought there was one little thing missing.
I put a "bug" in Sandy's ear,
and asked if she could please add a little ant cut!
No picnic is complete without an ant, or two, or three! lol
Well, in no time flat she had the ant file ready for me.
Isn't it fabulous?
The perfect addition to my picnic basket!

I've used:

Picnic Basket Cut File.

Here's my little picnic basket:


I chose a wicker colored cardstock for the basket base.
Then I found this gingham paper which I thought was picnic perfect.


I cut out some extra ants,
and added them here, there, and everywhere! 


I added another fun little picnic guest to the inside of the basket!


Rinea Foiled Paper made the perfect hinges and closure.
I added one final ant to the handle of the basket.


Other Materials Used:
Machine: Cricut Explore Air;
Papers: AC - Cardstock, Pebbles
Unknown Mini Brads - Copper.

File from Simply Crafty SVGs:


* * * * *
Thanks for stopping by today!
I hope you found some inspiration!
I'll be back next month to share a brand new project! :o)

* * * * * 
Here are all the links:


Thursday 25 July 2019

Ephemoire - Shabby Chic Cards and Tags

Hello, friends!

Today I have a fun new project for Ephemoire!

I've used a variety of printable products to create:
6 cards, and
2 tags!
There was even more left over to create more projects
but I ran out of time! ;o)

As with most of my printable projects,
I haven't added too much to the cards.
The gorgeous printables do all the work for you.
I did use some solid coordinating cardstock on each of them.
I'll go through and tell you what I added to each project.
There will be links to all the printable files at the end. 
These are all very simple but with really lovely results.


To this first card, I added a simple ribbon bow, and a few pearls.


Here I added just some pearls.
Then I added some sparkle pen to the flower.
It doesn't show in the photo.


On this one, I die-cut some leaves, and added them under the sentiment.


Here I created photo corners from the ephemera square.
I added a pretty sheer bow, and two pearls.


For this one I die-cut the "Hello", added the ribbon and pearls.
I also added the sparkle marker to the flower.


This is a repeat of the last card but in different colours.


Here I used some border punches along the bottom of the tag.
I added the ribbon, and some pearls.


Finally, I used another border punch, more ribbon, and pearls.


These were all so much fun to make!
The products all coordinated so beautifully,
making them come together easily!

* * * * *
Ephemoire Products Used:

Shabby Garden #2 Papers

Vintage Junk Journal Ephemera - Sampler #5

Guest Checks

Rustic Faux Ceramic Tags

Pretty in Pink Coin Envelope

* * * * *
Here are the links for you: Ephemoire Shop

Tuesday 23 July 2019

Let Me Introduce You To Artsystamper!

Hello, my friends!

I have some new fun to share with you starting today!
I want to introduce you to Artsystamper.
My sweet and very talented friend, Bev Cole,
has opened up a new etsy shop to sell her artwork.
You may know Bev from her most recent work over at Sparkle 'N Sprinkle. 
I have had the pleasure of knowing Bev, and creating with her artwork, years before that!
So I'm thrilled to be a member of her Artsystamper Addicts DT!

Today I am sharing a project that features:


One thing to note about these fabulous digital sets
is that they include both pre-colored and non-colored images!
I love that option, and look forward to sharing both with you in the coming months!

Here's what I have for you today:


Isn't that pretty?
I began with a box cut file from My Scrap Chick.
I cut the box base from solid purple cardstock.


The side panels were cut from this beautiful 
Aster and butterfly print, with a yellow background.


The top panel was cut from the gorgeous print Bev created.
I know...it looks like I slaved away for hours! lol


Once my panels were all added to the box,
I used the print/cut feature on my Cricut to print/cut the 
pre-colored Aster and Butterfly Image.
I added it to the top of the box using foam tape.


Finally, I added some sparkle marker to the butterfly, and all the flowers, 
and then added some pretty sequins!


Other Materials Used:
Papers: AC - Cardstock;
Marker: Spectrum Noir - Sparkle Marker;
Unknown Sequins;
Machine: Cricut Explore Air;
Cut File: My Scrap Chick - CG 4 x 6 Box for Ephemera.

* * * * *
Linking Up To:


* * * * *

Oh, some happy news for you...
there just happens to be a sale going on in the shop!
Buy 3 items and get 25% off your entire order!
Sale ends July 31st!

* * * * *
Thanks so much for stopping in today!
I hope you find these images as inspiring as I do!
I look forward to sharing more with you!

* * * * *
Here are the links for you:


Monday 22 July 2019

My Scrap Chick - Christmas in July!

Hello, my friends!

Welcome to a new DT post for My Scrap Chick!
We're celebrating Christmas in July!
The blog is full of Christmas inspiration...new and old,
and there's a great sale going on in the shop.
You're going to want to check out all the fun new files!

Today I'm featuring the lovely new:

Christmas Star Gift Box.

It's such a fun little box that goes together so quick and easy!
It comes with several Sentiment options.
I used "Remember the Star"...which is perfect for Christmas!


I found the perfect papers in my stash,
and added a piece of acetate in the window.


It opens on the top and can be filled with treats!


I also used the extra little cutout stars to create an extra tag.
I layered them, punched a hole, and threaded a string through.


* * * * * 
Thanks so much for stopping by!
I'll be back soon with another fun project share!

 * * * * *
Have you signed up for the My Scrap Chick newsletters yet?
Don't forget to do that!
You really don't want to miss out on any of the great freebies! :o)

* * * * *
Here are all the links you need:


Saturday 20 July 2019

ScraPerfect - July Calendar Page

Hello, my friends!

Today I'm happy to be sharing another post for ScraPerfect

I haven't yet shared my July Calendar Page,
so I thought today would be the perfect opportunity.
Here's my finished page:


I began by gathering all my page elements. 
I used a digital kit, and sized all my elements in Cricut Design Space. 
Then I used the print/cut feature and this is what I had:


I used the Best Glue Everwith the No-Clog Writing Tip,
to adhere all the pieces in place.


The tiny little butterflies are made of Makin's Clay®.
I had a dried piece of flat textured clay that was quite thin.
I used a Tim Holtz punch to punch them out.


A dot of the Best Glue Ever adhered them in place so easily!

Then I added one more tiny butterfly on the top left corner of the frame.

Then I grabbed the Embellie Gellie...


I added two of the tiny blossoms on the month, 
and one on the very top center of the frame.
Aren't they adorable?


This is such a pretty Summer arrangement!


Here's one last look at the finished Calendar Page:


* * * * *
Thanks so much for stopping by today! 
I'll be back soon with another project share!


* * * * *
Here are all the links for you:


Tuesday 16 July 2019

Rinea Tutorial - Flip Flop Card

Hello, my friends!

Today I have a fun tutorial for Rinea.

I'm going to show you how I made this fun
Flip Flop Card
using these fabulous foiled papers!


Materials Used:
Lavender/Lavender Starstruck Foiled Paper
Ebony/Ebony Startstruck Foiled Paper
Flower: Left Over From This Post HERE
Cardstock: Pale Lavender
Die: Sizzix Bigz XL - Card, Flip Flop
Sentiment Stamp: Stampin' Up - Pursuit of Happiness
Ink: Memento - Tuxedo Black


Here's How:

1. I cut the flip flop card base out of both the Lavender/Lavender Starstruck Foiled Paper, and the pale lavender cardstock. I cut the flip flop strap from the Ebony/Ebony Starstruck Foiled Paper. The die includes the two flowers shown in the photo above. However, I already had this flower put together from the previous post. I decided it would be perfect for this project. 


2. I stamped the sentiment on a piece of the cardstock, using the Memento ink. Then I matted it with the Ebony/Ebony Starstruck Foiled Paper.


3. To assemble, I adhered the foiled paper card base to the cardstock card base. I scored the fold, and folded it to match.
4. Using my fingers, I curled the strap piece. I then adhered it in three spots: the two ends, and the center point. I left the rest curved off the card.


5. The bottom of the card base is a round curve. On the back side, I cut a straight line across the bottom. This way the card can stand up for display.


6. I added foam tape to the back of the sentiment, and added it to the card at an angle.


7. Finally, I adhered the flower in place to the center of the strap.


Isn't that a pretty card?
It would be great for someone heading off on a beachy holiday, wouldn't it?
Or just a card to wish someone a lovely summer! :o)


Thanks so much for stopping by today!
I wish each of you a very lovely summer!
I'll see you again soon! :o)
* * * * *

Here are all the links for you:


Blog Archive