Wednesday 30 December 2020

Altair Arts - On the Wings of the Rainbow Display Stands

 Hello, my friends!


I'm back today with a new project share
 as Brand Ambassador for Altair Art Scrapbooking Papers.

This time I am sharing some projects created with one of the newest release collections.
It's a really lovely and versitile collection.

To show you a bit of that versitility...
...I have created two photo display stands.
Although I've used the same collection for both stands, they really have a different style.
The first one is pretty, and a little bit vintage.
The second one is very whimsical.

Here is the first:


The base of the stand is made of white matboard, using a notebook die.
Both the front and back are covered with the pretty floral paper. 
Then I fussy cut a variety of the element: frames, flowers, leaves and butterflies.

Here is a closer look:


I adhered the frames in place leaving an opening at the top.
I saved the oval that I cut from the center of the frame.
I then used it as a template to cut out the sweet vintage image,
and slid it in behind the frame. 

I did the same with the frame on the other side, shown below. 
Thet it was just a matter of adhering all the other bits it place.
To finish it off, I wrapped a ribbon around the center,
and added a pretty double-looped bow.


Here is the back of the stand.
On the left side I added a cluster of fussy cut flowers and leaves.
On the right side I added one of the pretty labels.


Here is the second stand, made from the same collection:


This whimsical version pulls out the fun unicorns and fairies in the collection.
This would be great for a little girls room.
I covered the matboard with this lovely scene paper.


Here I used the same steps for the frame.
Instead of slipping a photo in, I added the cute littel fairy, sitting in place.

On the other side, I simply added a fussy cut sentiment, 
some fussy cut flowers, and a butterfly. 
I didn't wrap the ribbon around this one.
I fussy cut a couple more butterflies instead.


Here's the back side.
I covered it with the rainbow and cloud paper.
On the left side, I added a fussy cut cloud and unicorn.
On the right side, I added the "Dream on..." label.


These projects were so much fun to make,
and the papers are a joy to work with!

* * * * *

Altair Art Products Used:


Other Materials Used:
Offray Ribbon;
Eileen Hull - Notebook Die;
White Matboard;

* * * * *
Thanks so much for stopping in today! 
I'll be back soon with more projects using these pretty papers!

Oh, one more thing...
Altair Art also has a wonderful monthly Challenge,
with a chance to win some fabulous prizes!
Check it out at the blog.

* * * * *

Here are all the links for you:


Wednesday 23 December 2020

Meg's Garden - Library Pocket Journal Insert in Burgundy with Cream

  Hello, my friends!

Today I have a new project share for Meg's Garden!

This is my final project using the new Christmas Collection:

 Burgundy with Cream

...at least for now...

Recently I have been having lots of fun altering some books,
and making some fun new journals.
I'll be sharing that with you in upcoming posts.

Today I am sharing a fun journal insert idea.
I have decorated a library pocket using this pretty collection.

Here it is:


I have used a cut file from My Scrap Chick to make my library pocket and tag.
You can find it right HERE.
Both the pocket and tag were cut from kraft cardstock.
I've collaged the bottom of the pocket with elements from the collection:
a fussy cut Santa image,
a piece of the decorative red paper,
a decorative element strip,
and a piece of the music paper.
To finish off the pocket,
I wrapped the flap with some lovely red jute twine.

Here you can see them side by side.
I fussy cut another Santa, and added him to the side of the tag.
Then I fussy cut the sentiment, and adhered it in place.
The back is left blank for journaling.
Finally, I added more jute twine to the top of the tag. 

This fun library pocket will be inserted into my altered Christmas book project!

Meg's Garden Products Used:

Burgundy with Cream

Other Materials Used:
Recollections Kraft Cardstock;
My Scrap Chick - Library Pocket Cut File;

* * * * *

Thanks so much for stopping in today!
See you again very soon!

* * * * *

Here are all the links for you:

Meg's Garden Papercraft Shop

Meg's Garden Blog

Meg's Garden Facebook Page

Monday 21 December 2020

Vilda Stamps - Christmas Mice

   Hello, my friends!

It's my time to share a new project for Vilda Stamps!
This will be my final Design Team project for Vilda Stamps.
I've been making some changes to my schedule,
and I have some new projects in the works.

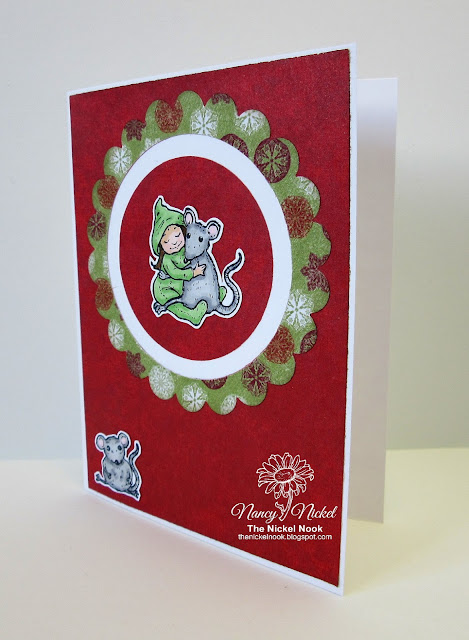
Today I have made another card featuring two more stamps
from the V219 Stamp Set.
You can find it in the shop HERE.

Here is my card:


Althought the card appears to have dimension,
it's all flat and easy to mail.


Aren't they cute?
They've been stamped, coloured, and fussy cut.
Then I did some simple die-cutting to frame them.


I had one extra little mouse that was added to the bottom corner.


Vilda Stamps Used:


Other Materials Used:
Hot Off the Press - Ultimate Christmas Creative Pack;
Memento Tuxedo Black Ink;
Spectrum Noir Markers;
Spellbinders Nestabilities - Circles, Scalloped Circles.

* * * * *
Thanks so much for taking a look!
I'll be back soon with another project!

* * * * *
If you're not familiar with Vilda Stamps, they are located in Sweden!
I've been a big fan of the stamps since I was introduced to them 
while working on a DT in Germany!
The stamps can be purchased from Engstroms Artstudio AB.
They ship all over the world.

* * * * *

Here are all the links for you:


Friday 18 December 2020

Meg's Garden - Quick and Easy Cards in Burgundy with Cream Collection

  Hello, my friends!

Today I have a new project share for Meg's Garden!

Again, I'm using the new Christmas Collection:

 Burgundy with Cream

This time I have made a selection of quick and easy Christmas Cards.
They look like so much more because of the beautiful papers.

We all need the option to make pretty cards that are easy to mail too.
So these digital products make them flat and fabulous!

Here are the first two cards:


For these two cards I simply resized two of the papers from the collection.
I distressed the edges with both a tool and ink,
and added them to burgundy cardstock card bases


I wanted you to see a closer look at these beautiful Digital Sentiments.
They are so elegant and the final touch to finish the cards.
You'll find them HERE.

Here are the next two cards:


For these two cards I used the card fronts from the collection. 
I was inspired by the frame around the card on the right to do some embossing.
I placed the piece on my scoreboard and simply followed the lines
with my embossing tool.
I repeated the process for the other card front.
If you look closely you can see it.
Then I adhered the card fronts onto burgundy cardstock bases.
To finish them off, I Stickles to each of them.
On the left, I added a frosty one to each of the snowflakes.
On the right, I added gold glitter to all printed old glitter bits. 


Meg's Garden Product Used:

 Burgundy with Cream

Other Materials Used:
Bazzill Cardstock;
Stickles - Frosted Lace, Gold;
Scoreboard and Tool.

* * * * *
Thanks so much for stopping in today!
I've got more projects coming soon!

* * * * *

Here are all the links for you:

Meg's Garden Papercraft Shop

Meg's Garden Blog

Meg's Garden Facebook Page

Monday 14 December 2020

Simply Crafty SVGs - Coffee!!

 Hello, my friends!


Welcome to a new project share for Simply Crafty SVGs!
Sadly, this will be my final DT post for SC SVGs!
Sandy has decided to dismantle the DT.
BIG thanks to Sandy for almost 3 years of great fun!

I will happily continue to use these files in my own projects!

Today I am sharing a card that will be near and dear to many of us! ;o)

I've used:


I had just enough scraps of this paper to put this card together.
They seriously make my mouth water!
Right after I was finished,
I sat down and enjoyed a really good cup of coffee! :o)
 
Here's my card:


Isn't that fun?
The file comes with several variations of decorative elements to add,
along with a variety of sentiments.
There's even a bonus card file included.
The sentiment I used is from my stash, 
and not included in the file.


I don't know if you can tell in the photos but I curled my cup.
The I added two layers of foam tape down just the center of the cup.

There is also a Slimline Envelope file in the shop...
...and it's FREE! 
So I cut one out of lightweight kraft paper,
and added my last strip of coffee bean paper to the top of the flap.


This would be a fabulous set to send to the coffee lover in your life!


File from Simply Crafty SVGs:


Other Materials Used:
Laserowe Love Coffee time Collection;
Mememnto Rich Cocoa Ink;
Simon Says Stamp - What's Brewing?

* * * * *
Thanks for stopping by today!
I hope you found some inspiration!
Please come back again soon!

* * * * * 
Here are all the links:


Saturday 12 December 2020

Vilda Stamps - Just Waiting...

   Hello, my friends!

It's my time to share a new project for Vilda Stamps!

Today I have used two stamps from:


You can find it in the shop HERE. 

This sweet little girl is all ready for her Christmas party;
in her pretty red dress and shoes.
She even has her party hat on! ;o)

Here is my card:


I stamped and coloured the girl and then bench,
and then fussy cut them out.
I decided to place her in a scene with this fun frame die.
I thought it looked like a place she needed to be,
as she waits for her party to begin.


Here's a closer look:


Vilda Stamps Used:


Other Materials Used:
Recollections Cardstock;
Memento Tuxedo Black Ink;
Spectrum Noir Markers;
Yvonne Creations - Autumn Frame Square.


* * * * *
Thanks so much for taking a look!
I'll be back soon with another project!

* * * * *
If you're not familiar with Vilda Stamps, they are located in Sweden!
I've been a big fan of the stamps since I was introduced to them 
while working on a DT in Germany!
The stamps can be purchased from Engstroms Artstudio AB.
They ship all over the world.

* * * * *

Here are all the links for you:


Thursday 10 December 2020

Maker's Movement - Frosty Fun Shaker Card

 Hello, my friends!


I'm back today to share a really fun project for Maker's Movement

I used my wonderful Crossover II Machine for all my die-cutting on this project.

I've also used:


I've used all these products to make a "cool" shaker card! ;o)
Here's my card:


The cardstock I used has a beautiful pearly finish on it - just like snow.
I couldn't get it to show in the photos 
because I was making sure there was no glare on the acetate.


After creating the fun Winter scene,
I stamped and die-cut one cute snowman from the Christmas is Best With You stamp set.
I paper pieced his scarf and hat from cardstock to match the background.
Finally, I added some Enamel Accents to add the fluffy fur to his hat.


To fill my shaker, I used the snowflakes from the Jingle Bell Shaker Srinkles.
I added just a pinch of fake snow to the mix.
For my final photo I gave it a good shake,
so you can see the full effect! :o)

This was LOTS of fun to put together! 


* * * * *

Maker's Movement Products Used:

Crossover II Fabric & Paper Cutting System,


Other Materials Used:
Bazzill Bling Cardstock;
Memento Tuxedo Black Ink;
White Enamel Accents;
Pinch of Fake Snow.

* * *
Thanks so much for stopping by!
I'll be back soon with another fun project!

* * *

Here are all the links for you:

Maker's Movement Facebook 

Thursday 3 December 2020

Meg's Garden - Burgundy with Cream Christmas Tag

 Hello, my friends!

Today I have a new project share for Meg's Garden!

Again, I've used the newly released Christmas Collection:

 Burgundy with Cream

It's a beautiful Collection full of goodness!
The creative possibilities are endless!

I have made a tag:


I began with a red cardstock tag base.
I punched along the bottom edge with a decorative border punch.
To pull out the bits of gold included in the collection,
I also punched along the bottom edge of the foiled paper.


I chose one of the beautiful Burgundy with Cream Papers,
and added that in place on top of the Foiled Paper layer.
Then I fussy cut several of the elements from the Burgundy with Cream Cut and Create Pages.
I had fun positioning them in place.
I added some pretty gold ribbon to the top of the tag.


I also added a small gold bow to the berry stem.
Finally, I added some extra sparkle with Stickles.

Find the full Collection here:

 Burgundy with Cream

Other Materials Used:
DCWV Red Textured Cardstock;
Rinea Foiled Paper - Gold/Gold Glossy;
Fiskars Holly Border Punch;
EK Success Scalloped Scallop Border Punch;
Diamond Stickles;
Celebrate It Gold Ribbon.

* * * * *
Thanks so much for stopping by today!
Head over to etsy to take a good look at this beautiful collection!
You can buy the complete collection, or just pick up what you want!
I'll be back soon with more fun!

* *.* * *

Here are all the links for you:

Meg's Garden Papercraft Shop

Meg's Garden Blog

Meg's Garden Facebook Page

Monday 30 November 2020

Maker's Movement - Merry & Bright

 Hello, my friends!


I'm back today to share a fun project for Maker's Movement

I used my wonderful Crossover II Machine for all my die-cutting on this project.

Today I'm featuring:


I also used:


Here's my card:


This is such a fabulous and fun set to play with!
There are 18 stamps included, and 10 dies in the die set.
I used only a few of them on my card!

I began with a light kraft card base.
I cut the rounded tag out of a Christmas print.
I then stamped/die-cut the tree, star, and gifts from coordinating paper.
Then I just put all the pieces together.
I added the sentiment to the front...


...and then used some other pieces to decorate the inside.


Finally, I added Stickles to give everything some sparkle and shine!


Maker's Movement Products Used:

Other Materials Used:
Hot Off the Press Ultimate Christmas Pack;
Recollections Cardstock;
Memento Tuxedo Black Ink;
Gold, Frosted Lace.

* * *
Thanks so much for stopping by!
I'll be back soon with another fun project!

* * *

Here are all the links for you:

Maker's Movement Facebook 

Saturday 28 November 2020

Meg's Garden - Christmas Gift Tags in Burgundy with Cream

  Hello, my friends!

Today I have a new project share for Meg's Garden!

This is my first project share using the new Christmas Collection:

 Burgundy with Cream

  I have made an assortment of Christmas gift tags:


Aren't they pretty?
This is such a beautiful collection of papers and elements!
The tag base in the top center of the photo, is one of the printable elements.
I simply cut it out, and layered a Santa image on top of it. 

This collection has lovely touches of gold throughout.
To bring out the gold, I have added a layer of Rinea Gold/Gold Glossy Foiled Paper.
To finish the tags off, I punched a hole and added a piece of gold cording.
They've all been left blank on the back,
offering a place to add names and messages.

Below is my favorite image! 
The finished tag measures 4"x 4".
That will give you a good idea of the size of all in the photo. 

Any of these tags would certainly dress up a Christmas gift!


Meg's Garden Products Used:

 Burgundy with Cream

Other Materials Used:
Bazzill Cardstock;
Rinea Gold/Gold Glossy Foiled Paper;
Gold Cord;
Distressing Tool;
Walnut Stain Distress Ink.

* * * * *
Thanks so much for stopping in today!
I'll have another project to share very soon!

* * * * *

Here are all the links for you:

Meg's Garden Papercraft Shop

Meg's Garden Blog

Meg's Garden Facebook Page

Monday 23 November 2020

Simply Crafty SVGs - JOY Gift Box

 Hello, my friends!


Welcome to a new project share for Simply Crafty SVGs!

This month I'm sharing another great gift box!

I've used the:

Joy Gift Box SVG File

It was the title of this box that attracted me.
How could I not want to make a JOY gift box?
Sandy has two wonderful samples posted in the shop;
one is Christmas themed and one is Winter themed.

I thought I would give you another creative option.

Here's my version:


As you can see, I've combined Christmas with Winter,
and added a stamped panel rather than the JOY cut panel.


I used pretty shimmer cardstock, added some big red rhinestones,
and finished it off with a big glittery bow.


The lid of this box is such a great shape!
The box base is a wonderful size to fill with some goodies!


When you look at all these great cut files,
think about how you can incorporate your other craft supplies,
like stamps, stencils and such.
It's all so much fun!


File from Simply Crafty SVGs:


Other Materials Used:
DCWV Handpainted Christmas Stack;
Recollection Holiday Shimmer Paper Pad;
Tim Holtz Holiday Joy Stamp Set;
CTMH Ink: Cranberry, Ponderosa Pine;
Celebrate It Glitter Ribbon.

* * * * *
Thanks for stopping by today!
I hope you found some inspiration!
I'll be back next month to share a brand new project! :o)

* * * * * 
Here are all the links:


Friday 20 November 2020

Vilda Stamps - Little Flower Sprite Card

  Hello, my friends!

It's my time to share a new project for Vilda Stamps!

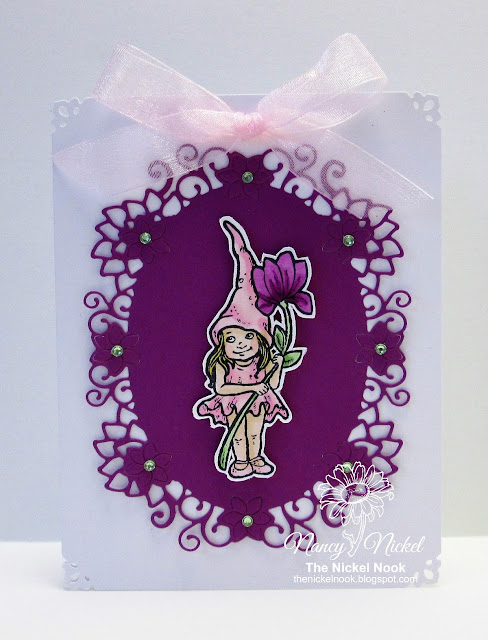
Today I have made a card featuring V219 Stamp Set.
You can find it in the shop HERE.

This stamp set is really loaded with images that are so much fun!

Here is my card:


I stamped, coloured, and fussy cut this cute little girl.
I die-cut a pretty floral background for her,
and popped her up on foam tape.
After adding everything to the white card base,
I added little green rhinestones and a pink ribbon bow!


To finish it off, I added some sparkle marker to the image.
Here's a closer look:


Vilda Stamps Used:


Other Materials Used:
Recollections Cardstock;
Precious Marieke Die - Clematis Oval;
Celebrate It Ribbon;
Crafts Mini Rhinestones;
Spectrum Noir Sparkle Marker.

* * * * *
Thanks so much for taking a look!
I'll be back soon with another project!

* * * * *
If you're not familiar with Vilda Stamps, they are located in Sweden!
I've been a big fan of the stamps since I was introduced to them 
while working on a DT in Germany!
The stamps can be purchased from Engstroms Artstudio AB.
They ship all over the world.

* * * * *

Here are all the links for you:


Blog Archive