Thursday 30 January 2020

Southern Ridge Trading Company - Loveable Layout

Hello, my friends!

I have a fun new post for Southern Ridge Trading Company!

 After yesterdays break from the theme,
I'm back today with another sweet Valentine project!

Most of you know that I always have several 8 X 8 Albums going. 
Some are seasonal, like the Winter one I shared last month. 
Some are filled with assorted pages that I've been inspired to make.
This is one of those pages.

It was the beautiful Abstract Heart Frames,
from Southern Ridge Trading Company,
that inspired this page.


I started by gathering all my supplies.


I dabbed the heart chipboard frames with embossing ink,
sprinkled them with the embossing enamel, and heat set. 
I repeated the process using the pink embossing powder,
on the "Loveable" and the three little hearts. 


I laid the smaller heart frame onto an old photo of my daughters.
This was taken back in the day...when they were still "Loveable"! lol
 Using my blade, I cut the photo to fit the frame. 
If you don't like using a blade, just draw around the frame, 
and cut out with scissors. 


Here's a close-up of the intricate frame, and the sparkly enamel. 
The "Loveable" is so shiny and pink!


 I adhered the 6" decorative paper to the center of the 8" cardstock base.
I adhered the large frame in place first, and then added the word in place.
Next, I added foam tape to the back of the framed photo,
and adhered it in place.
Finally, I added the three little hearts to the page.


I know that the word and little hearts would have shown up
much more clearly on the first paper I had chosen.
However, I really wanted something more whimsical and pretty.
So that's why I decided to go with this paper!


Southern Ridge Trading Company Products:


Other Materials Used:
  Recollections - Cardstock, Bo Bunny - Crazy Love;
Stampendous Embossing Ink;
Stampendous Shabby Pink Embossing Enamel;
Glitters Galore Shabby Pink Embossing Powder;
ScraPerfect Best Glue Ever and No Clog Writing Cap.

* * * * *
Thanks so much for stopping in today!
I'll have another project share for you in very soon!

* * * * *
In the meantime, here are all the links for you:


Wednesday 29 January 2020

Quietfire Digital - Sparkly Snowflake Shoe

Hello, my friends!

It's time for another project share for Quietfire Design

Today I'm over on the Quiefire Digital Blog sharing this fabulous digital file:


You may remember that I shared a Fall shoe several months ago. 
If you missed it, you'll find it HERE.

This is my Winter shoe:


For all the details and product links,
 head on over to the Quietfire Digital Blog HERE.

* * * * *
While you're over there, check out the shop and the Designer's blog.
They're full of fabulous inspiration!

* * * * *
Here are all the links for you:


Monday 27 January 2020

Simply Crafty SVGs - Candy Dispenser

Hello, my friends!

Welcome to a new project share for Simply Crafty SVGs!

This month I've used the:

Treat Dispenser

I still have some treats left over from Christmas
that I want to have close at hand in my craft room!
Then when I realized my post date
I decided to make it a Valentine themed dispenser.
Maybe I'll get some more treats for Valentine's Day! ;o)


I cut the base out of some pink AC cardstock.
Then I found this fun heart paper in my stash.
It's been there a long time! 
I used it for all the panels.


To finish it off, I simply added a pretty ribbon bow.


The back is left blank,
and serves as a great spot to write a note.


The lid comes off for easy filling. 
I'm sure this could be used for lots of other things too.
Wouldn't it make a fun button dispenser? 
I might have to try that! :o)


File from Simply Crafty SVGs:


* * * * *
Thanks for stopping by today!
I hope you found some inspiration!
I'll be back next month to share a brand new project! :o)

* * * * * 
Here are all the links:


Saturday 25 January 2020

My Scrap Chick - Love Card

Hello, my friends!

Welcome to a new DT post for My Scrap Chick!

Today I'm featuring a Valentine card, 
combining three great files:

Scalloped Oval Tag Layers,

Love Script Word,

Botanical Branches.

Here's my card:


I began with a white A2 card base, to which I added a piece of black cardstock.
I cut two ovals: the large one in red, and the next layer in pink.
They were adhered together, and then added to the card base using foam tape.


Next, I cut the Botanical Branch piece.
There are several options on this file, I chose the one with hearts.
I centered it on the pink oval, and adhered it in place.


The Love Script file comes with 3 layers but I only used two. 
I layered the red onto the black, and adhered it on my card at an angle.


Finally, I added some pretty red Stickles to each heart on the Botanical Branch.


Again, this was a really fun card to put together!
Maybe this will be the one that I give to my Sweetie! :o)


Other Materials Used:
Papers: Recollections - Cardstock;
Stickles: Christmas Red.

My Scrap Chick Files Used:

Scalloped Oval Tag Layers,

Love Script Word,

Botanical Branches.

* * * * * 
Thanks so much for stopping by!
I hope that I've given you some fun ideas!
I'll be back soon with another fun project share!

 * * * * *
Have you signed up for the My Scrap Chick newsletters yet?
Don't forget to do that!
You really don't want to miss out on any of the great freebies! :o)

* * * * *
Here are all the links you need:


Thursday 23 January 2020

Quietfire Creations - Flourished Heart Card

Hello, my friends!

It's time for another project share for Quietfire Design

Today I'm sharing another really pretty cut file. 
It's called Ornamental Heart.
and you can find it HERE.

Here's my card:

Isn't that a beautiful cut?


There are so many creative possibilities with this one!
There are also lots of ways to embellish it 
once it's put together. 


I opted to keep it very simple,
and just added three large sequins.


Other Materials Used:
Papers: Recollections - Cardstock;
Sequins: Unknown.

Quietfire Products Used:


* * * * *
Thanks so much for stopping by today!
I'll be back soon with another Quietfire project.
In the meantime, check out the shop and the Designer's blog.
They're full of fabulous inspiration!

* * * * *
Here are all the links for you:


Tuesday 21 January 2020

Vilda Stamps - Being Creative Isn't a Hobby!

Hello, my friends!

I'm back to share my second project for Vilda Stamps!

On the 12th and 21st of each month, I will be sharing two projects, in two separate blog posts,
that I hope will inspire you to get some Vilda Stamps of your own.
They have such a fabulous variety of stamps to create with!

This one might be Valentine colours but it's not a Valentine! 
The stamp set I used is very versatile and could definitely be used to make a Valentine card.

Here's what I made:


Using Vilda Stamp V813, I stamped the tag and the corner flourish onto white cardstock.
I then cut them out, and coloured the flowers. 
I then chose one of the sentiments from Vilda Stamp V763,
and stamped it onto the tag, using dark pink ink.
I created my card base by layering two papers onto a white card base.
I then added the tag and corner flourish in place, using foam tape.
Finally, I added some ribbon through the top of the tag,
and added some sparkly stickles to everything!


Isn't that tag great? 
I'll be using it over and over! 


Other Materials Used:
Papers: Basic Grey - Kissing Booth;
Ink: Memento - Tuxedo Black, Hampton Art - Pink;
Markers: Hobby Colour;
Ribbon: Offray;
Stickles: Star Dust.

Vilda Stamps Used:


* * * * *
Thanks so much for taking a look!
I'll be back next month with more fun projects!

* * * * *
If you're not familiar with Vilda Stamps, they are located in Sweden!
I've been a big fan of the stamps since I was introduced to them 
while working on a DT in Germany!
The stamps can be purchased from Engstroms Artstudio AB.
They ship all over the world.

* * * * *

Here are all the links for you:


Monday 20 January 2020

Vilda Stamps - Best Friends Card

Hello, my friends!

I'm excited to be sharing my first DT project for Vilda Stamps!

In case you missed the announcement over on facebook,
I have joined the fabulous Vilda Stamps Design Team for this year!

On the 12th and 21st of each month, I will be sharing two projects, in two separate blog posts,
that I hope will inspire you to get some Vilda Stamps of your own.
They have such a fabulous variety of stamps to create with!

I thought I would take a little break from Valentine's cards
but then I added a heart,
so technically it's a Valentine, right? ;o)

Here is my first card:


Isn't that sweet?
I used V686 Stamp. This is just one of the two adorable images.
I also used the sentiment "Best Friends" from the V860 Stamp.


I coloured my image, cut it out, and matted it. 
Then I layered it with foam tape, onto a pretty die-cut piece, 
before adhering it onto the prepared background and card base. 


I stamped "Best Friends" on blue cardstock,
and then die-cut it with a heart.


Here's a closer look at the heart. 
Finally, I added a pretty double looped bow!


Other Materials Used:
Papers: AC - Cardstock, AC - My Baby;
Markers: Hobby Colour;
Dies: Marianne Design, Spellbinders - Nesting Heart;
Ribbon: Celebrate it.

Vilda Stamps Used:


* * * * *
Thanks so much for taking a look!
I'll be back in a little while to share my second card with you!

* * * * *
If you're not familiar with Vilda Stamps, they are located in Sweden!
I've been a big fan of the stamps since I was introduced to them 
while working on a DT in Germany!
The stamps can be purchased from Engstroms Artstudio AB.
They ship all over the world.

* * * * *

Here are all the links for you:


Friday 17 January 2020

Rinea Tutorial - Valentine Pocket Card

Hello, my friends!

Today I have a fun tutorial for Rinea.

I'm going to show you how to make this great 
Valentine Pocket Card,
using these fabulous foiled papers!

I'm using the "Love" collection for this project.


Here's how I did it:


Materials Used in this Project:

Punches: Martha Stewart - Filigree Heart, Mini Hearts,
EK Success - Arrow Border Punch;
Die: Love Word;
White Cardstock;
Ribbon: Celebrate It.


1. Using the variety of foiled papers in the variety pack, I cut out the file, as shown in the photo. I cut multiples of  a couple of them because I wasn't sure which one I would use. 
2. From the white cardstock, I cut one tag panel, and one circle.


3. I then punched the filigree heart and the mini hearts, and die-cut the "Love", all from the Fuchsia/Gold Glossy Foiled Paper in the Variety Pack. 
4. I assembled the pocket, as per the file instructions.
5. I decided to use the Blush/Gold Glossy Foiled Paper front pocket panel. I used the border punch along both long ends, and then adhered it in place. I then added the filigree heart, the "Love", and several hearts, to the front panel. The pocket is finished.


6. I used the tag cut from the Blush/Gold Glossy Foiled Paper, and the tag panel cut from the Blush/Blush Starstruck Foiled Paper. Once they were adhered together, I added the small "Love" and several mini hearts. 
7. To the back of the tag, I added the white cardstock tag panel, embellished with some more mini hearts. This offers a great spot to stamp/write your sentiment.
8. Finally, I looped a pretty ribbon through the tag hole, and added a little bow to each side. 


 Here's a closer look at the pocket detail:


These foiled papers make a lovely project extra special! :o)


Thanks so much for stopping by today!
I'll be back soon with another fun project!

* * * * *

Here are all the links for you:


Wednesday 15 January 2020

Glittery Love Valentine Card

Hello, my friends!

Today I have another combination DT post.
I've combined products from Southern Ridge Trading Company,
with products from ScraPerfect,
to create a Glittery Love Valentine card.

These products really are an ideal combination!

Here's my sparkly card:


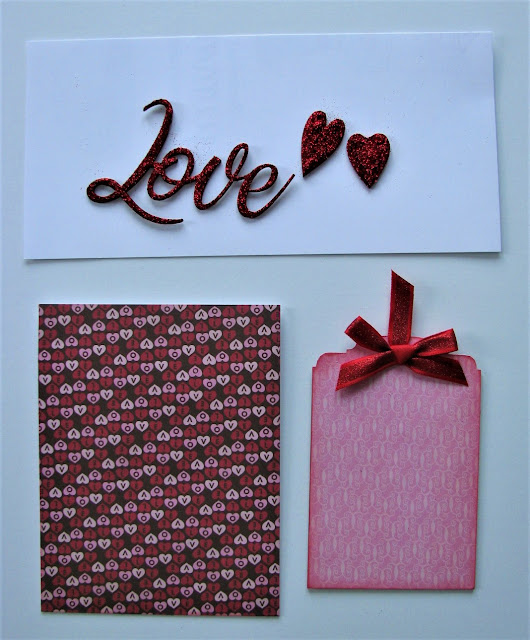
Here's what I used to make it:


First I cut the background paper and adhered it to the front of the A2 Card Base.
Then I glued the pink paper to the front of the chipboard tag.
I trimmed around it with my blade, and then inked all the edges.
I looped some red glittery ribbon through the top of the tag,
and then added a ribbon bow.
I added the Best Glue Ever to the front of the "Love" and two chipboard hearts.
The No-Clog Writing Cap really helps with adding glue neatly to the lettering.
While the glue was still wet, I sprinkled the red glitter liberally over top.


Once the glue was all dry, I adhered the chipboard tag and hearts in place on the card base.


Here's a close-up look at the "love"-ly word!
You may also notice that there's random glitter .
I forgot to brush off all the loose glitter once it was dry...oops! 
I did that after the photos were taken. 
Then I used the Perfect Cleaning Cloth to clean up all the glittery mess! lol


It's such a pretty combination of products!


Southern Ridge Trading Company Products:


ScraPerfect Products:


Other Materials Used:
Papers: Recollections - Cardstock, Bo Bunny - Crazy Love;
Glitter: Glitters Galore - Fire Engine Red;
Ribbon: Celebrate It.

* * * * *
Thanks so much for stopping by today!
I'll be back soon with more creative fun!

* * * * *
Here are all the links for you: 


Blog Archive